Overview
Message2Give Chat is your central hub for managing customer communications across all channels. When customers reach out to your business, they're automatically queued in this intelligent chat system, waiting for your team to connect and provide personalized support.
How It Works
Queue Management: Customers are organized in a first-come, first-served queue system. Simply select a queue category to connect with the customer who has been waiting longest.
Conversation Management: Once connected, you can engage in real-time conversations, add contextual notes, and apply tags to track conversation outcomes and topics (e.g., Dispute, Resolution, Transfer).
Session Recording: Every conversation is automatically recorded as a session when you end the chat or navigate away, ensuring complete conversation history and accountability.
Interface Overview
The Message2Give Chat interface is organized into three main sections:
- Left Sidebar: Queue management and customer selection
- Main Section: Active conversation area and customer details
- Right Sidebar: Customer information, notes, and conversation tools
Left Sidebar
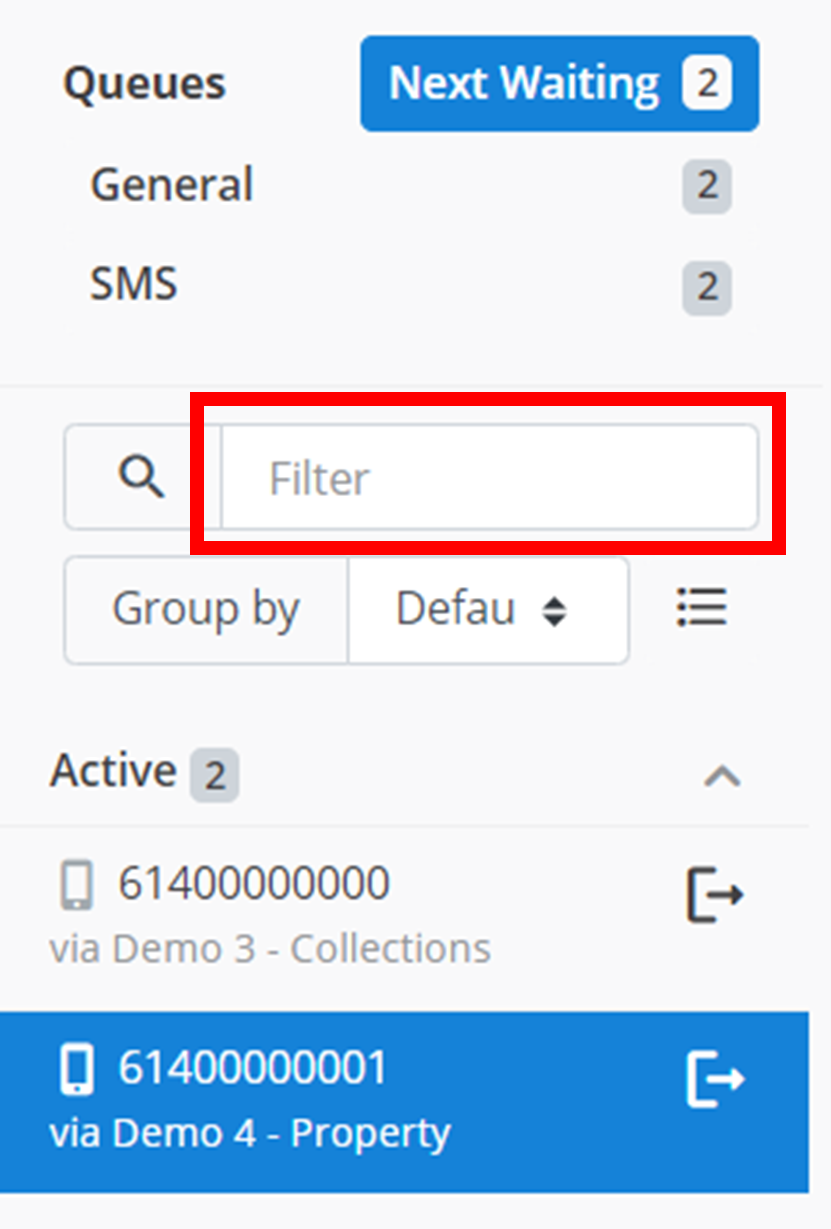
Below is a screenshot of the left sidebar.
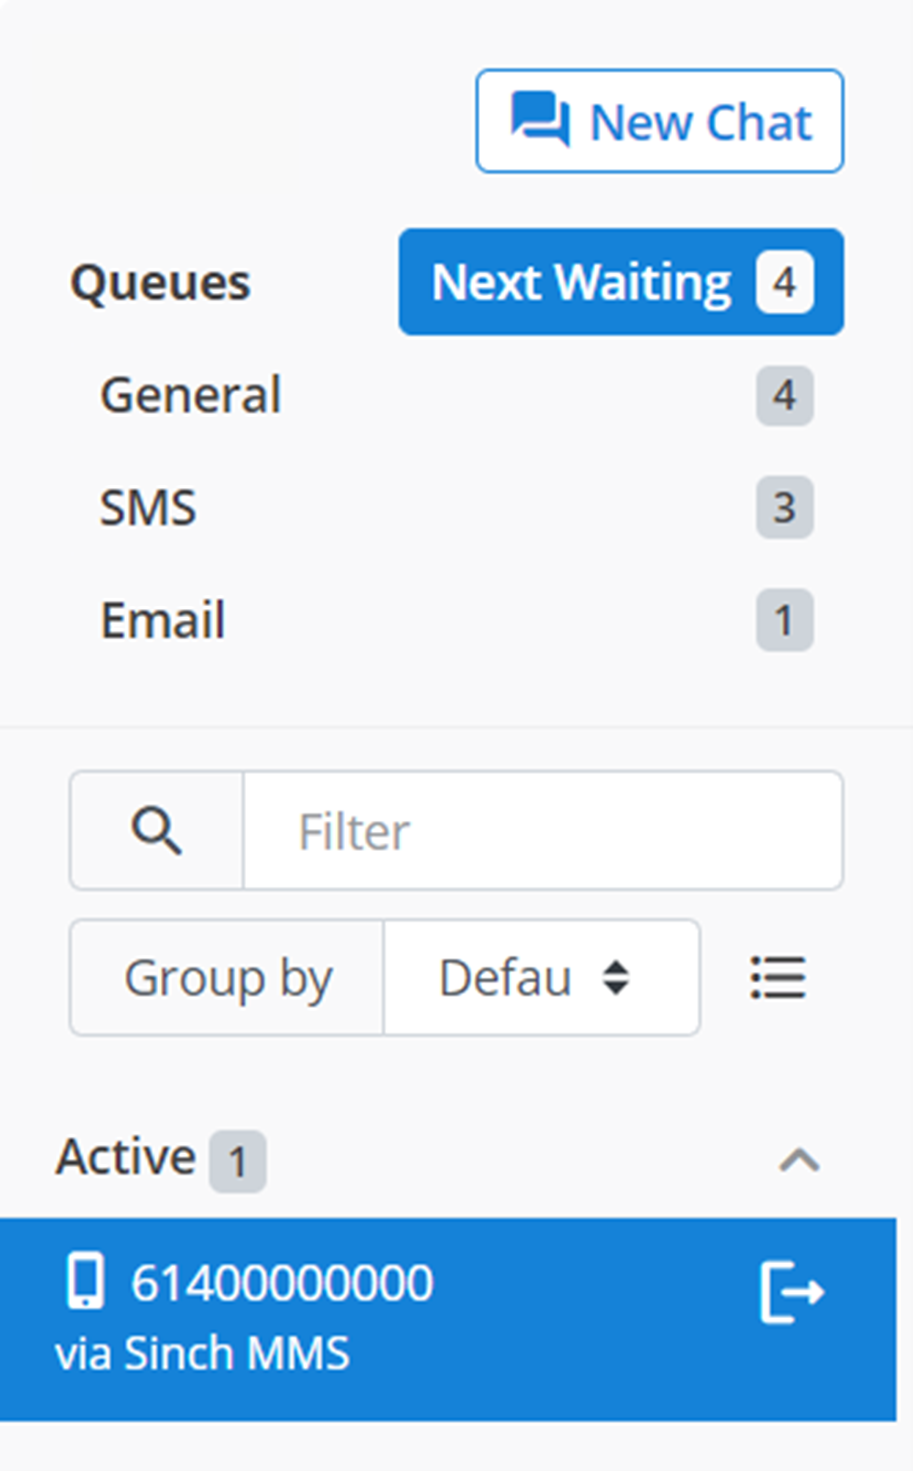
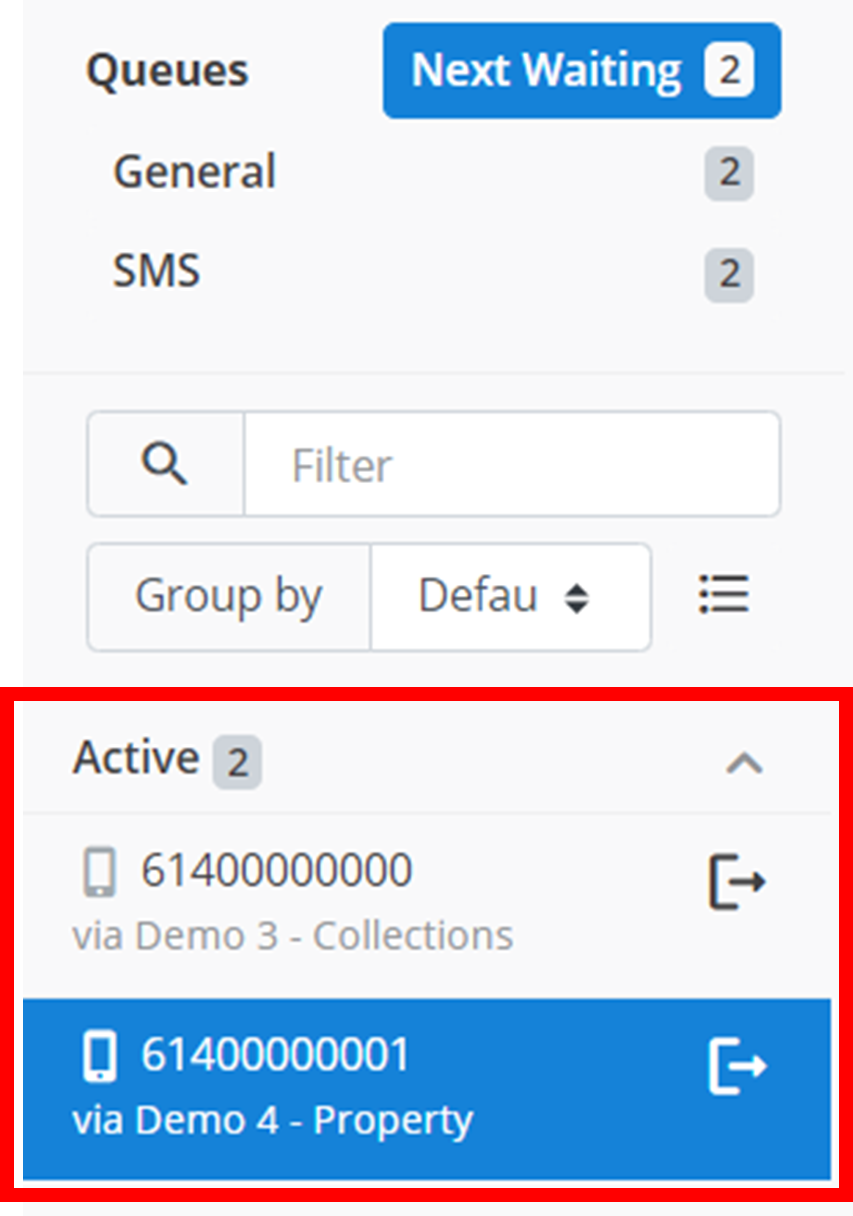
Queue
When a customer contacts one of your registered company contacts, they will be put into a queue whilst they await contact from one of the company's agents. To pull a customer out of the queue to begin a conversation with them, simply click on the category of the queue you wish to pull from.
The queue works on a 'first come first served' basis. Thus, you cannot choose which contact you pull from the queue. When you pull someone from a queue, it will always be the person who has been waiting in the queue for the longest - the first person in the queue.
Clicking on a queue and pulling a customer out will move them to the 'Active' section on the left sidebar.
Below is an example of what this queue might look like:
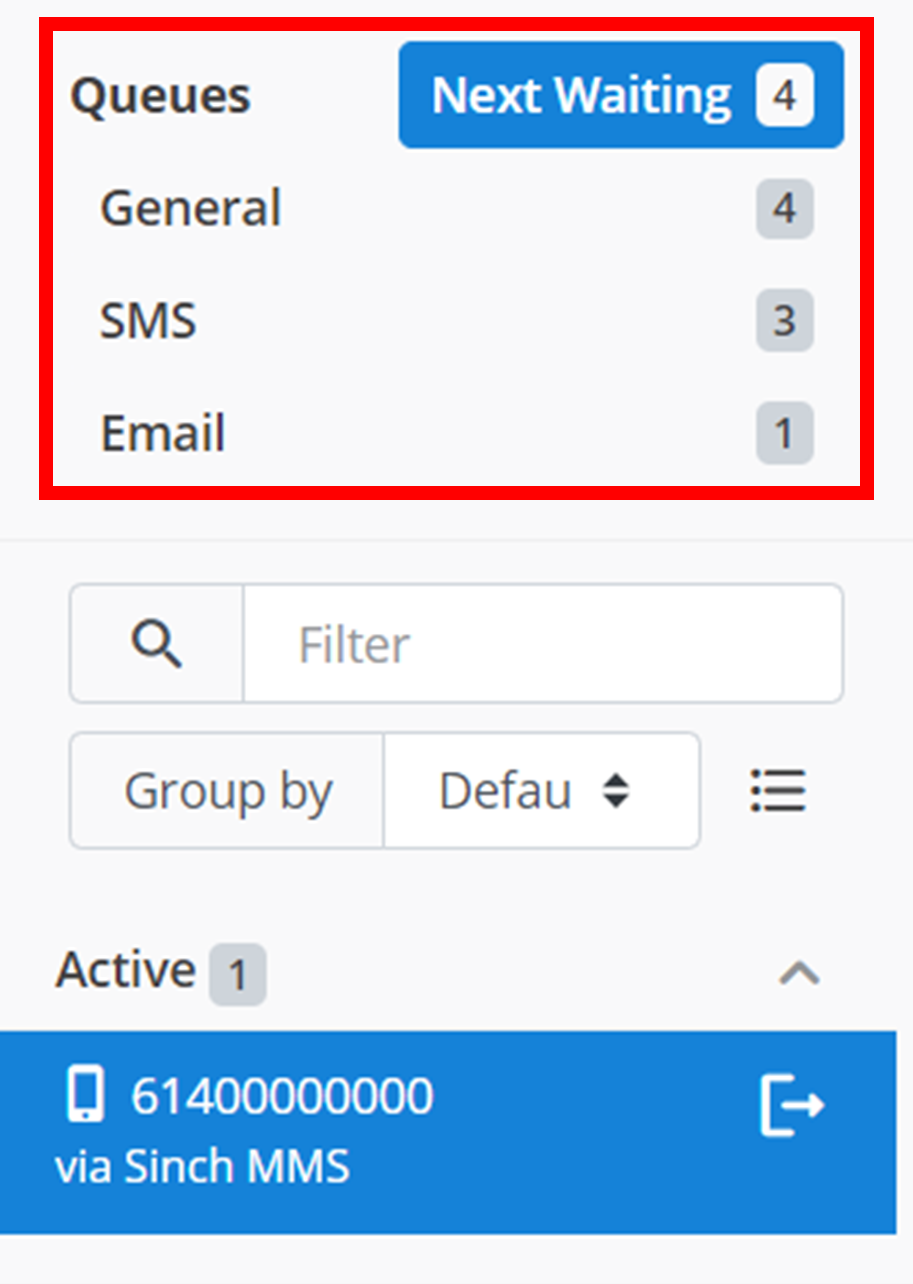
- Next Waiting: will pull the absolute first person; the one person who has been waiting the longest in any category.
- General: this is a compiled queue of all the message mediums. In the above image, there are 5 in the General queue because there are 4 in the SMS queue and 1 in the Email queue, and 4 + 1 = 5.
All other queue types that appear are for different message mediums: SMS, MMS, Email, Voice, and Web.
Information
The queue for MMS and Web is not pictured above.
New Chat
To start a new chat with any customer irregardless of queues, click on the 🗪 New Chat button outlined below.
This will bring up a small menu like the one below.
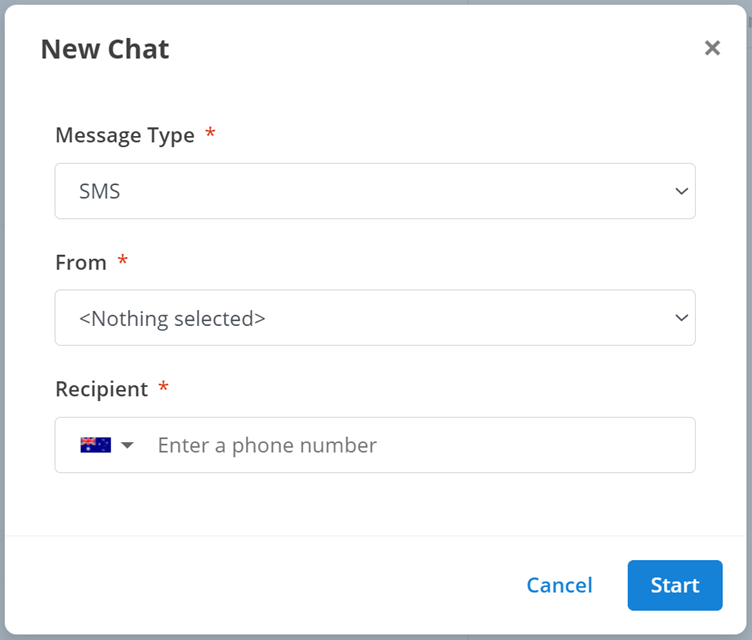
- Message Type: the message medium the new chat will start in. This can either be 'SMS' or 'Email'. Select an option from the drop-down menu.
- From: the Virtual Number or Email Alias that the agent will contact the customer through.
- Recipient: the contact of the customer you want to start a chat with.
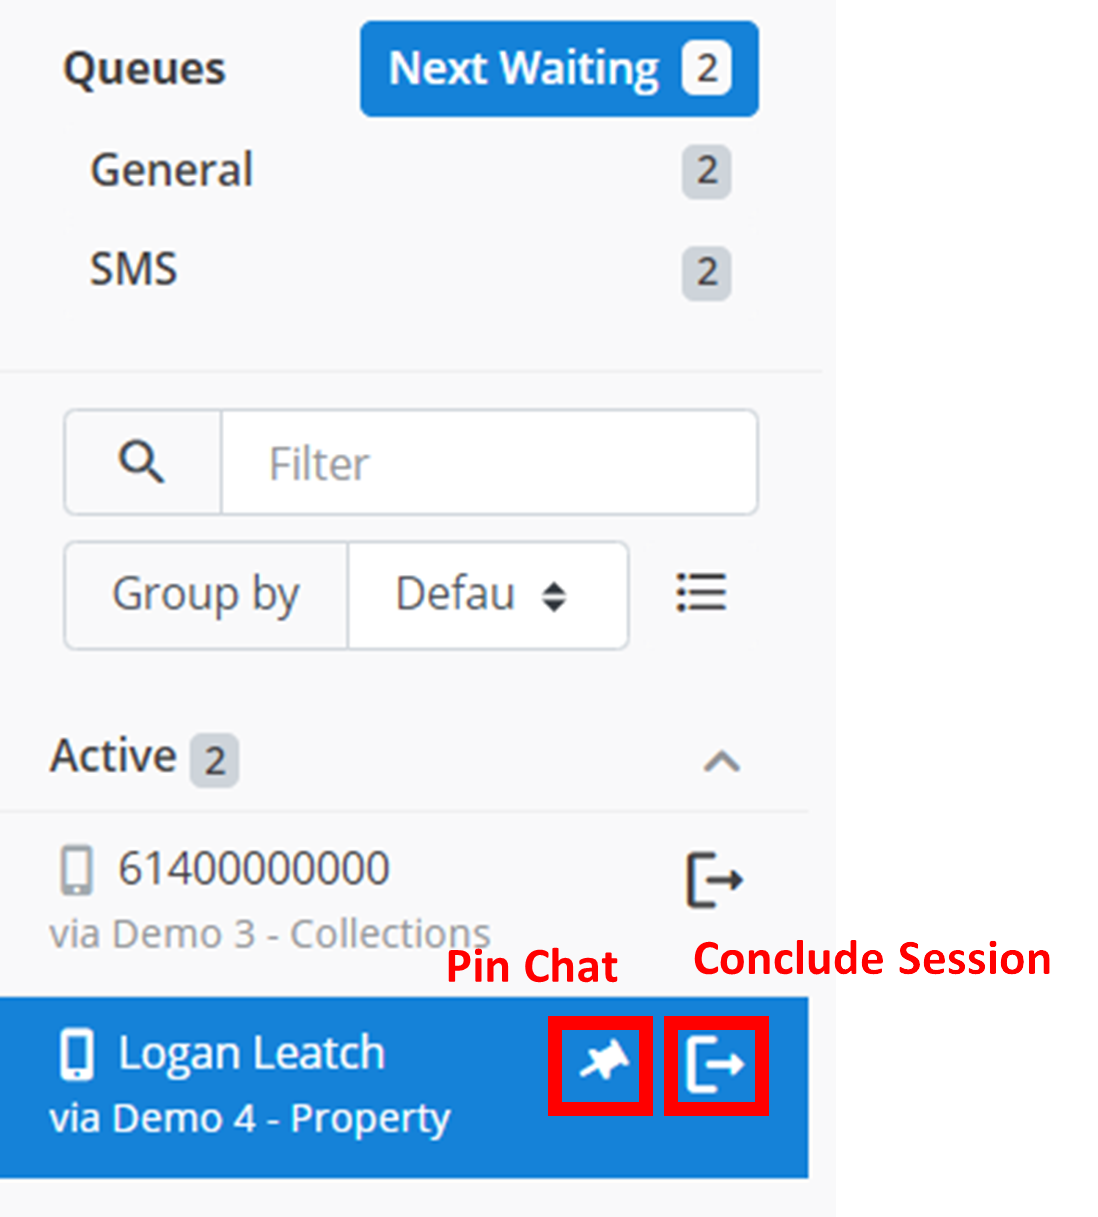
Active Chats
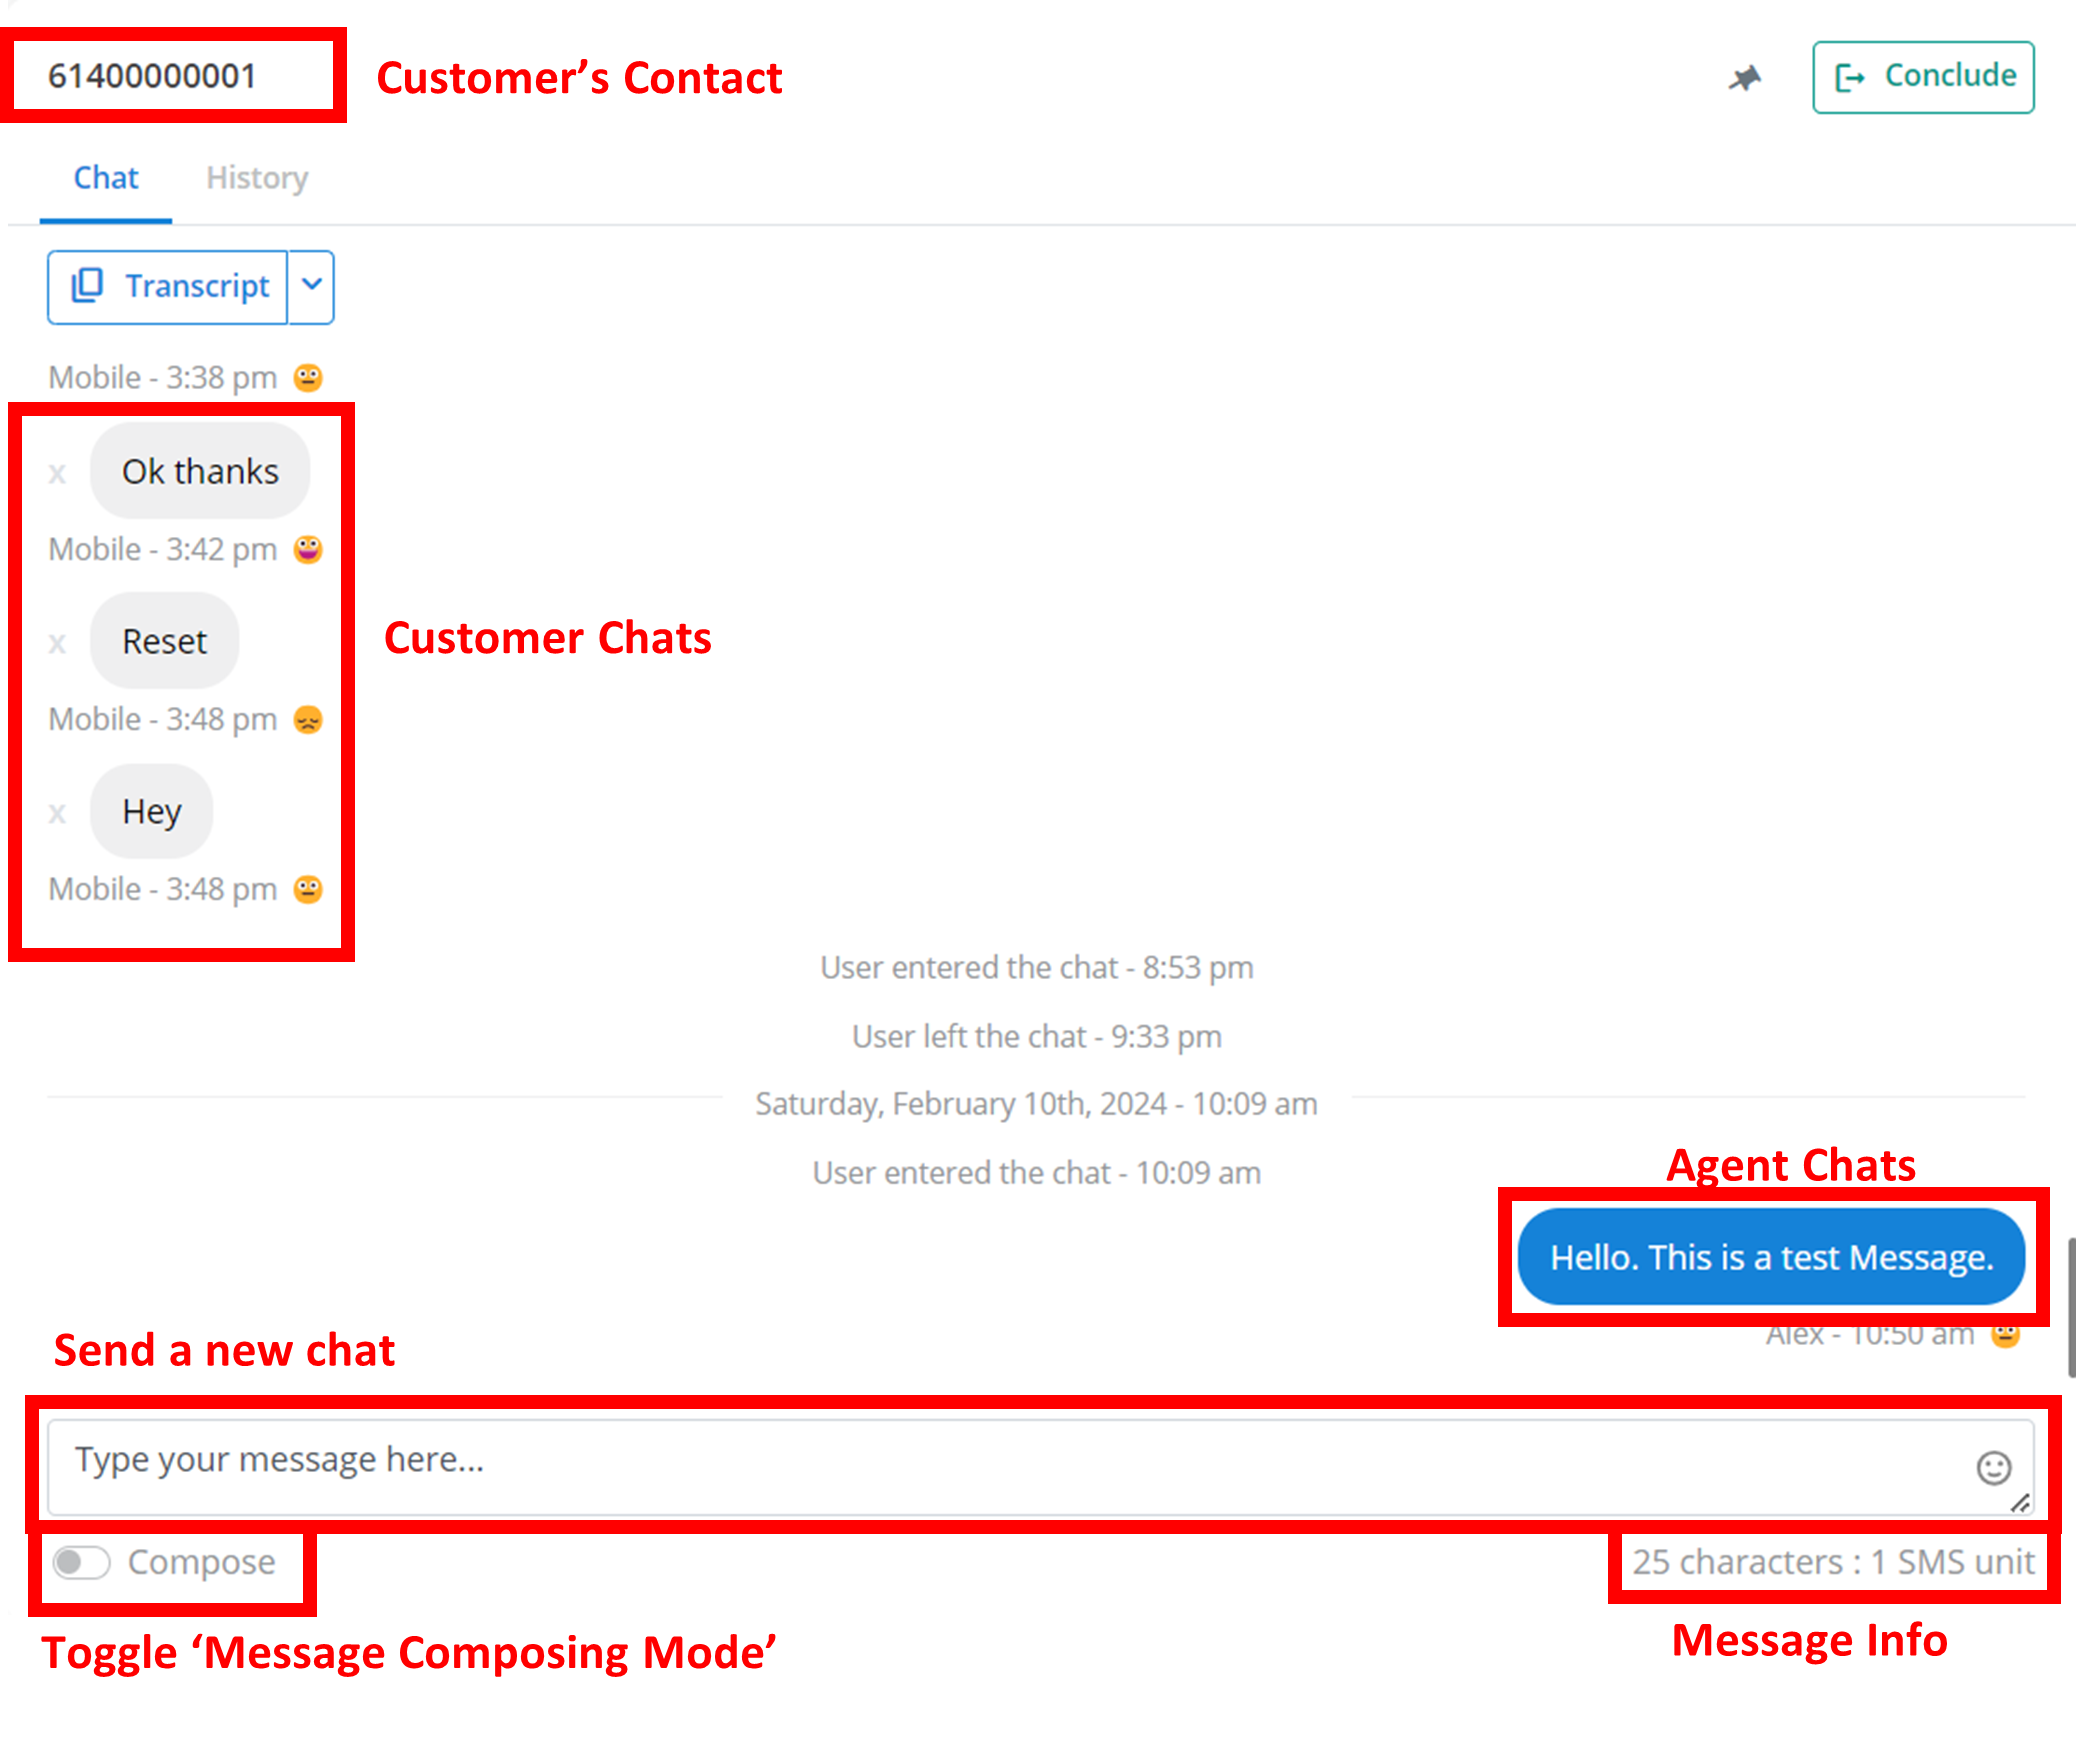
When you pull a customer from the queue, or start a new chat with a customer, they will appear under the "Active Chats" display outlined below. Each customer is designated their own chat with you - the agent. The chat you are currently in is highlighted blue. To enter a different active chat, just click on it in this menu. The rest of the active chats that you are not currently in are grey. The contact of the customer is listed at the top of the chat name. The contact that the agent is using to talk to the customer is listed at the bottom of the chat name.
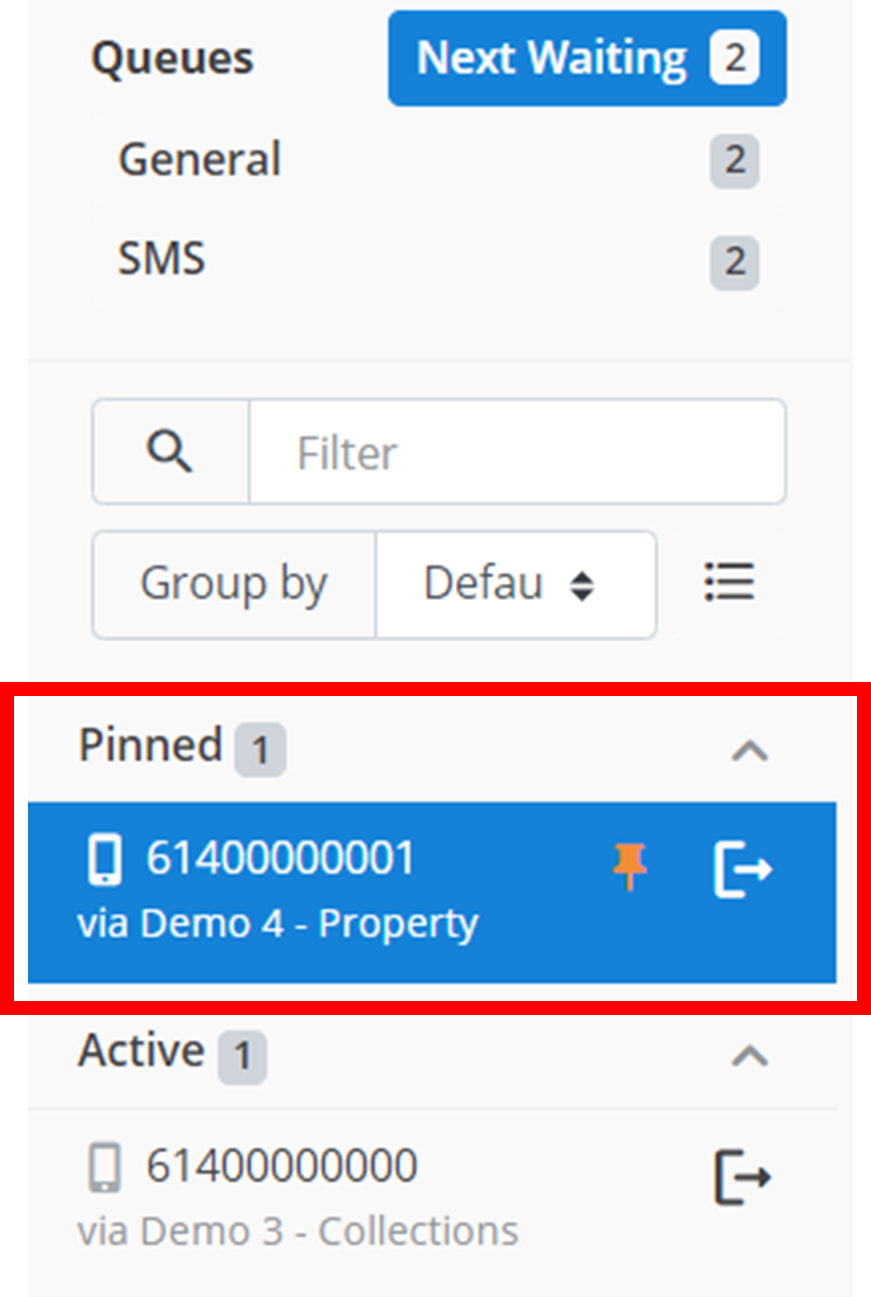
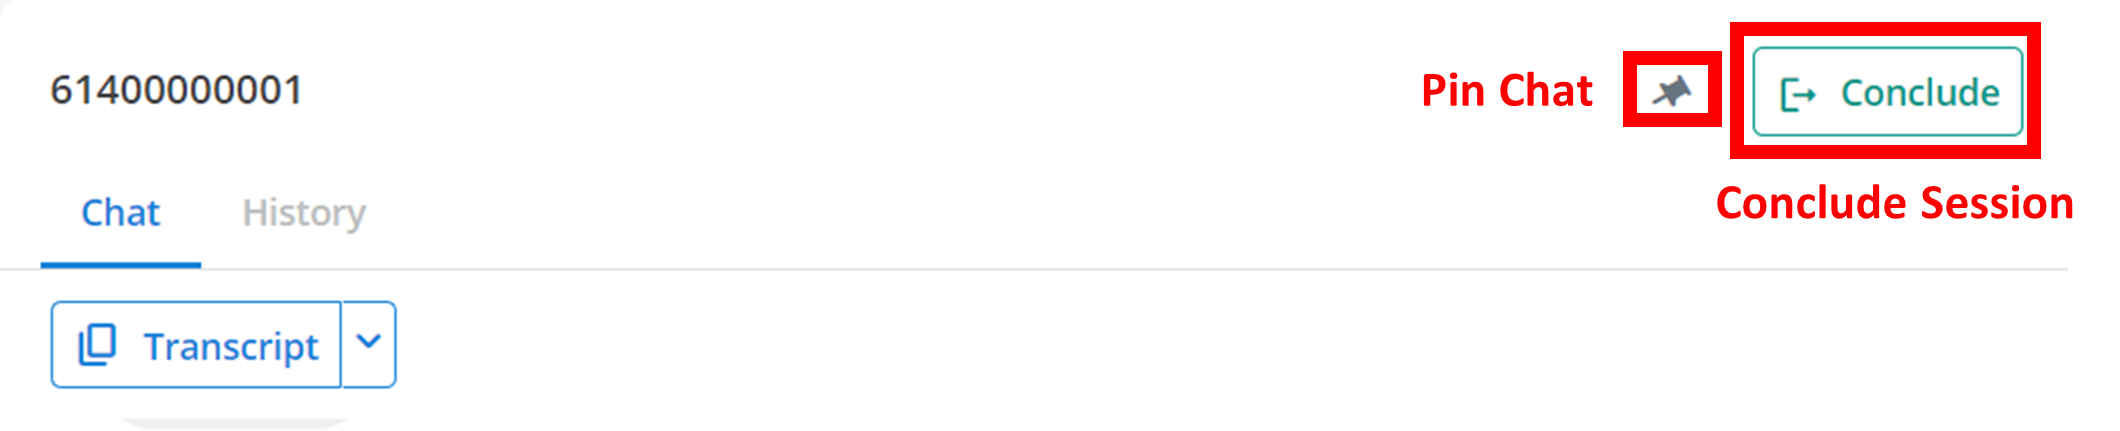
Clicking the ↦ button (outlined below) on one of these active chats will Conclude the Session. Clicking the 📌 button when hovering over an active chat (as outlined below) will move the chat to a 'Pinned' section that appears above the 'Active Chats'.
Example Pinned Chat
Bulk Actions
If you have several 'Active Chats', it can be tedious to individually conclude each one and add the relevant chat tags and notes for each session. 'Bulk Actions' allows you to conclude several sessions/chats at once.
To use bulk actions:
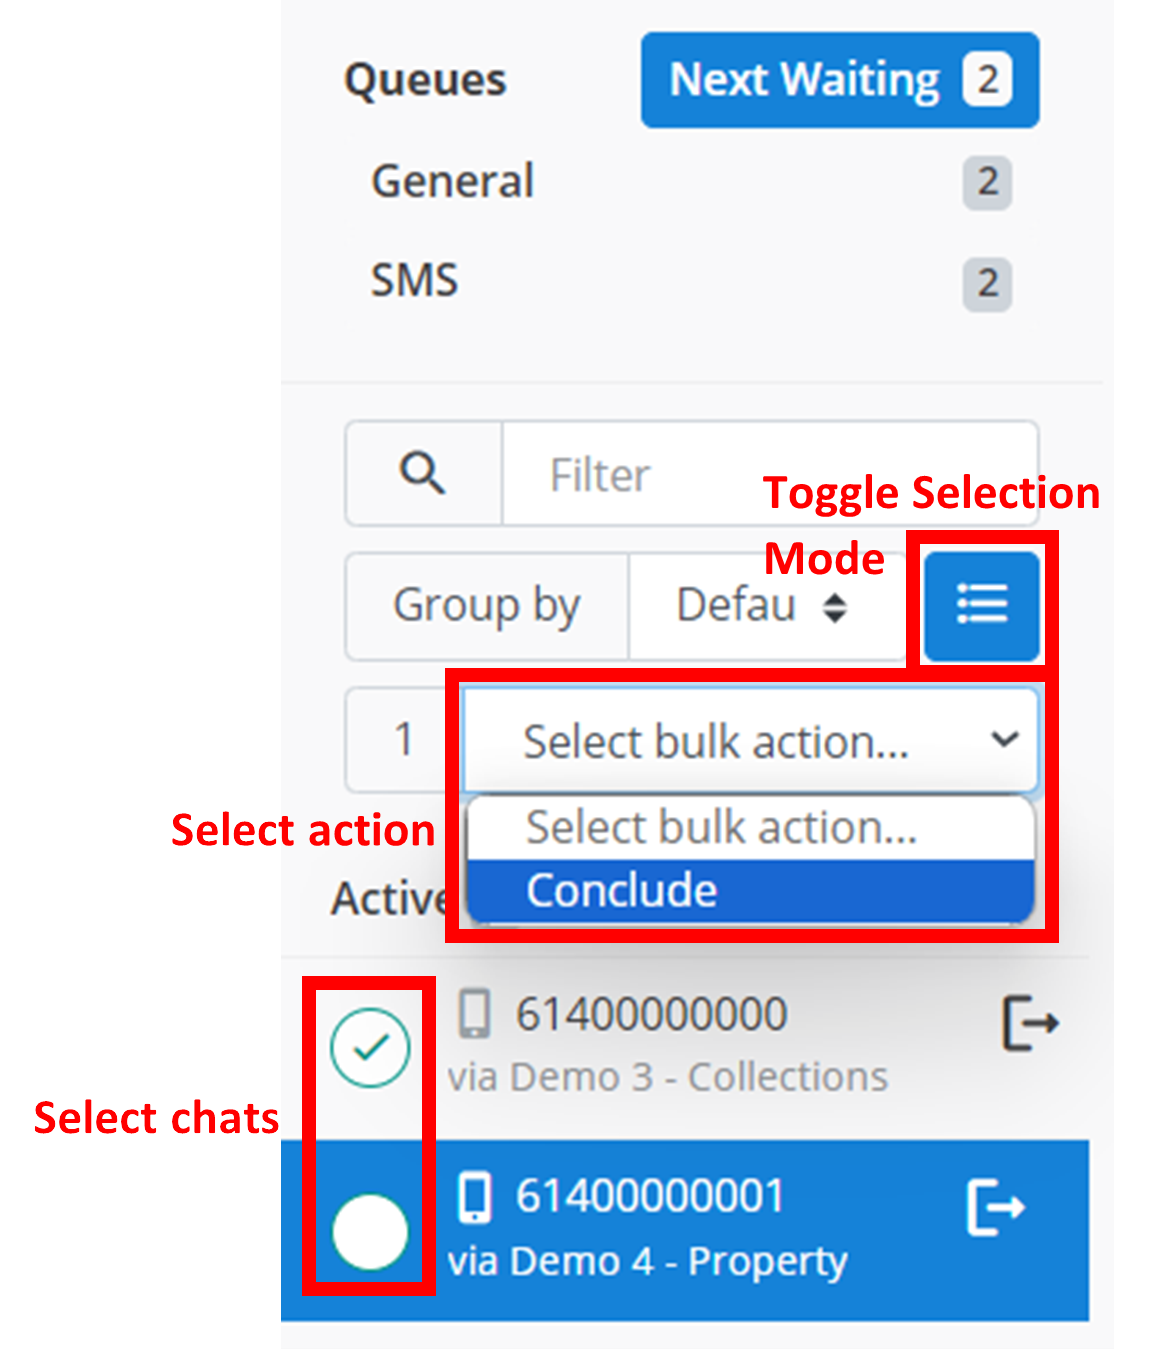
Enter Selection Mode
Click the hamburger icon outlined below. This will enter you into 'selection mode'. Exit selection mode at any time by clicking the hamburger icon again.
Select Chats
Select all the chats you want to apply the action to. Do this by clicking the round green circle that appears on the left of the chat in selection mode. In the example below, 61400000000 has been selected. Unselect a chat at any time by clicking the round green circle again.
Choose Action
Select the action you wish to perform on all selected chats using the drop-down menu outlined below. Currently, the only action supported is 'Conclude'.
Filters
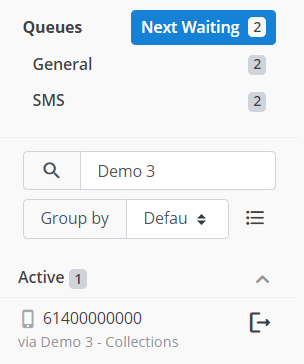
Your 'Active Chats' displays all of the customers that you have an active session with - this is everyone you are currently talking to. If you have multiple session running concurrently, the active chats display might get a bit crowded. The search filter allows you to sort through all of the chats in 'Active Chats'. You just need to type in any text into the filter box outlined below.
Then, only the chats that have this text somewhere in its name (either in the customer contact or the agent contact) will be displayed. An example is shown below. "Demo 3" has been entered into the search filter. Then, only the chat with "Demo 3" in its name (here it is in the agent's contact name) appears.
Group By
If you have multiple session running concurrnently with different customers, the 'Active Chats' display can be hard to navigate and find the right customer. Using the 'Group By' functionality, you can separate the 'Active Chats' display into multiple sections or 'groups'. The chats are divided into different groups based on different properties they have. You can select which property you want to group by using the drop-down menu outlined below.
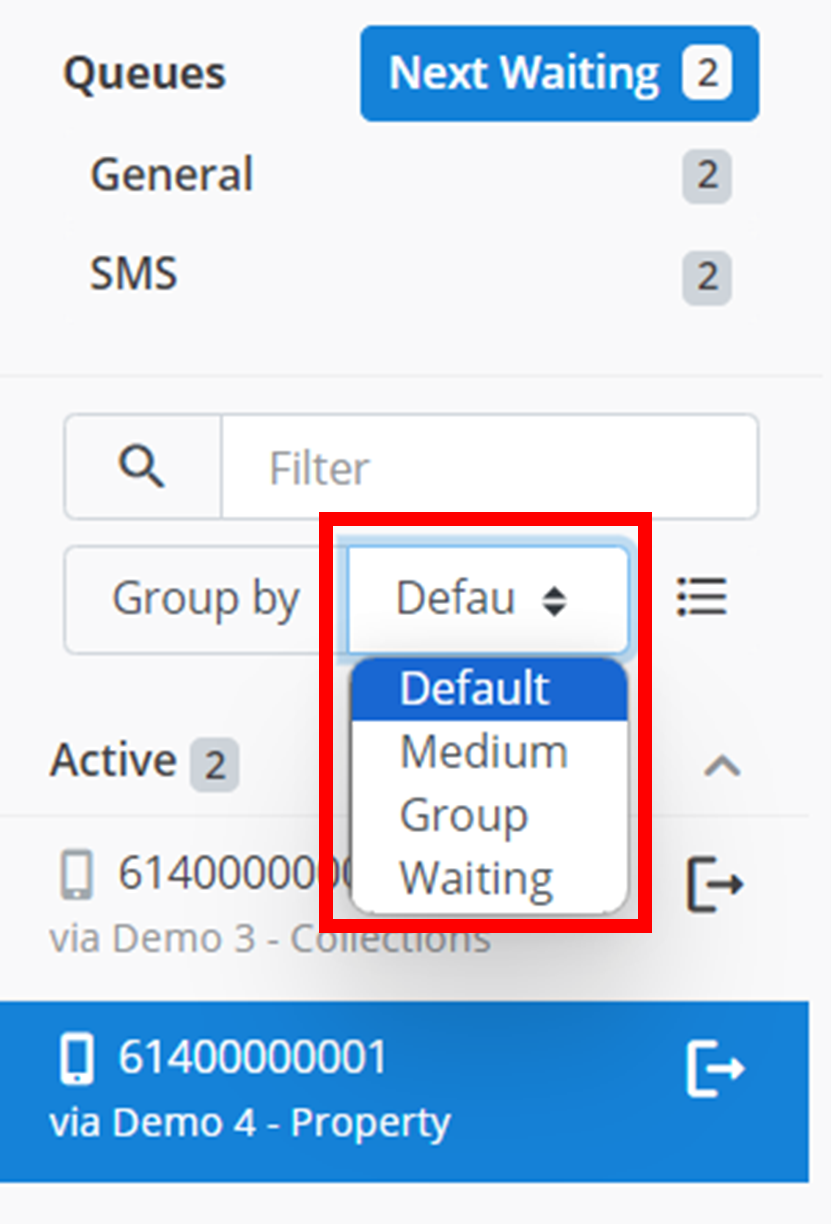
- Default: ungroups all the chats. All chats appear under 'Active Chats'.
- Medium: groups chats into sections based on the type of message being used (eg SMS, Email).
- Group: groups chats into sections based on which queue they are from (eg General, SMS).
- Waiting: group chats into sections based on how long they have been in the 'Active Chats' (eg < 5 minutes, < 10 minutes).
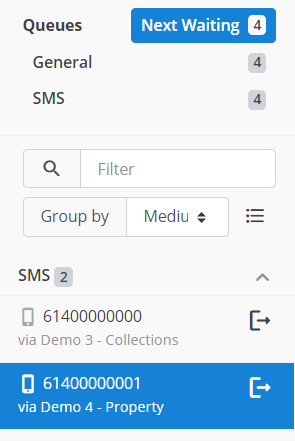
Below is an example. The 'Active Chats' have been grouped by their 'Medium'. All the current active chats in the example use SMS, so they all appear in the 'SMS' group.
Main Chat (Middle)
This is the main functionality of Message2Give Chat. The middle of your screen is the actual chat itself. This is where you and your agents can communicate with your customers.
The Chat
The chat works like most chat platforms online. Messages from the customer appear on the left of the screen with a grey background. Messages from any of the agents appear in blue on the right of the screen.
Tip
Multiple agents can interact with the same customer. Multiple agents can also be in the same chat with a customer at once.
For example, Agent 1 may send some introductory messages like 'Hi, thank you for your interest', and then Agent 2 may interject or take over with some negotiations like 'You have three overdue payments'. From the point of view of the customer, all these messages are coming from the same contact.
To send a new message to the customer, just type the message in the text box at the bottom of the screen and hit enter. Some extra annotations are shown below.
Tip
You can add emojis to your message by clicking the emoji icon on the right of the message text box, and then selecting your desired emoji:

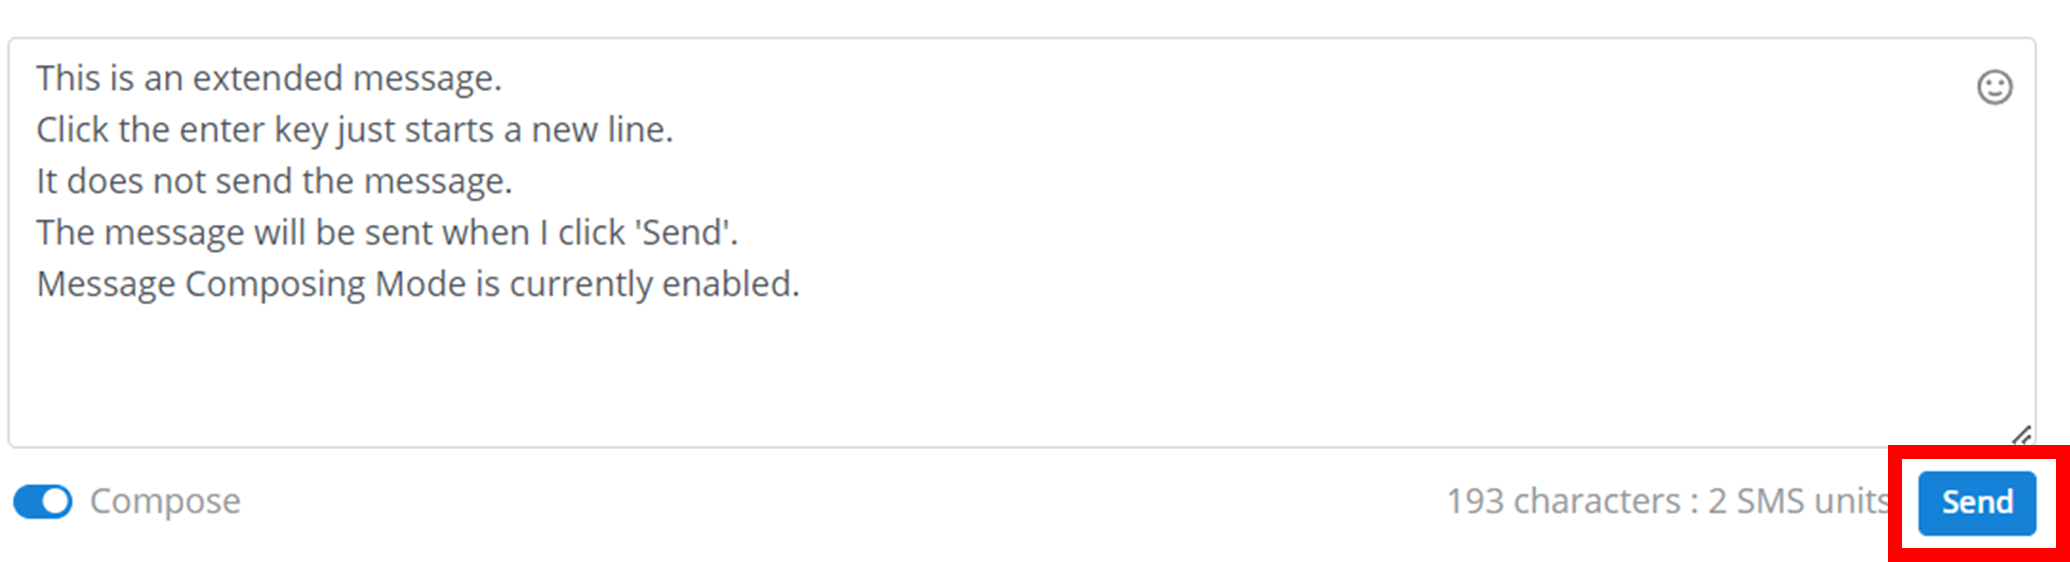
Message Composing Mode
Toggling this option will make the above text box a lot larger. Use this option when you want to create a large message. In Message Composing Mode, click 'Enter' will not send the message. Instead, it will start a new line. This is useful for larger messages. Instead, to send the message once you have finished composing it click the Send button (outlined below) that appears in the bottom right of the screen.
Redacting a Message
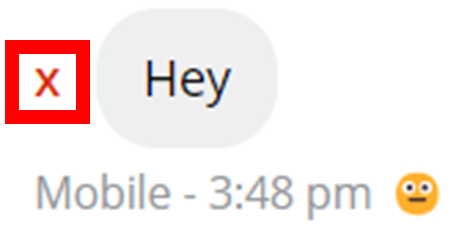
You can choose to redact messages sent by the customer by clicking the 'X' on the left of the message. This will remove the message contents from chat records.
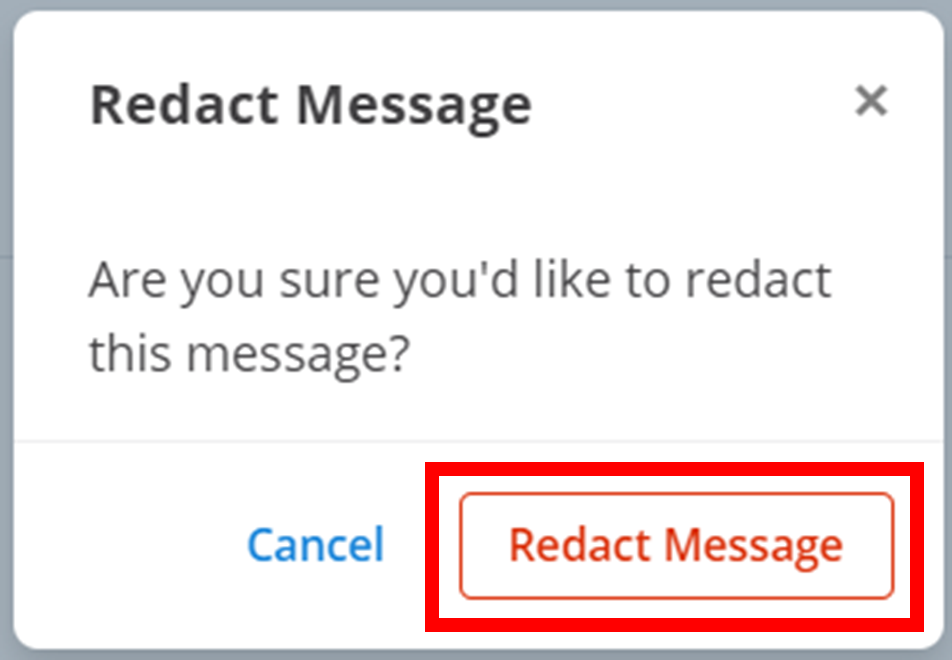
This will bring up a small confirmation menu. Click Redact Message
Caution
Redacting a message does not completely eliminate its existence from any records. A message still appears as being 'sent'. Only the contents of the message is redacted:

Message Emotion Analysis
As you will notice, every message sent by the customer has an emoji underneath it. Each message can have one of three emojis: 😀, 😐, 😞. All text usually has some connotation from positive to neutral to negative. This emoji is the 'mood' that the message portrays. An algorithm reads the message and then determines its tone. Then, it allocates an emoji that relates to that tone.
- 😀: indicates the message is positive
- 😐: indicates the message is neutral
- 😞: indicates the message is negative
Examples of Emotions:

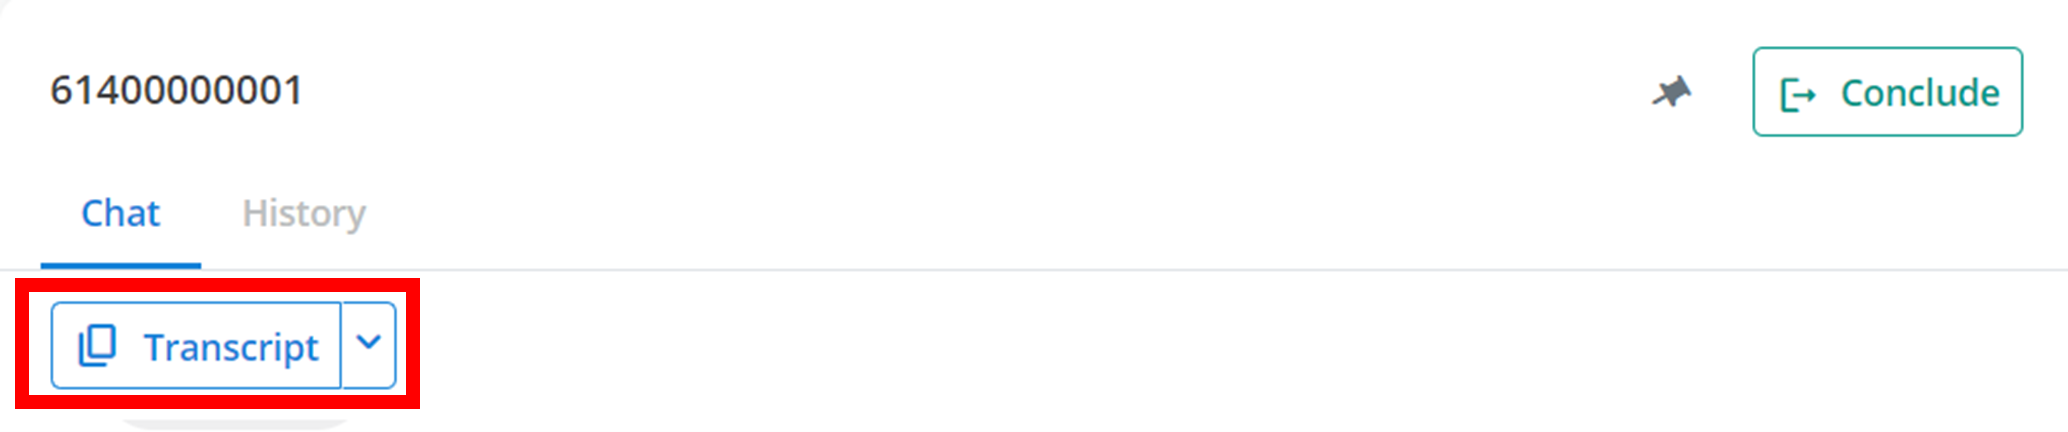
Transcripts
Every chat session automatically records a full Transcript of the session. You can also download a transcript of the current session by click on the ˅ on the Transcript ˅ button, and then click 'Print to PDF'. This will download a PDF of a transcript of the current chat session to your device.
Extra Actions
In the top right of the screen, there are two actions you can perform on the current chat: Conclude or Pin. These have already been explained under Active Chats.
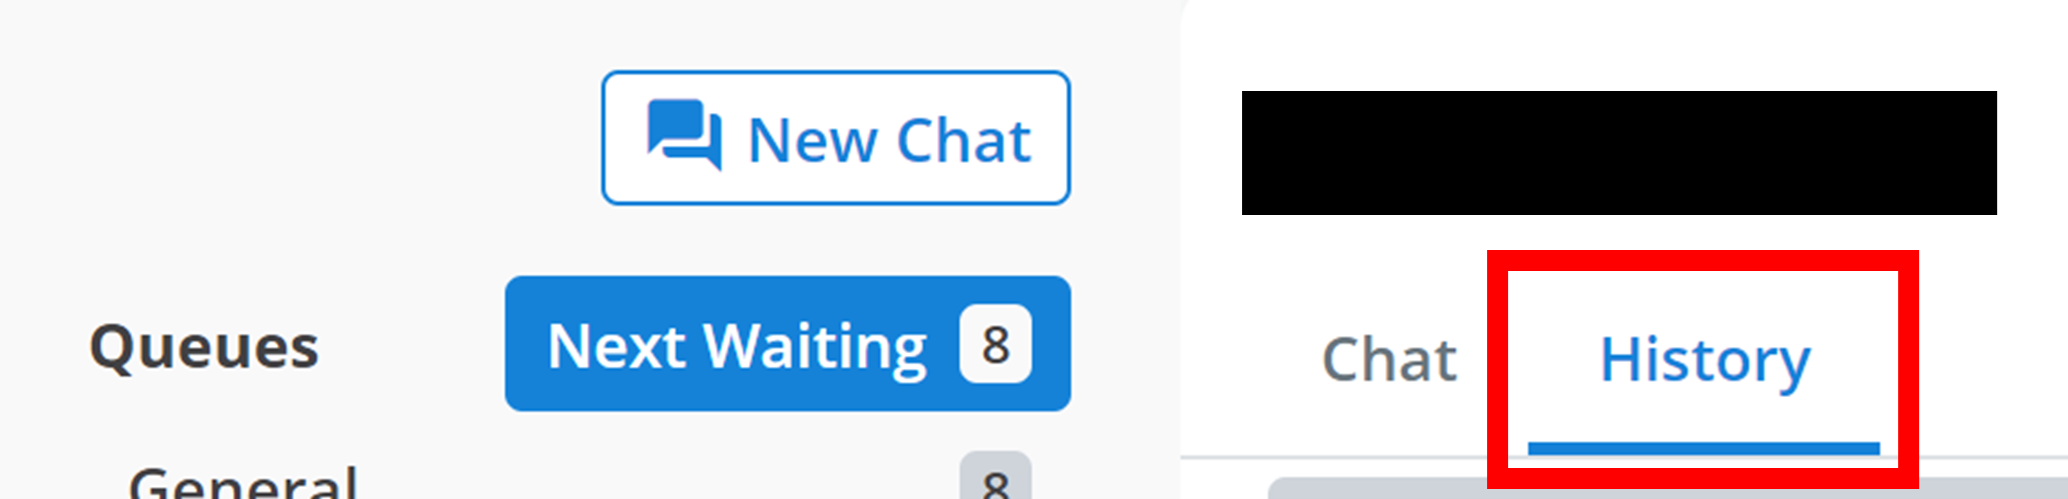
History
All of your conversations/sessions with a customer are saved in 'History'. To access this history of conversations with a contact, click the History tab outlined below.
Here, you will be able to view a transcript of every conversation you have had with the customer. Each transcript should look like this:

To find a specific transcript, you can look at the date and time of the conversation that is listed on the top right of the transcript. All of the transcripts are organised in chronological order, with the oldest transcripts at the top of the page.
All of the transcripts are collapsible as well. So, to view the full transcript of the conversation, click on the transcript and it will expand to show you the full conversation. You can collapse the transcript by clicking it again.
The collapsed transcript will show you the message type (phone, email, etc.), the time period of the conversation, the number of chats, the conversation's chat tags, and give you the option to save the transcript. To save the transcript, you can either click the overlapping rectangles to copy the transcript to your clipboard, or click the ˅ button and select 'Print to PDF' to download a PDF of the transcript.

Right Sidebar
To navigate between sections of the right sidebar, click on the different tabs shown below. In the example, 'Replies' is currently selected.

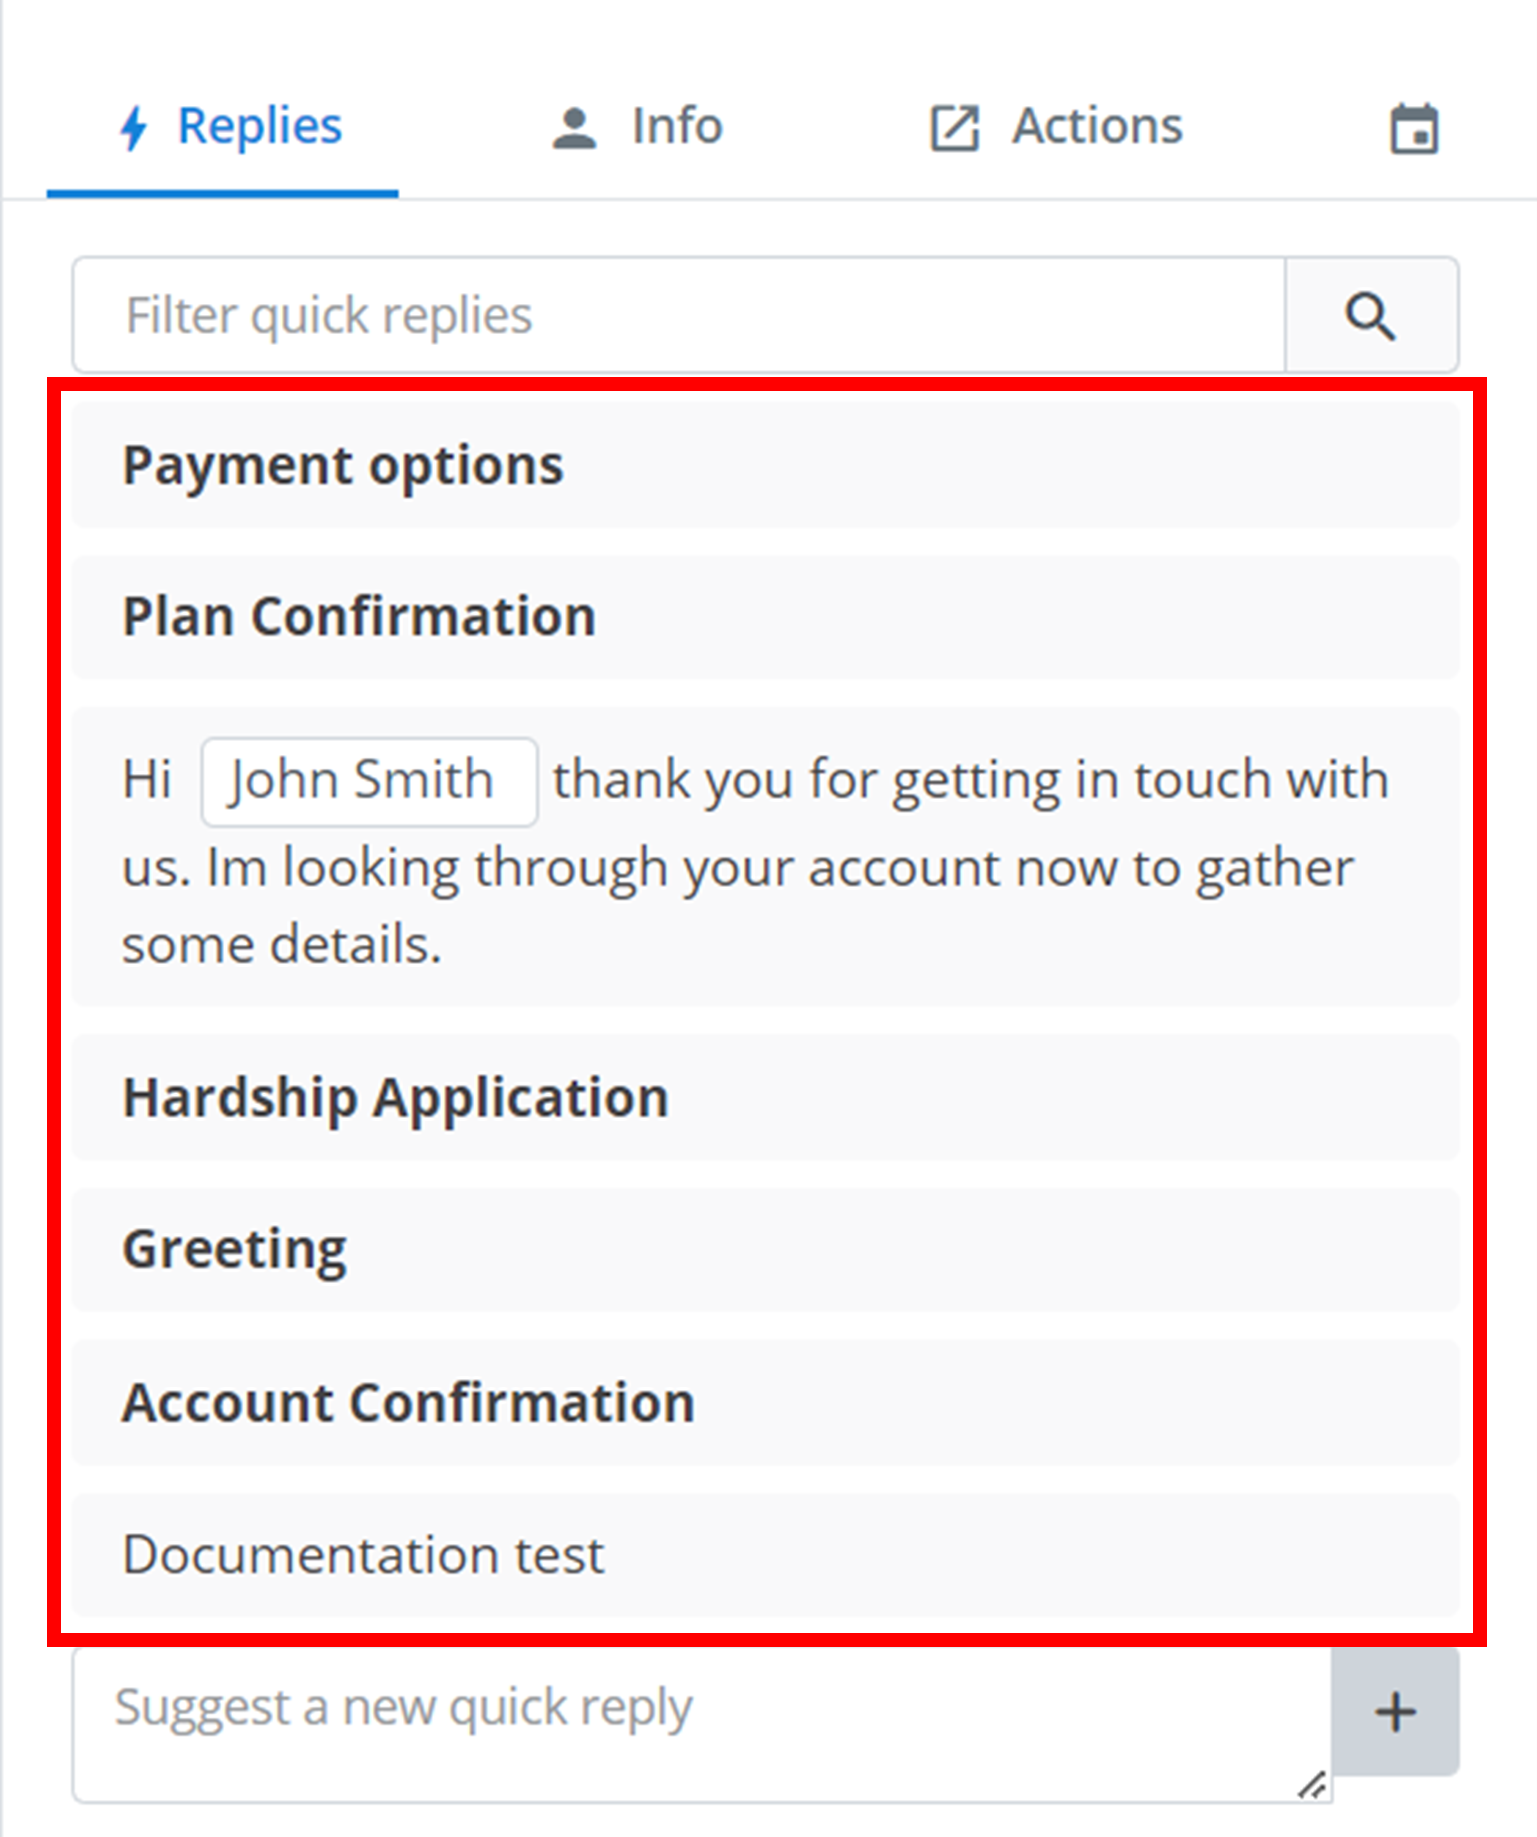
Replies
The first tab on the right sidebar is the Replies. These are all of your enabled Quick Replies. They are useful for long messages that are commonly sent to customers.
Using Quick Replies
Select Quick Reply
To use a quick reply, just click on the desired quick reply on the right sidebar (outlined below). Then, the quick reply message will be automatically pasted into your message to the customer.
Fill Template (Optional)
Some quick replies also use a template. When you select one of these quick replies, a small menu will come up where you need to enter the value for the templates before the quick reply is pasted into your message.
The example below has a placeholder for the customer's email. Under the 'Template Fields' section, one of the fields is this 'email'. Then, in the 'email' text box, the customer's email is inputted. This then autmoatically inserts the customer's email into the quick reply message that you can view on the right.
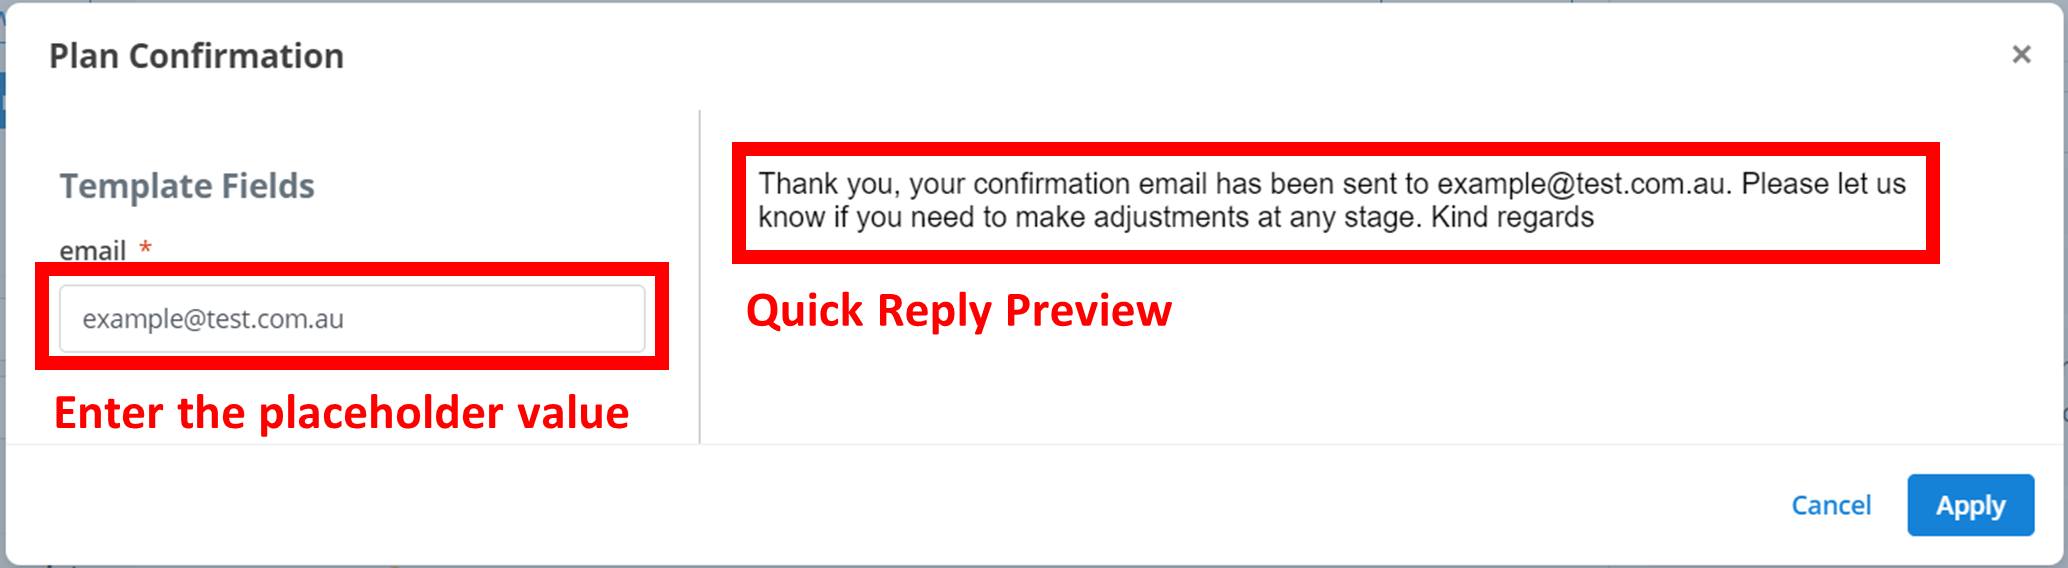
Apply
Finally, click Apply to paste the quick reply into your message.
Filtering Quick Replies
If you have a lot of quick replies setup, it may be difficult to find the one you want to use. You can sort through all of your quick replies using the 'Filter Quick Replies' text box. This acts like a search function.
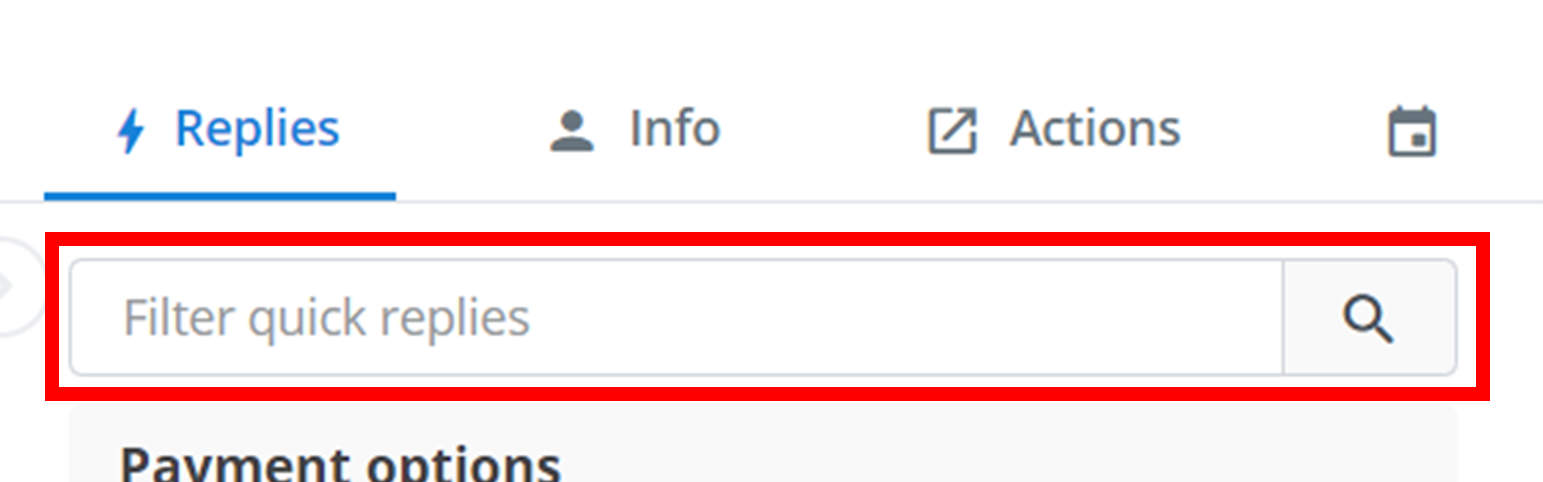
Enter the text you want to search for in the text box. Then, only the quick replies with that text in its title or message will appear.
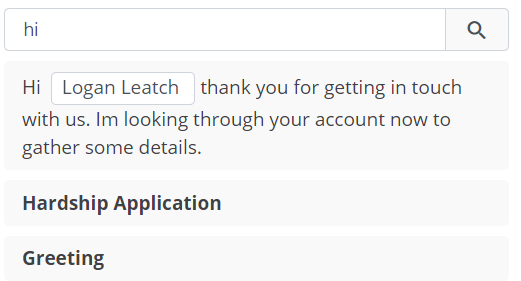
In the below example, 'hi' is being searched for. The three quick replies that appear either have 'hi' in their title or their message.
Adding Quick Replies
You can temporarily add a new quick reply to appear here. Just type the message content of the new quick reply in the text box outlined below. Then, to add it to the list, click the grey + button.

Info
Navigate between different sections of 'Info' using the tabs outlined below. In the example, 'Details' is currently selected.
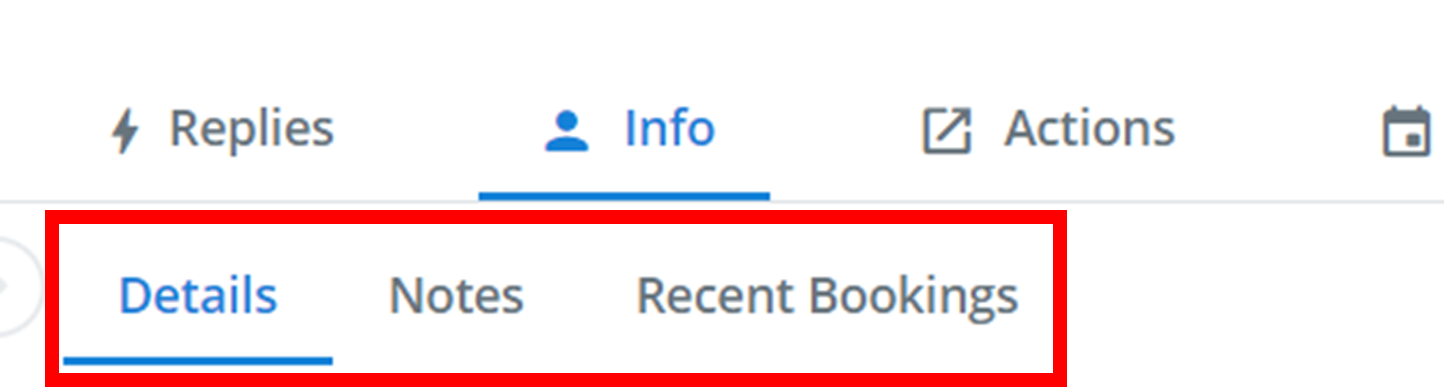
Details
This is every single recorded detail about the client. It includes their name, email, phone number, date of birth and more. In this menu, you can view and edit any of this information. Configure what details are stored for each customer in Contact Attributes.
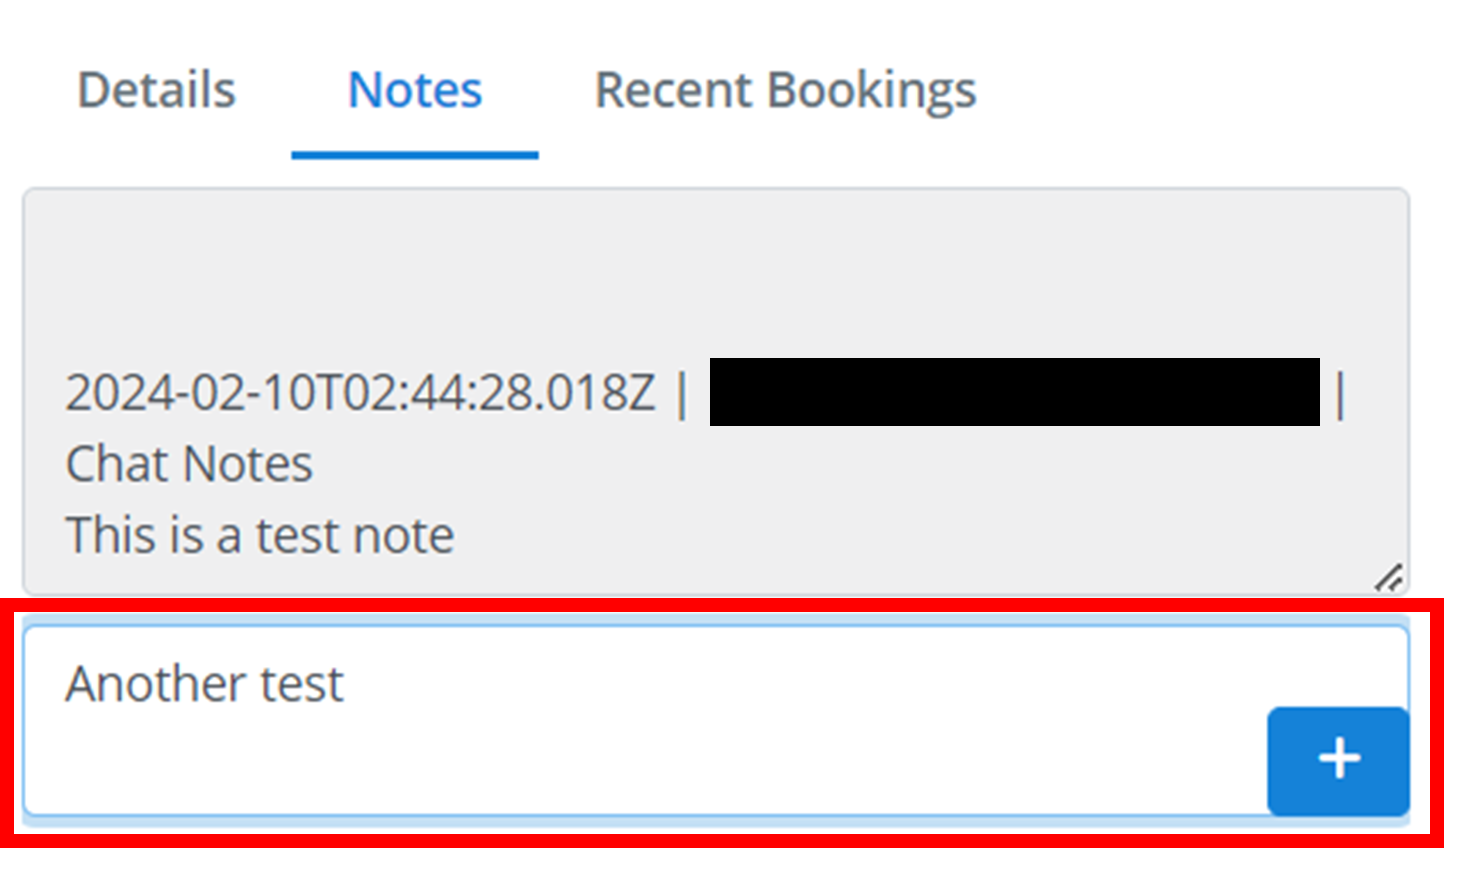
Notes
You can add little comments or notes to the chat. These notes are stored, recorded, and created in this tab. Any agent can make a note, and all agents can see all other agents' notes.
In the below example a note has been made on the chat that says 'This is a test note'.
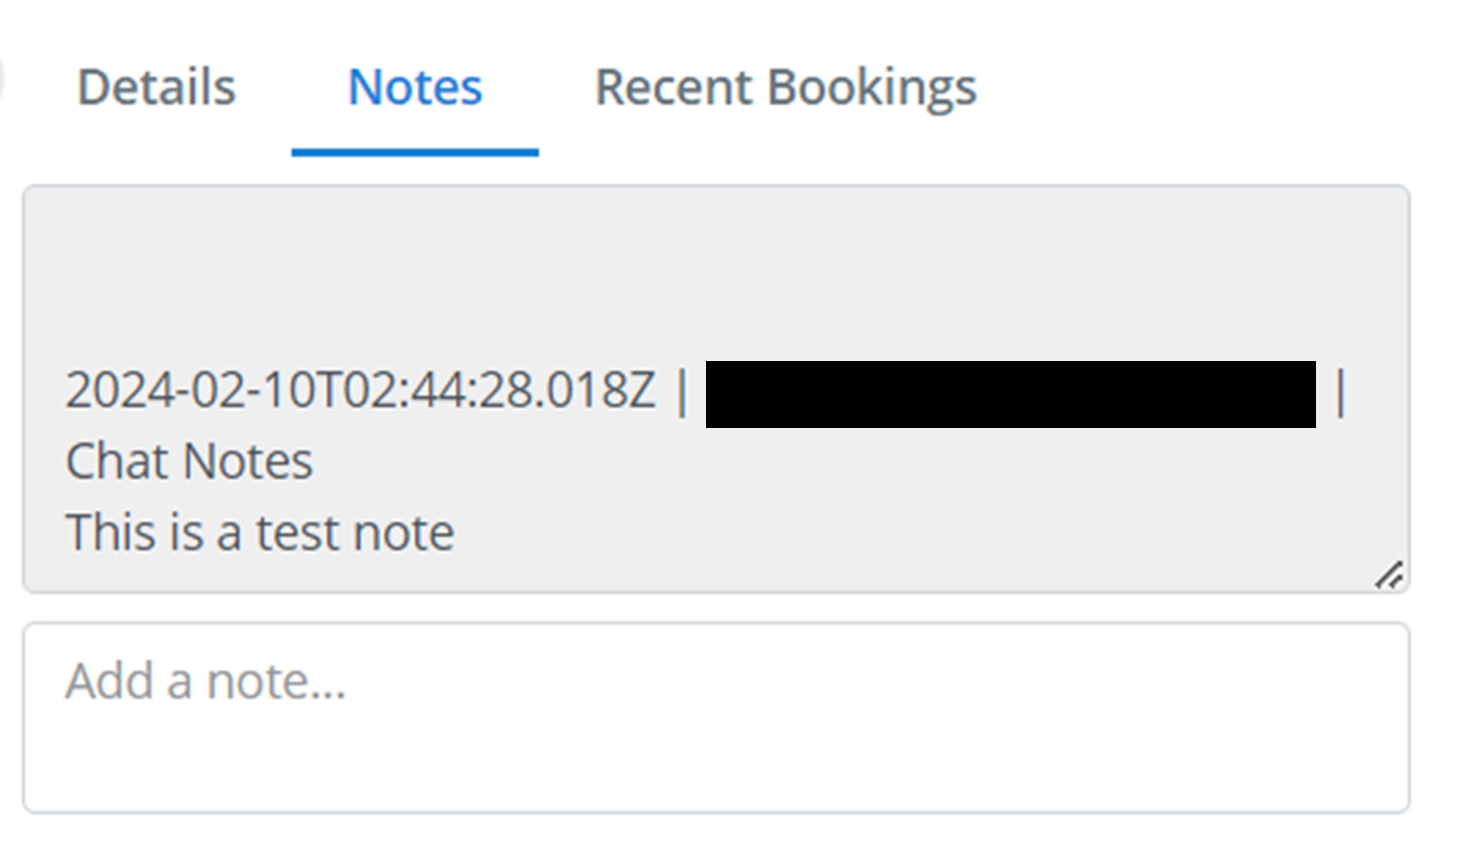
To add a new note, type the text content of the note into the text box 'Add note...' (outlined below), and then click the blue +.
Recent Bookings
Any recent bookings that have occured with this contact will appear here. See Bookings for more info about bookings.
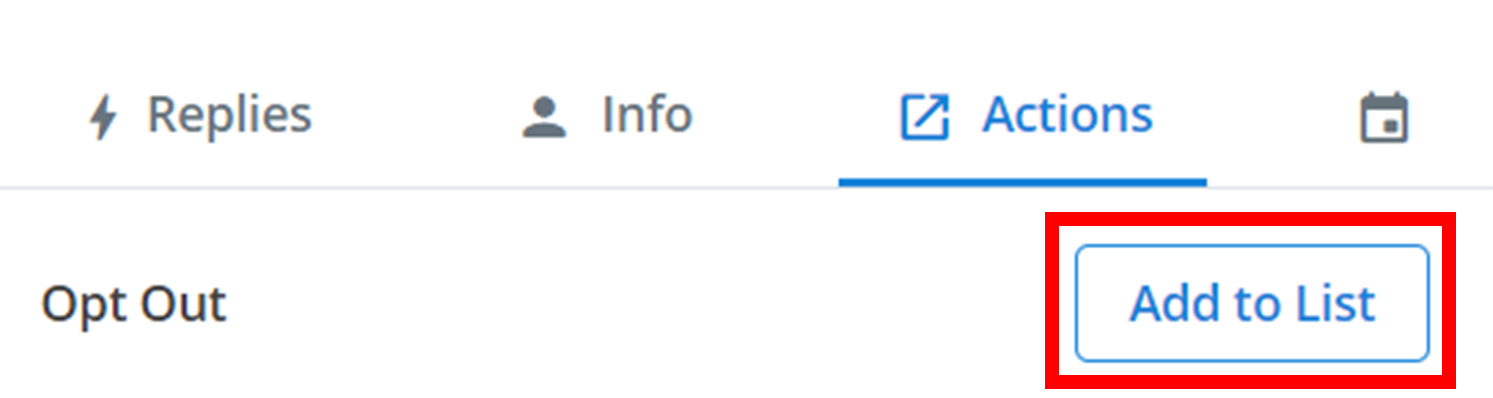
Actions
The only current action is adding the contact to an 'Opt Out' list (opt-out lists are used elsewhere to exclude a group of people from receiving an outbound message).
Start
Just click on the Add to List button next to 'Opt Out'.
Configure
Then a small menu will appear where you select which opt-out list to add the contact to.
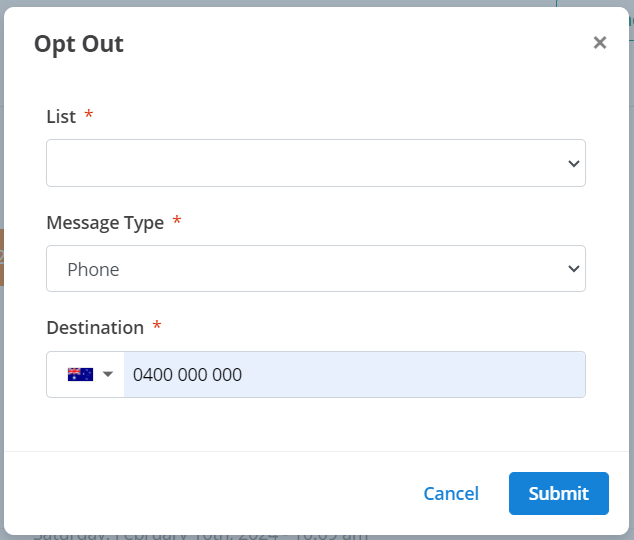
In the drop-down menus, you need to select the:
- List: the specific opt-out list to add the contact to.
- Message Type: the type of contact you are adding - a phone number (Phone) or an email address (Email).
- Destination: the contact you are adding to the opt-out list.
Submit
Once you have configured all of these, add them to the list by clicking Submit.
Bookings
This calendar icon is where you create bookings.
A booking is a new session between a customer and a group of agents. All of the agents in the group will interact with the one customer through a single contact, and in a single chat. You configure the booking using the inputs outlined below.
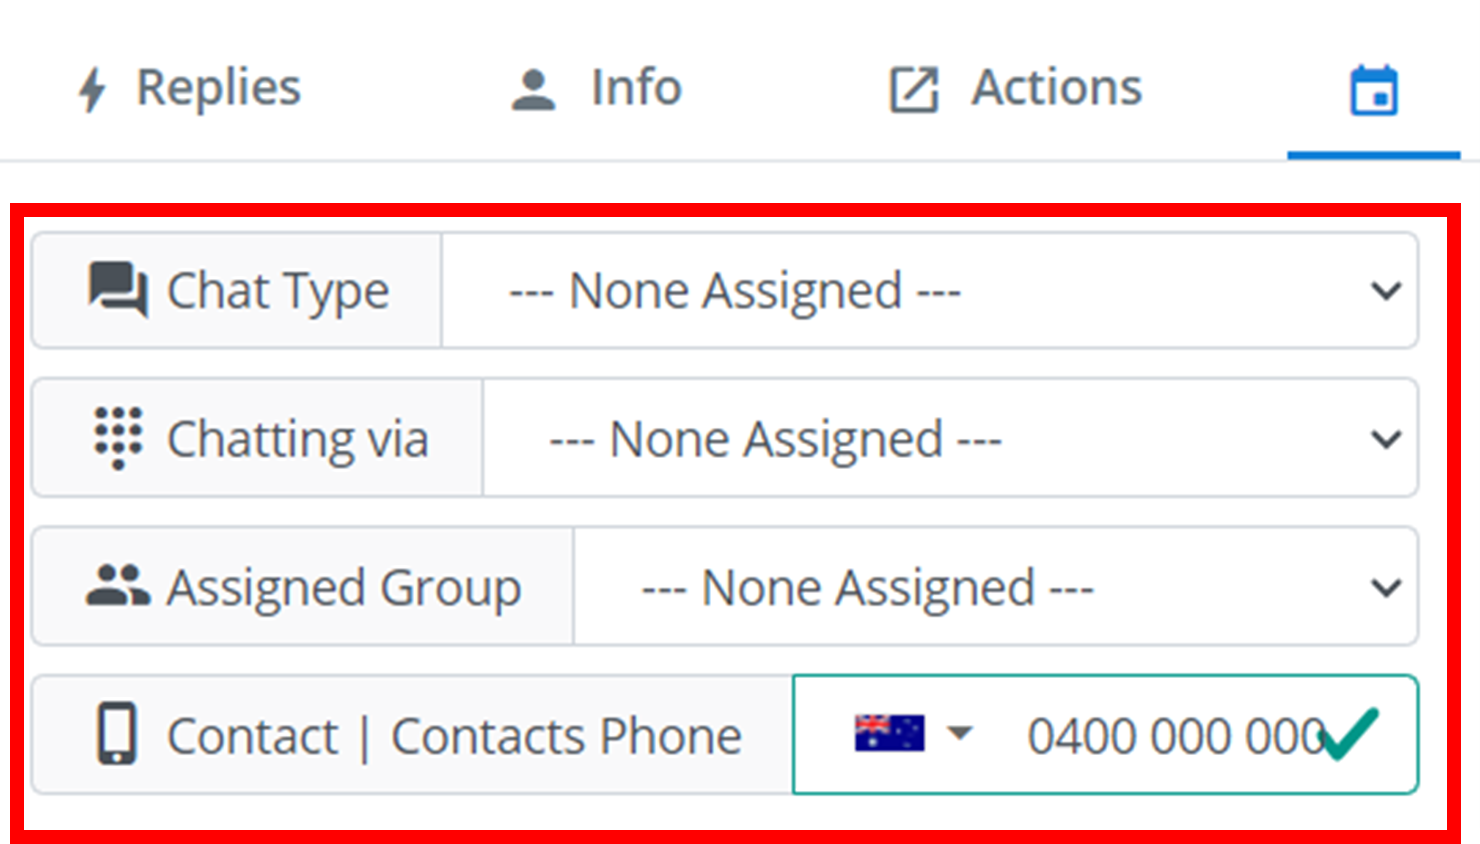
- Chat Type: the message medium. Either SMS, MMS, or Phone.
- Chat via: the contact that the agents will talk to the customer through.
- Assigned Group: the group of agents that will be in the chat. Read more about groups here.
- Contact: the contact of the customer you want to start a booking with.
Concluding a Session
After using any of the various methods of concluding a chat/session, you will see a small menu appear. For the purposes of records and transcripts, it is important to give a short description of what happend in the chat session and what was achieved. This description can be through using tags or a note.
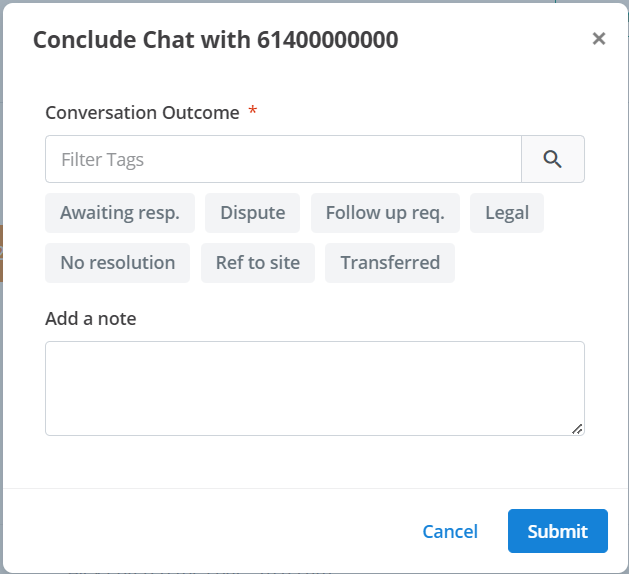
Conversation Outcome
This is the final result of the conversation. This result/outcome is indicated using a tag. Select a tag by clicking on it, and unselect it by clicking it again. You can select multiple tags. Eg - if the customer did not cooperate with the agent, then an appropriate tag to select would be 'Dispute'. Read more about chat tags here, including how to configure the minimum/maximum number of chat tags.
Add a note
This is optional. This note is just any extra comments about the conversation that may be important for the record.
Submit
Finally, to conclude the chat, click Submit.
Concluded Chats
After concluding a chat, it will appear underneath your Active Chats in the 'Concluded' group.
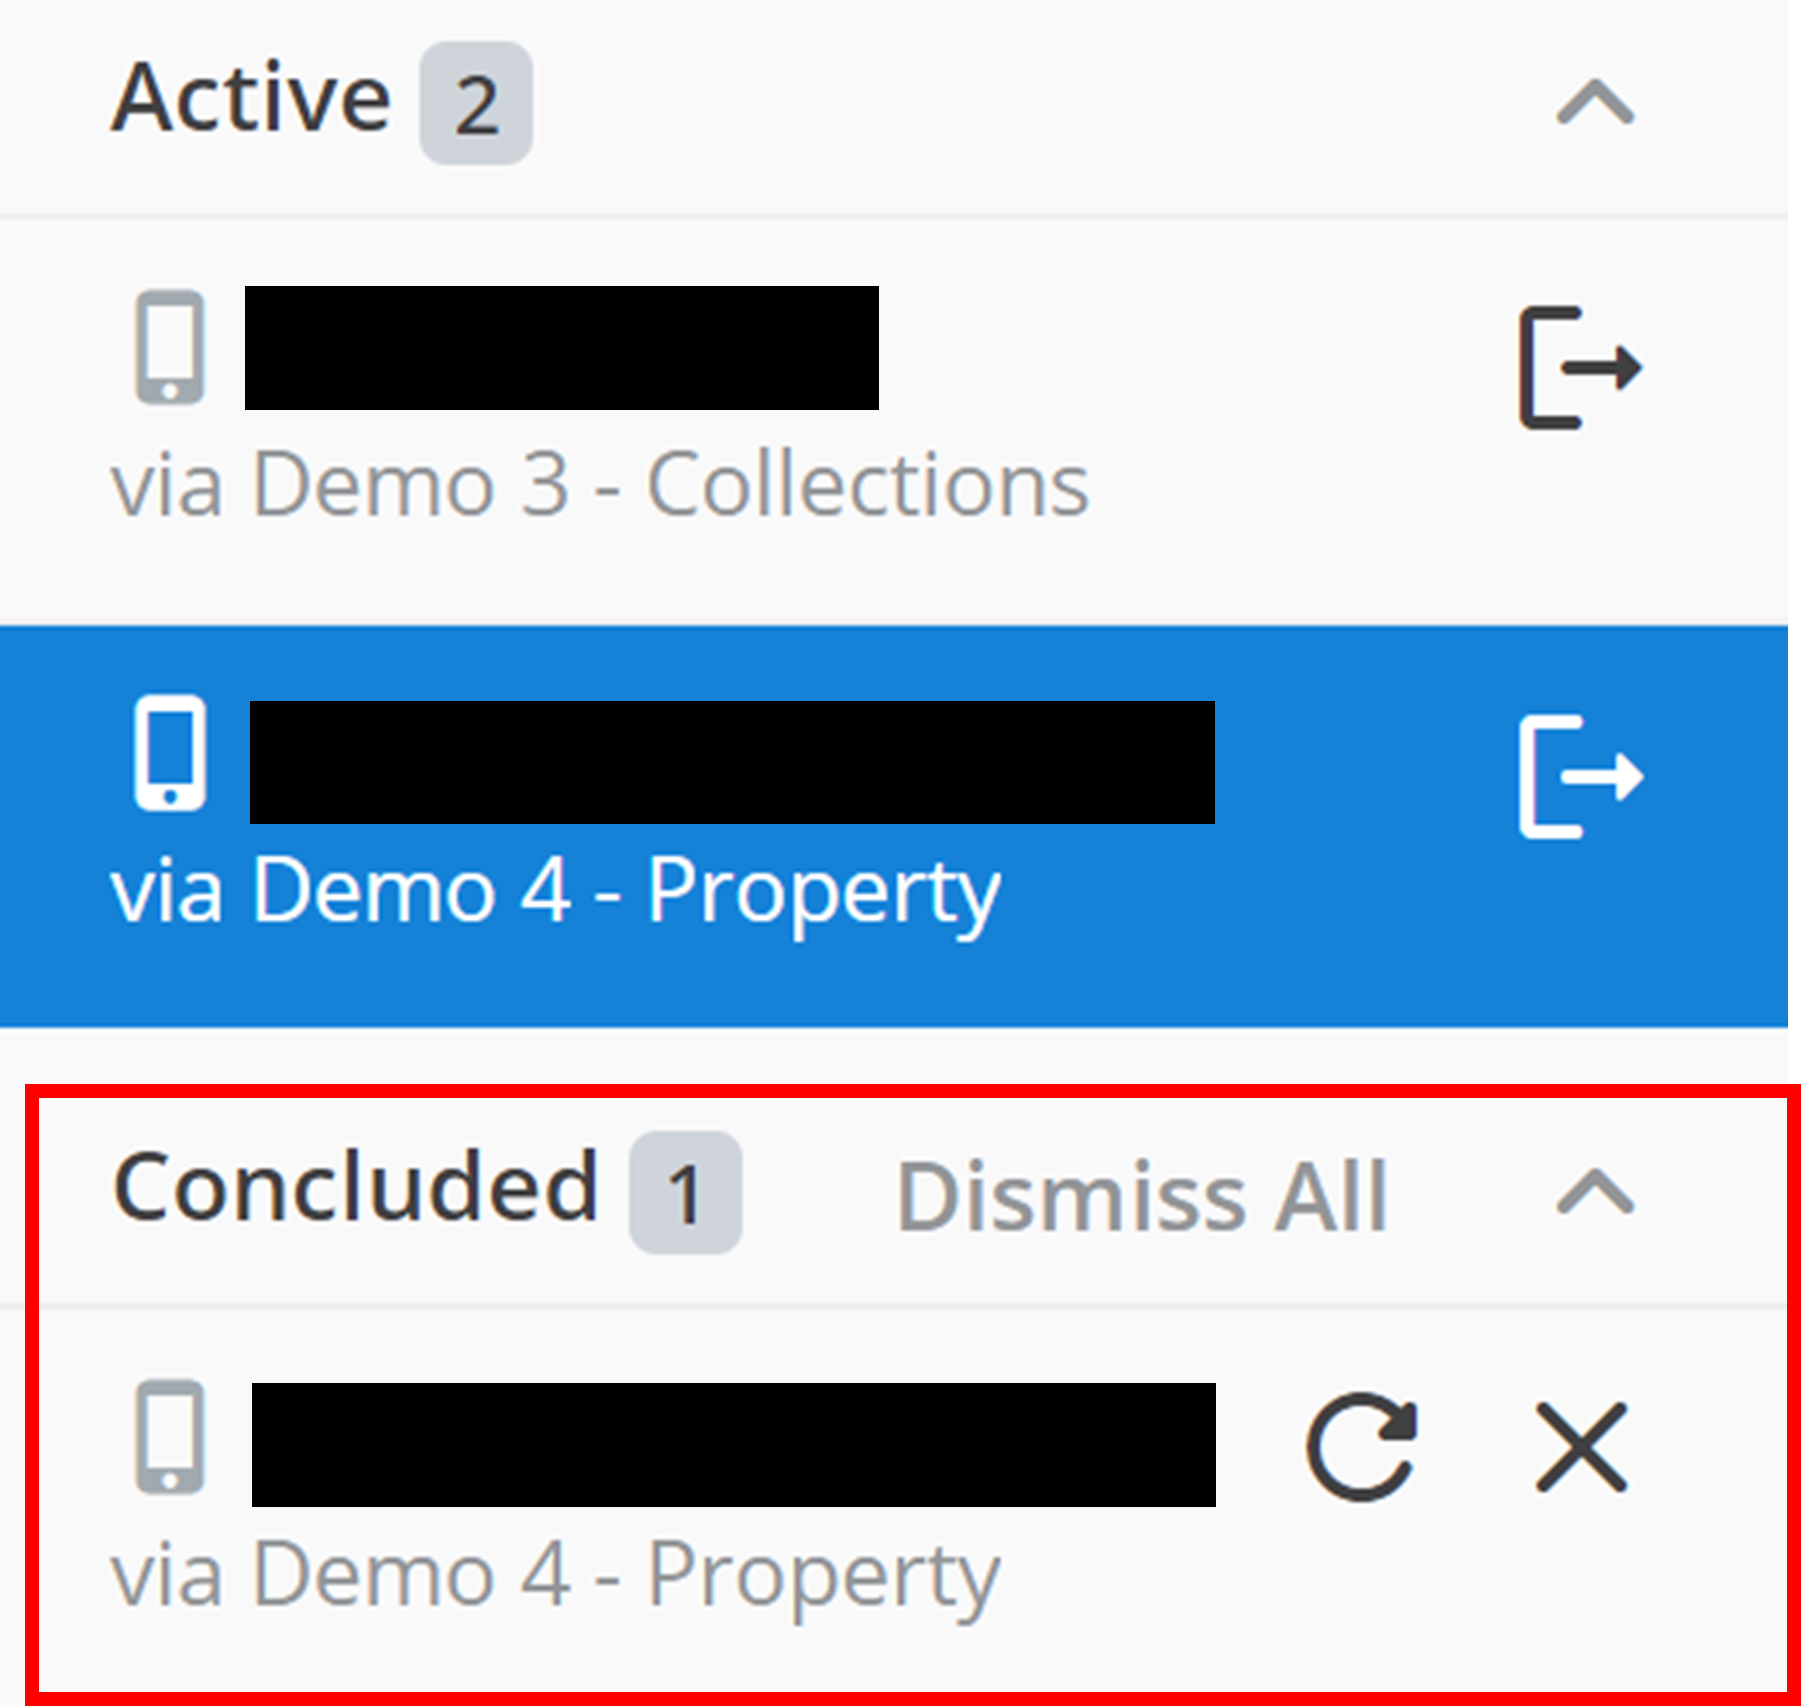
These concluded chats give you two options. To restart the chat with the customer, click the refresh button. To remove the chat from your sidebar, click the X button. To remove all concluded chats from your sidebar, click Dismiss All.

How is this guide?