Virtual Numbers
Virtual Numbers
Read Sender ID documentation for an in-depth explanation of Sender IDs and their differen types. A Virtual Number (VN) is just one type of Sender ID in Message2Give. It is a phone number that you can rent from Message2Give to use in your workspace as a Sender ID. Messages sent using Virtual Numbers can be responded to, and these responses can be recorded and accessed by Message2Give. Thus, Virtual Numbers are the only Sender IDs that can have inbound functionality in your workspace. Therefore, they are the only phone numbers you can use in Chat.
Setup
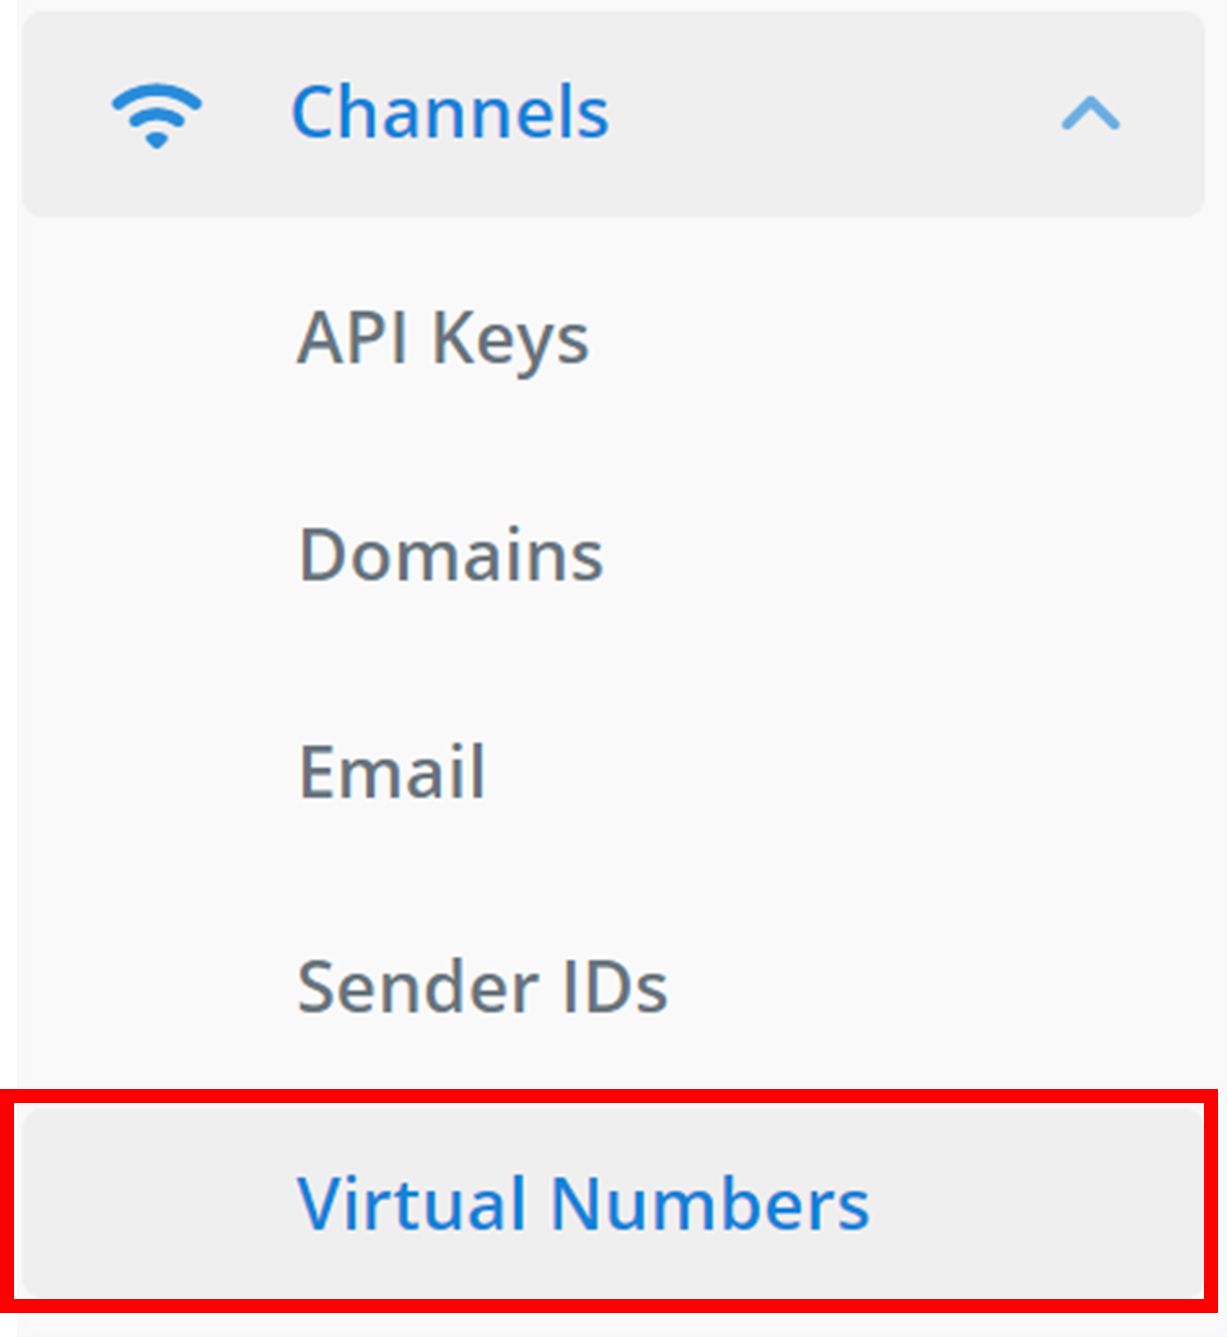
To find the VNs section in your workspace: on the left sidebar, navigate to 'Channels', and then find 'Virtual Numbers'.
Create
Then, to create a new VN, click + Number.

Configure
Clicking on this button will bring up a small menu like the one below:

This is where you select VNs to add to your workspace. This is what each section does:
- Country: the region the VN belongs to.
- Capabilities: which message types the VN supports. The options are SMS, MMS, and Voice. You can select multiple message types from the drop-down menu. To delete a message type from your selection, either click it again in the drop-down menu, or click on the 'X' that appears next to its name:
-

- Number Selector: select the available VNs you want to add to your workspace. Each VN costs a certain amount per month to rent. To select a number, click the circle in the first column of the VN's details. Click it again to unselect it. You can select multiple VNs at once. The second column 'Number' is the actual phone number of the VN. The third column 'Feature' is all the message types that the VN can use. The final column 'Cost' is the renting price of the VN. VNs must be paid for to stay active in your workplace.
Then, to add the new VNs to your workspace, click Add.
Management
All of your workspace's VNs will appear here (numbers have been redacted for documentation):
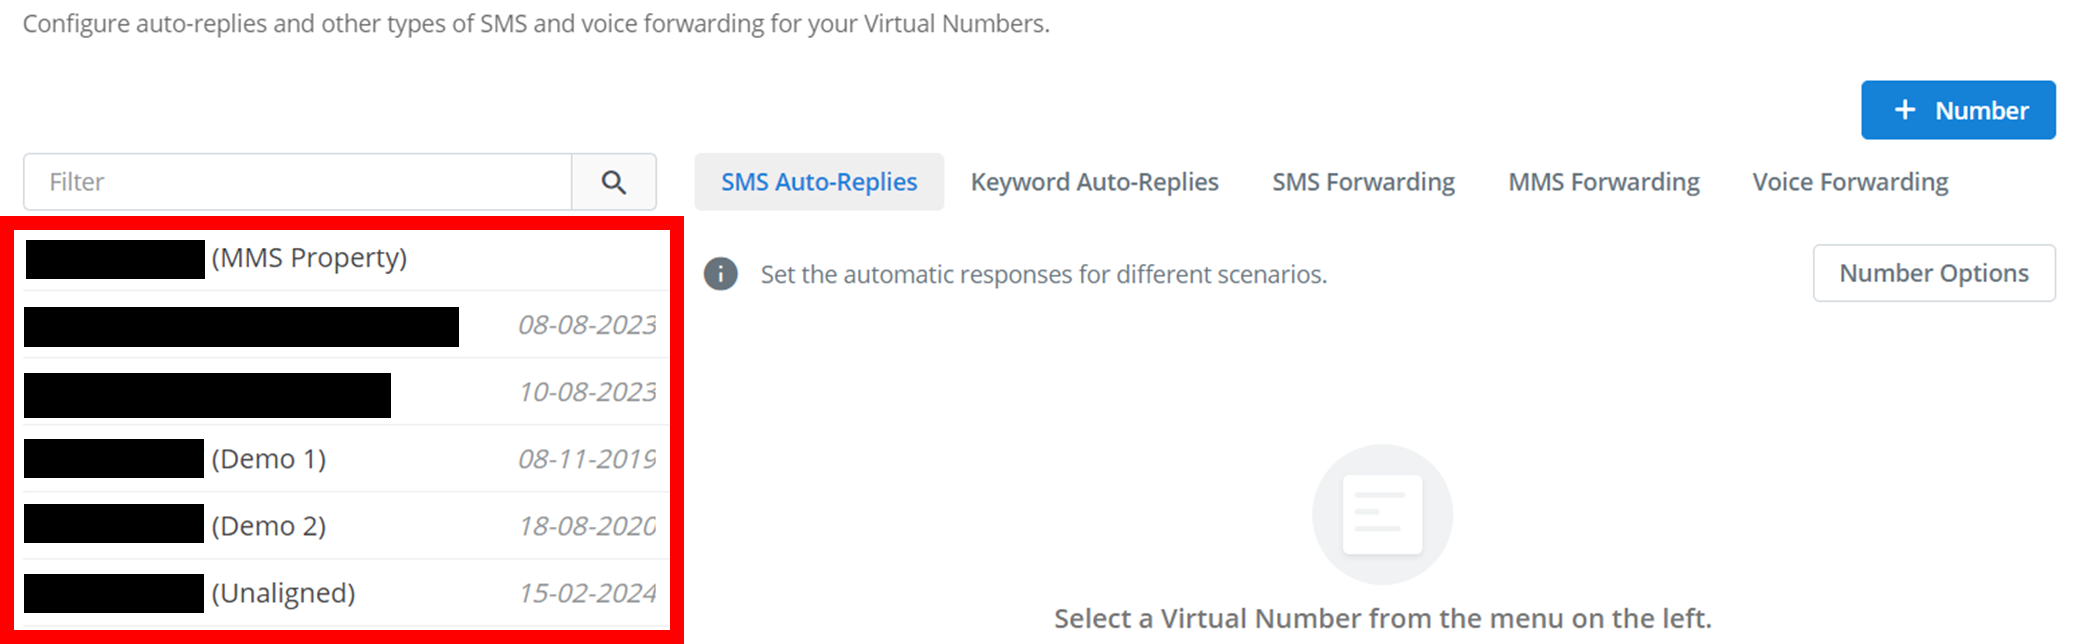
:::tip TIP You can search the Sender IDs by name using the 'Filter' text box. :::
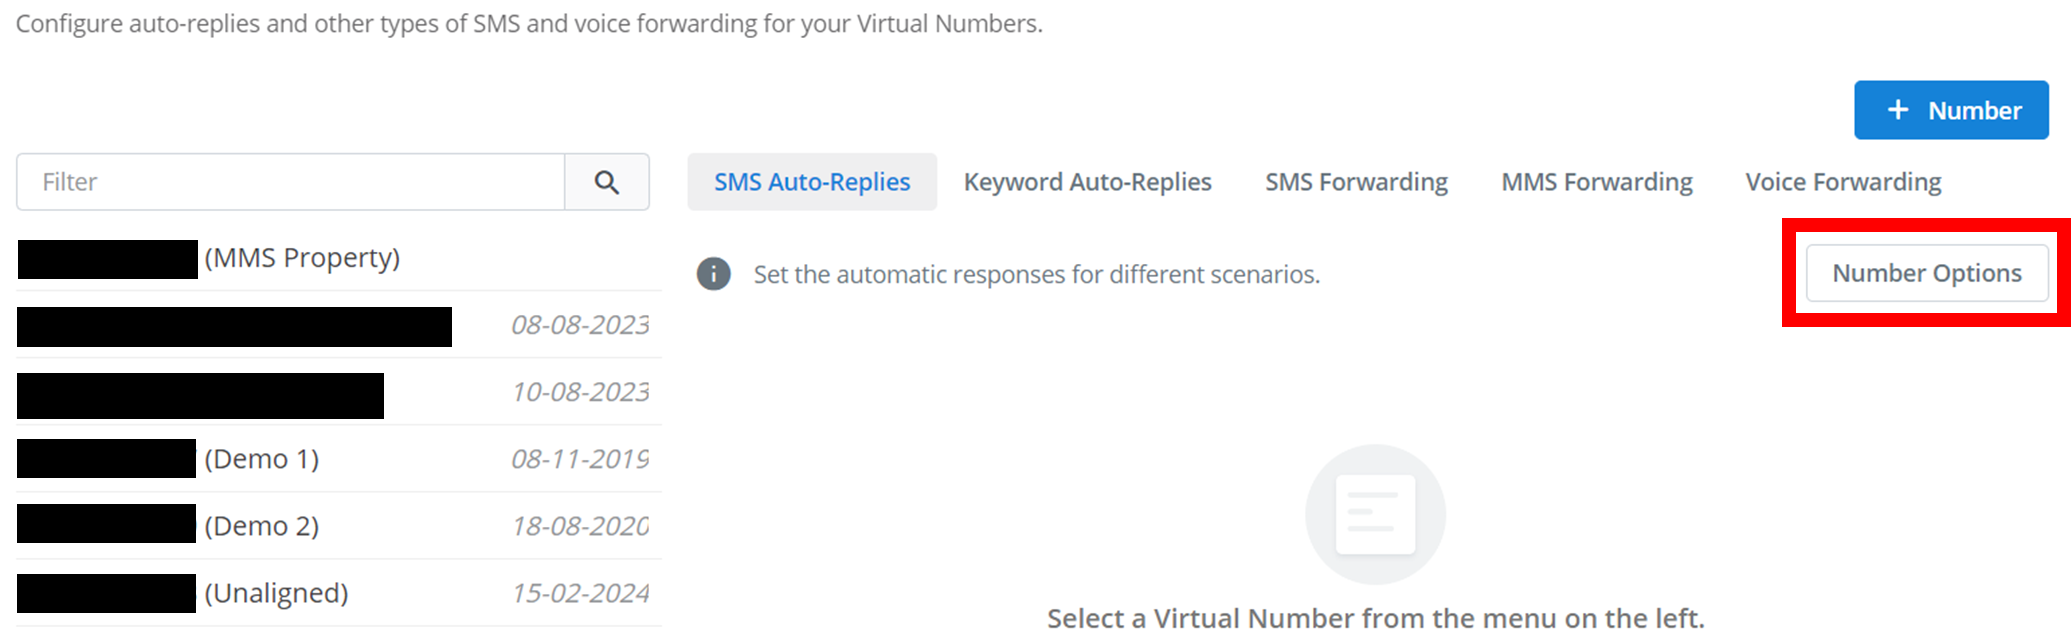
Number Options
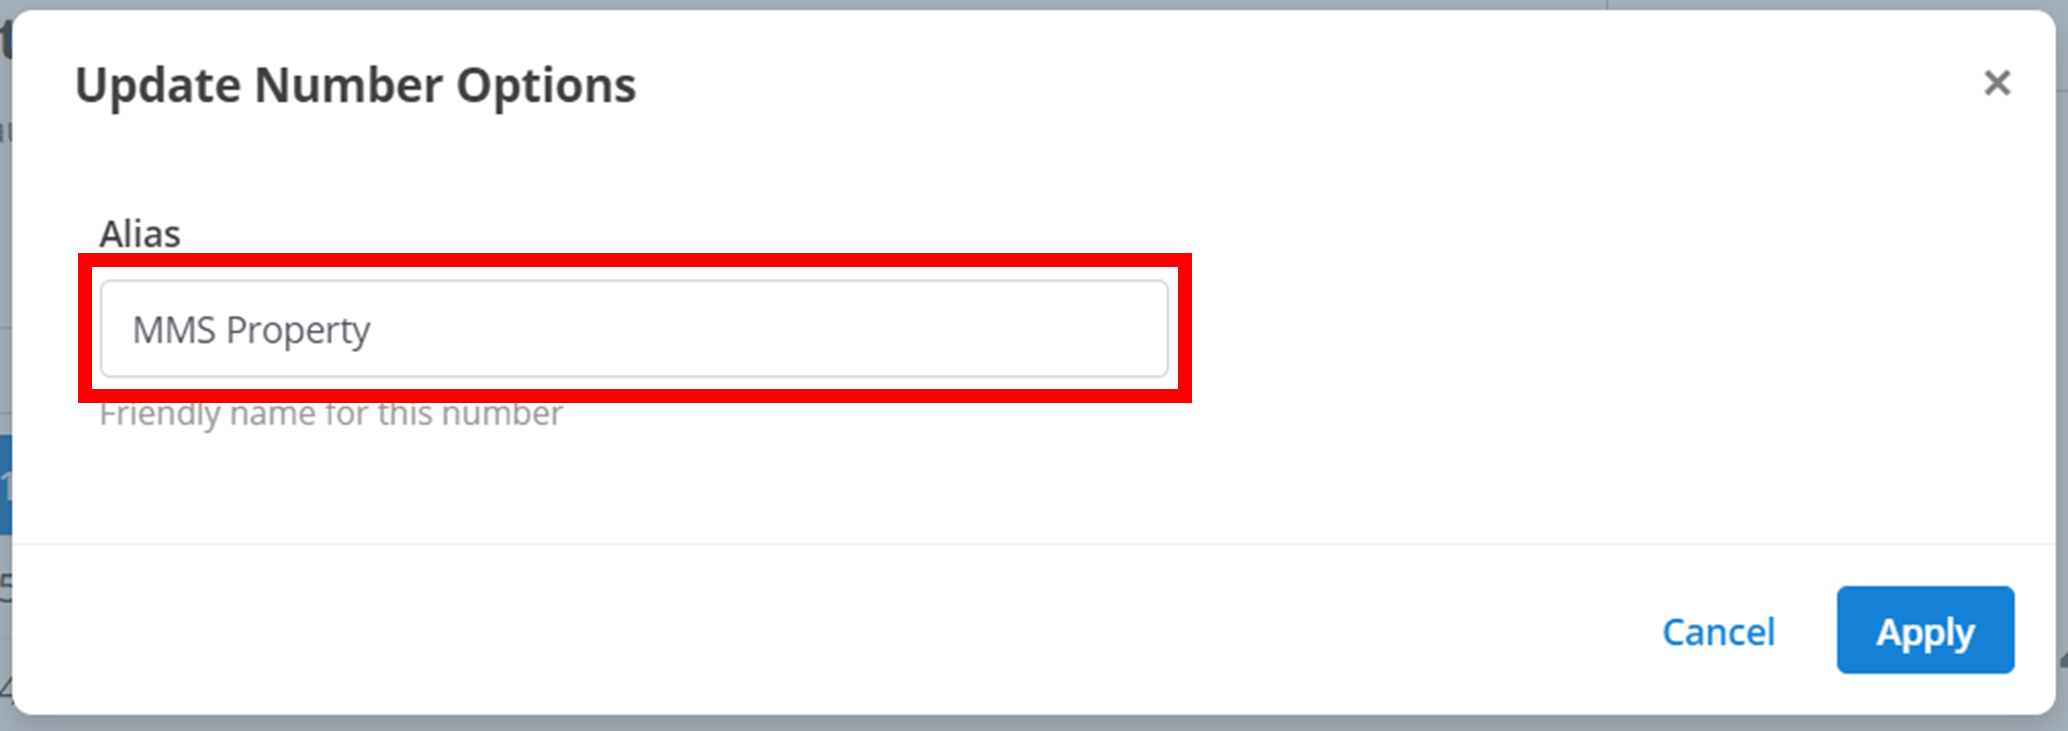
The 'Number Options' can be used to create and edit an 'alias' for your VNs. This alias is the name of the VN and can be used to help identify certain VNs in your workspace. The alias is the string of text that appears in parentheses after the VNs phone number. For example, in "61000000000 (Demo Number)", the alias is "Demo Number".
To create and edit this alias:
- Click on the
Number Optionsbutton outlined below.
- Select a VN to create/edit the alias of.
- Click on the pencil icon outlined below.

- Enter the new desired Alias in the text box outlined below, and then click
Apply.
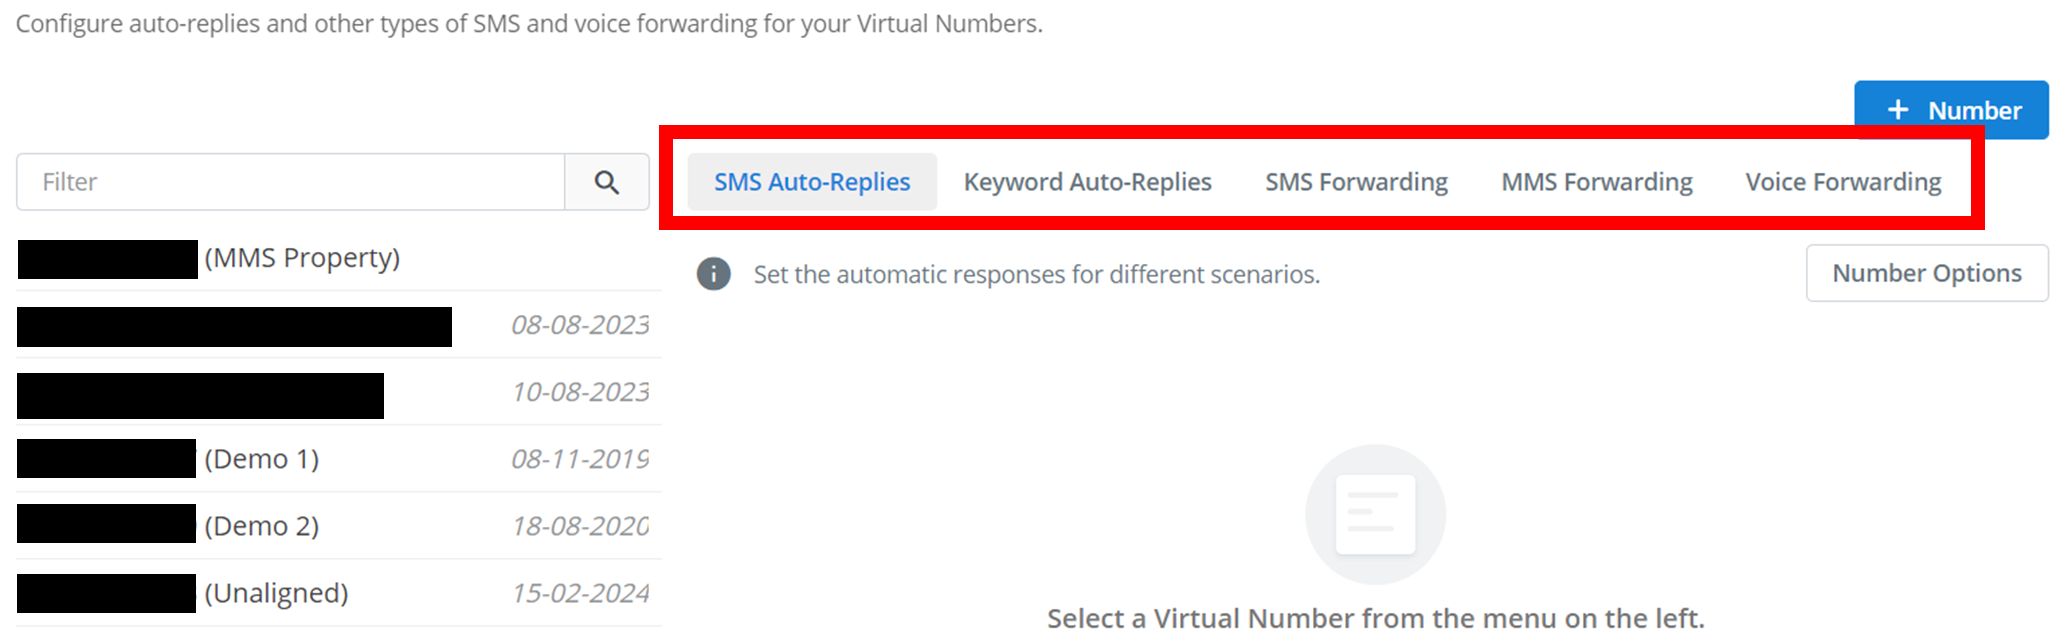
Feature Configuration
The next step in making your VNs fully functioning throughout your workspace is to configure them for different features. All of the features are layed out into different tabs outlined below. To configure a set of VNs for a certain feature:
- Select the feature in the tabs outlined below.
- Select all the VNs you would like to configure for this feature. Click on a VN in the menu to select it. Click it again to unselect it. You can select multiple VNs at once. A selected VN will be highlighted blue.
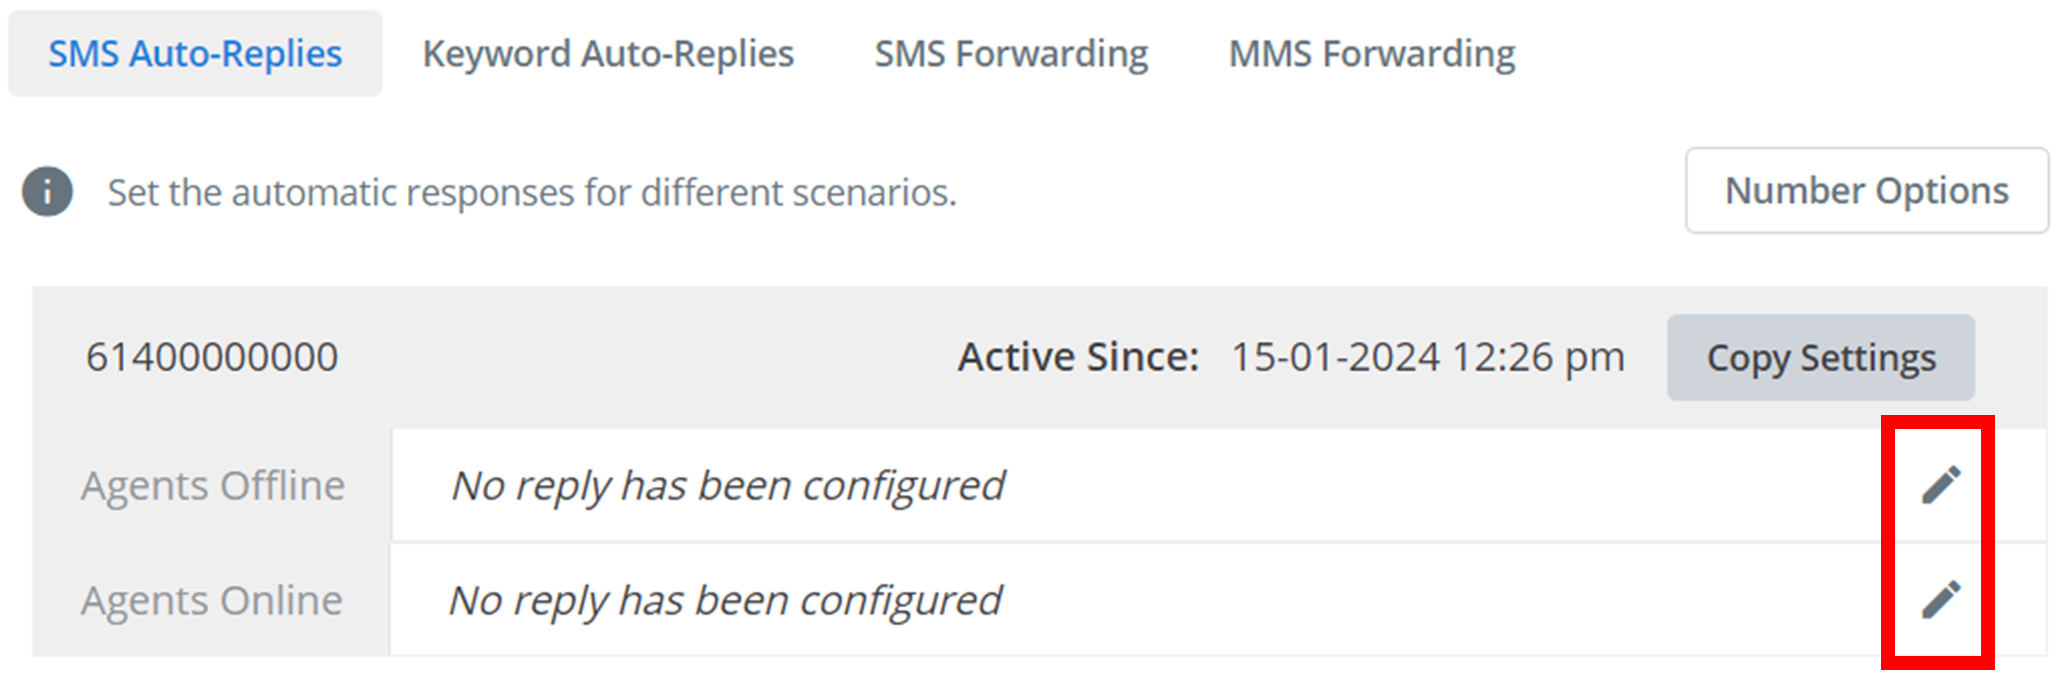
SMS Auto-Replies
When someone responds to a VN, Message2Give can intercept these responses. Then, you can configure your VN to automatically respond based on certain conditions. For SMS messaging, the only condition you can detect is if an agent is online or not. When a condition is met, the auto reply is activated and sent.
For example, you can configure an automated reply so that when users contact a VN and there are no agents currently online, the VN will say "Sorry but no agents are currently available for contact. Agents are online from 9am-5pm on weekdays." A similar concept can apply for if an agent is online.
To add or edit an automated reply for either of these conditions, click the pencil icon outlined below next to the desired condition (Agents Offline, Agents Online).
Clicking on this button will open the below menu:
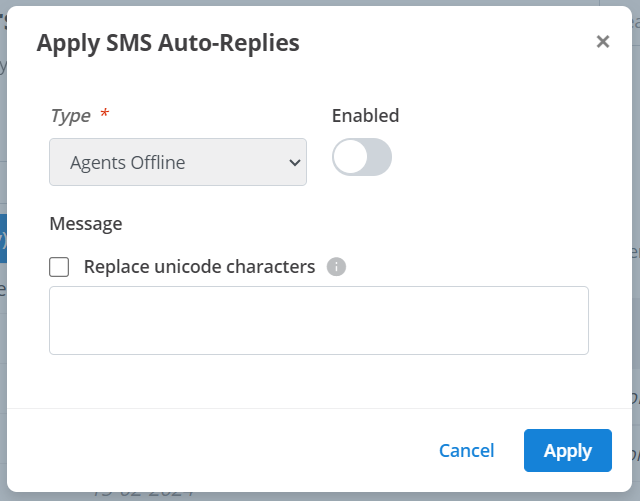
The 'Type' will change depending on the automated reply condition you selected. Turning on the 'Enabled' button will enable the functionality of this automated reply on the VN. The 'Message' is the SMS you want the VN to send as the automated reply, eg "Sorry but no agents are currently available for contact. Agents are online from 9am-5pm on weekdays." See SMS Message Type for more information about SMS messaging. To apply this automatic reply to the VN, click Apply.
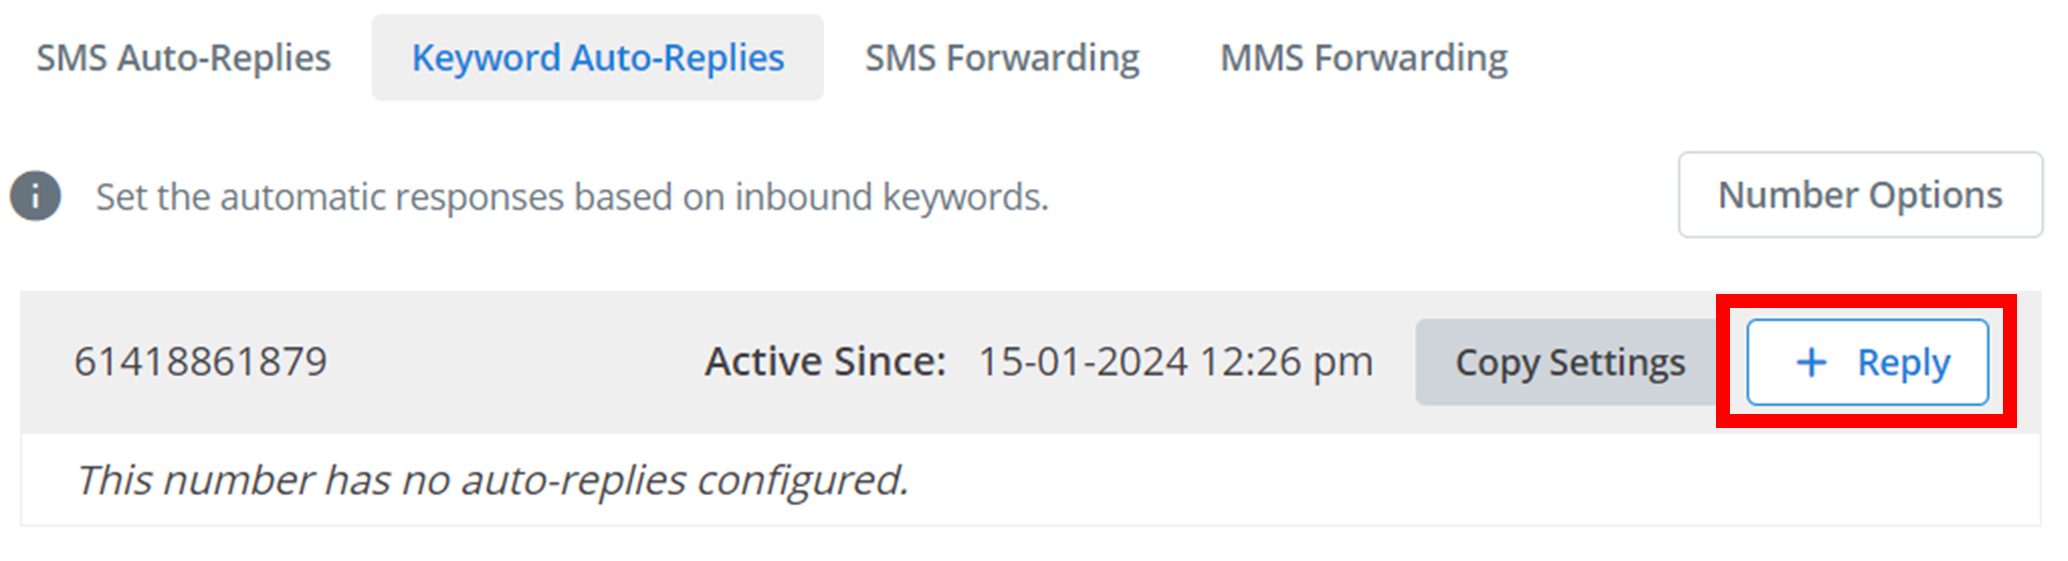
Keyword Auto-Replies
A keyword auto reply serves a similar purpose as an SMS Auto Reply. However, it instead detects for certain words or phrases in a customer's message. If this 'keyword' phrase is detected, then the automated reply is activated and sent to the customer.
To add a new keyword auto reply to your VN, click the + Reply button outlined below.
Clicking on this button will open the below menu:
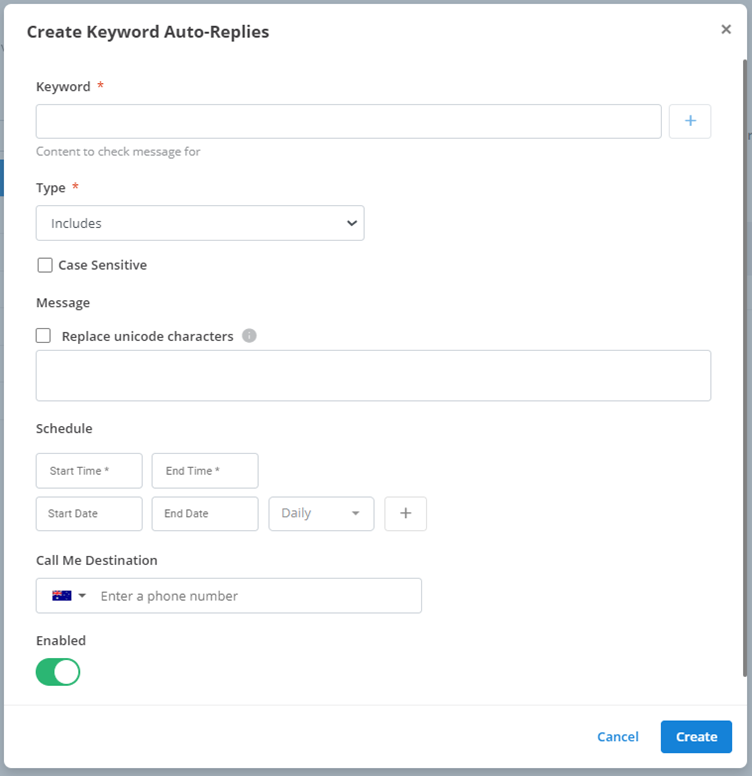
Use each section to customise and configure your keyword and the reply:
- Keyword: these are the word(s) or phrase(s) you are trying to detect. For example, "no", "n", "y", "yes", "maybe not". To add a keyword reply, click the
+button on the right of the text box. You can add multiple keywords here. To delete a keyword from this list, click the 'X' on the right of its name. The VN will then compare these keywords to the actual message it receives. If the message meets the correct conditions configured here, then the auto reply is activated and sent. - Type: this is how a message to the VN is compared to the keyword.
- Equals: the message only includes the keyword.
- Includes: the keyword appears somewhere in the message
- Begins with: the keyword appears at the start of the mess.age.
- Ends with: the keyword appears at the end of the message.
- Not equal: the keyword does not appear somewhere in the message.
- Less than: the value of the message is less than the value of the keyword.
- Greater than: the value of the message is greater than the value of the keyword.
- Case Senstiive: if this is enabled, then the comparison between the message to the VN and the keyword is case sensitive. This means a capital letter is not equivalent to its lower-case counterpart. If this is disabled, the capitalisation of letters is ignored.
- Message: when the condition is met, this is the SMS the VN will send as an automated reply. See SMS Message Type for more information about SMS messaging.
- Schedule: the keyword reply will only be detected within this schedule. See Schedule for how the schedule works. The schedule is also optional. No schedule specified means the keyword reply will always work (Note: the schedule documentation is for a campaign. Where it talks about the running times of the campaign, replace it with the active times for the keyword reply).
- Call Me: see further documentation for an explanation (Note: this documentation is for an SMS campaign. Where it talks about a campaign-recipient, replace it with the customer that has sent a message to the VN).
- Enabled: this will enable/disable the functionality of the keyword auto reply for the VN.
Finally, to add this keyword auto reply to the VN, click Create.
Once you have created a keyword reply, it will appear in the below menu. To edit a keyword reply, click the pencil icon. To delete a keyword reply, click the trash icon.

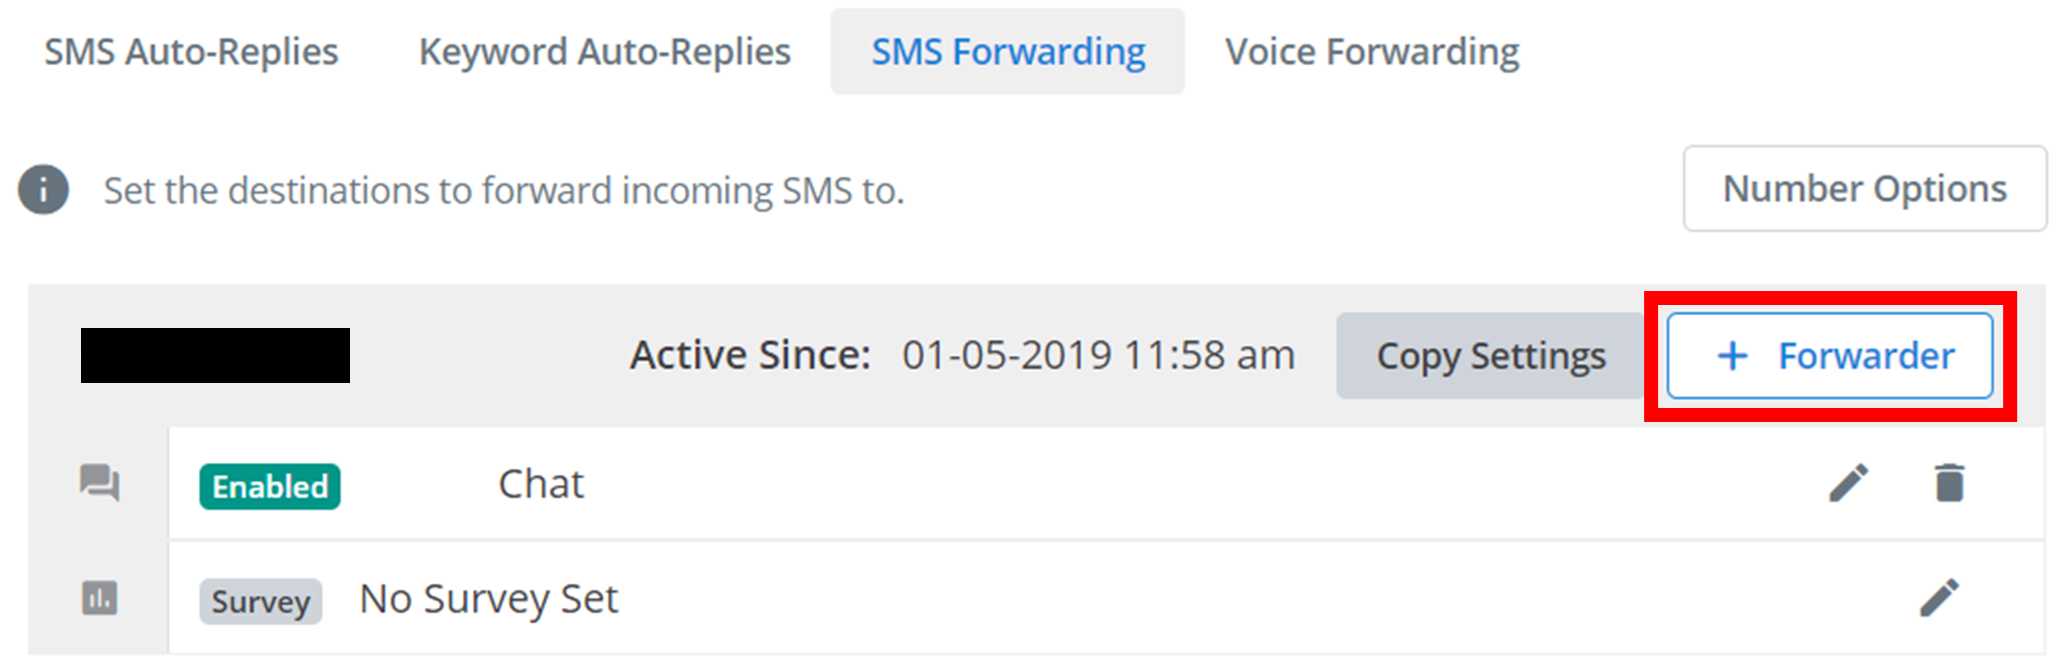
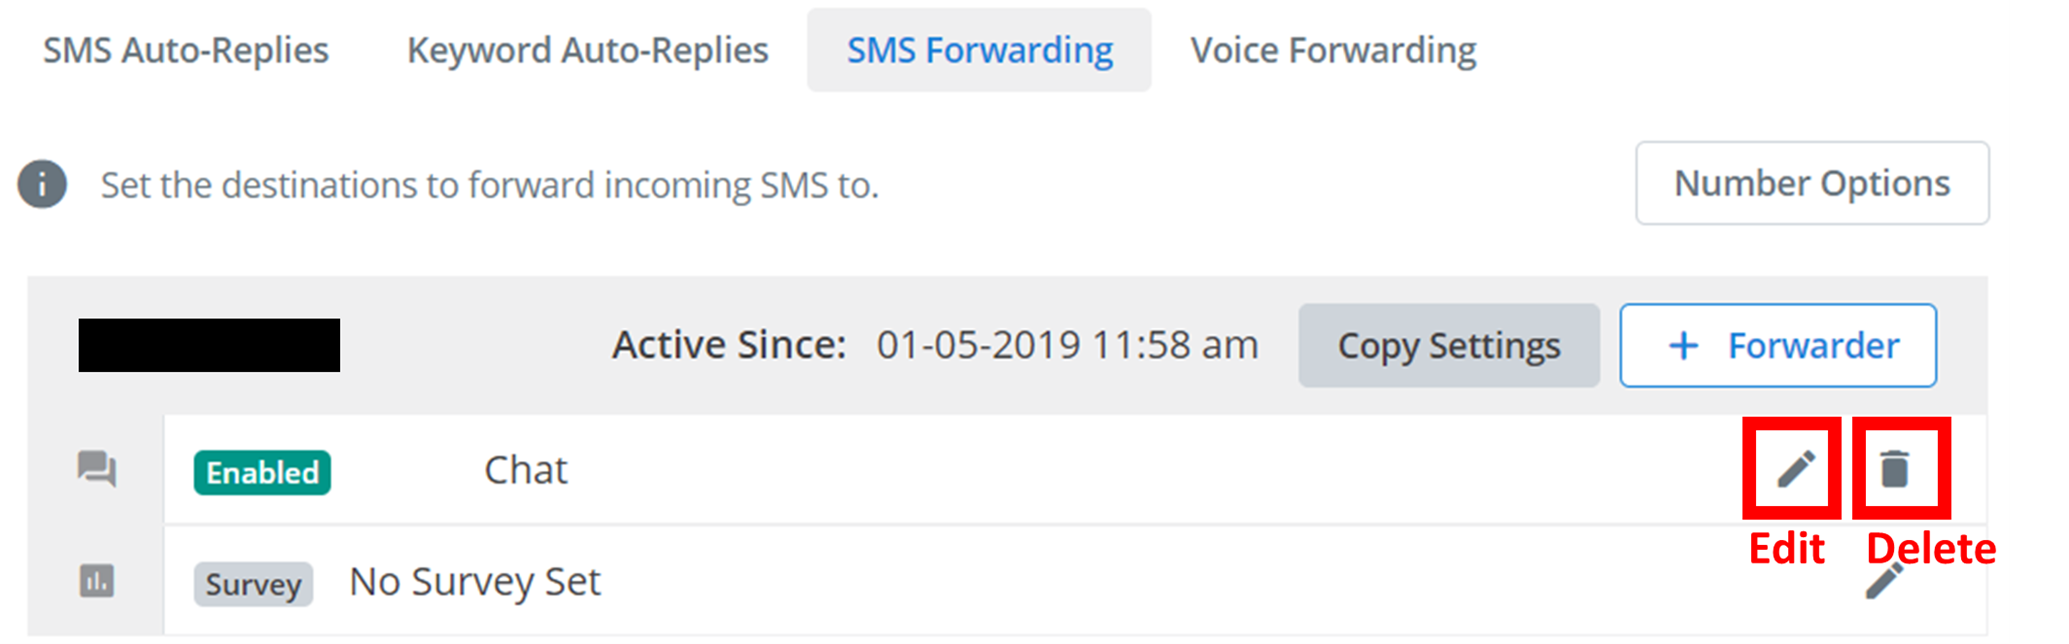
SMS Forwarding
When a VN receives a message, you can choose to forward this message to another location. For example, messages received by your sales VN can be sent to an salesperson's email address. Alternately, you could send them to an API endpoint and collect them in a database.
To create a new forwarding destination, click the + Forwarder button outlined below.
Clicking on this button will open the below menu:
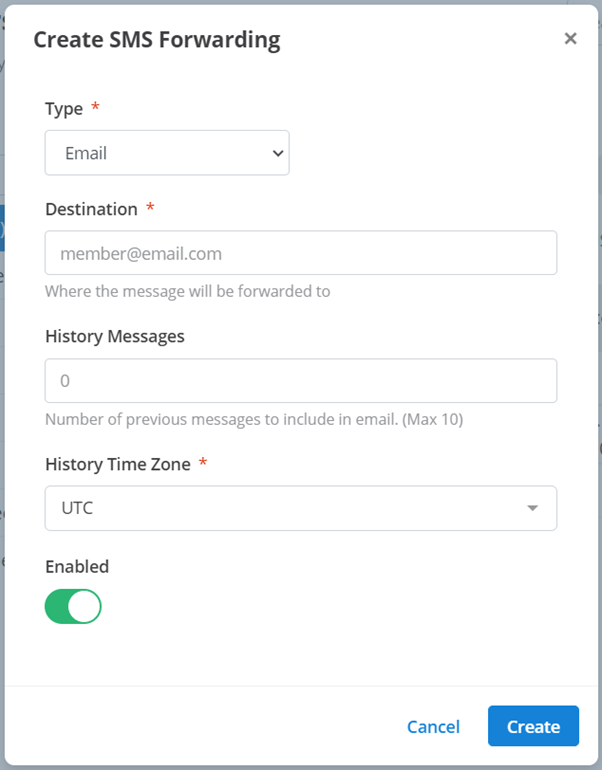
There are three types of locations you can forward a message to: Email, HTTP (API endpoint), SMS, and Chat. The first step in configuring the message forwarding is selecting one of these three options in the 'Type' drop-down menu. Each one of these forwarding types will have different customisations and configurations.
The configuration options will be as seen in the above image:
- Destination: the email address you are forwarding the message to. Eg 'abc123@example.com'
- History Messages (Optional): the forwarded message can include a list of previous messages sent to the VN. This is the number of previous messages that will be sent to the email.
- History Messages: the message history includes the time each messages was sent. This is the timezone you want those send times to be displayed in.
- Enabled: this will enable/disable the functionality of this forwarding process.
HTTP
Below are the configuration options for the HTTP forwarding type:
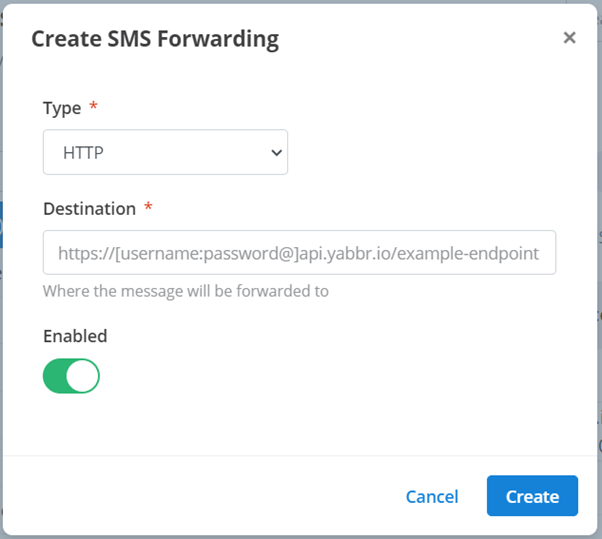
Use these options to configure the forwarding process:
- Destination: the location you are sending the forwarded message to. This is usually an API endpoint.
- Enabled: this will enable/disable the functionality of this forwarding process.
SMS
Below are the configuration options for the SMS forwarding type:
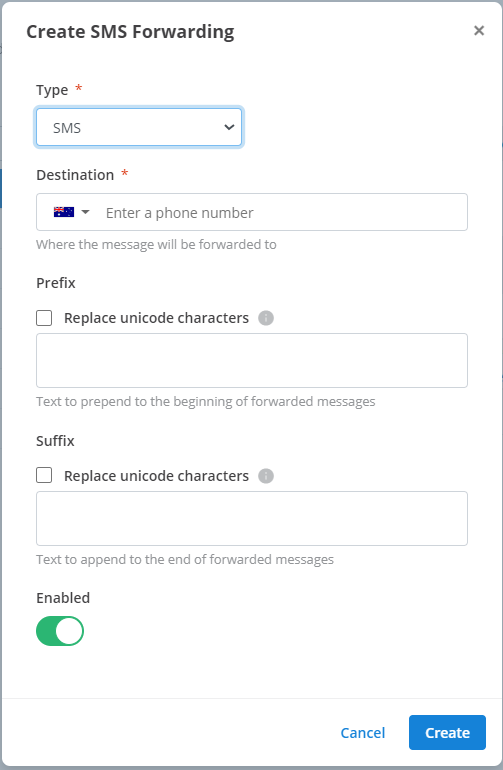
Use these options to configure the forwarding process:
- Destination: the number you are forwarding the message to. Eg 0400 000 000 Use the drop-down menu on the left of the text box to specify the region of the phone number.
- Prefix (Optional): the text that will appear before the forwarded message. See SMS Message Type for more information about SMS messaging.
- Suffix (Optional): the text that will appear after the forwarded message. See SMS Message Type for more information about SMS messaging.
- Enabled: this will enable/disable the functionality of this forwarding process.
Chat
No configuration is required for Chat. The message will be automatically forwarded to Chat.
Finalising
Finally, to add this forwarder to the VN, click Create.
Once you have created a forwarder, it will appear in the below menu. To edit a forwarder, click the pencil icon. To delete a keyword reply, click the trash icon.
MMS Forwarding
This process is identical to SMS Forwarding. See SMS Forwarding documentation for an explanation. This forwarding option is only available for MMS VNs. MMS Forwarding is only compatible with the 'HTTP' type.
Voice Forwarding
Similarly to SMS Forwarding, you can forward a phone call to a different phone number. This is called Voice Forwarding. This option is only available for VNs compatible with the 'Voice' message type.
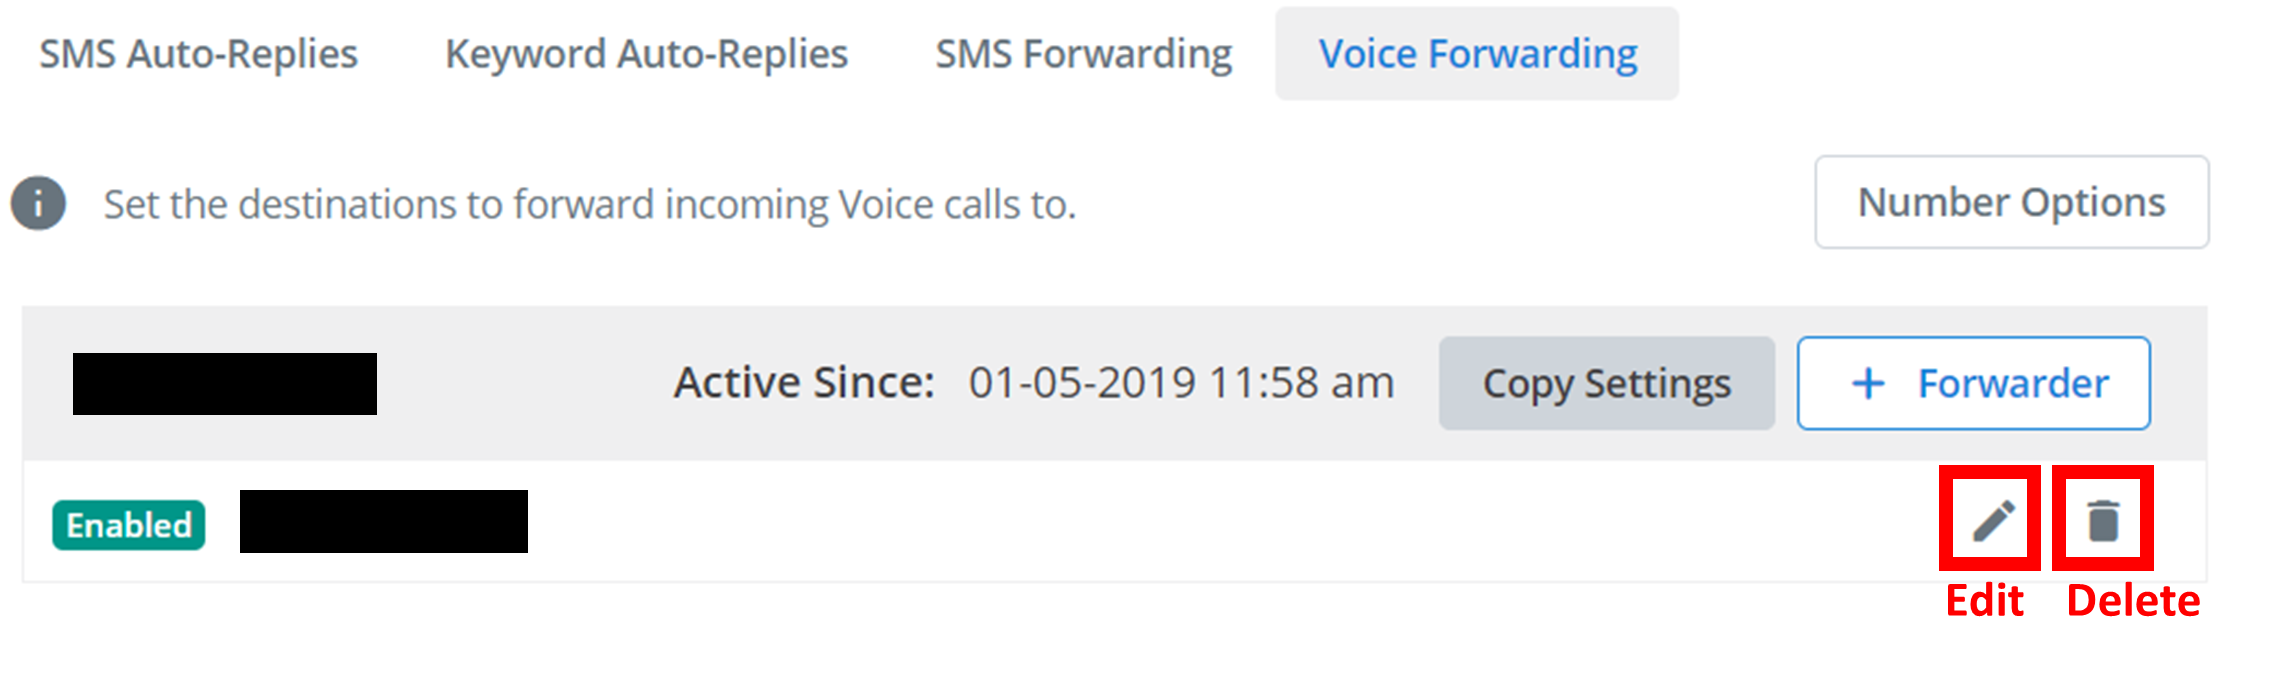
To create a new forwarding destination, click the + Forwarder button outlined below.

Clicking on this button will open the below menu:
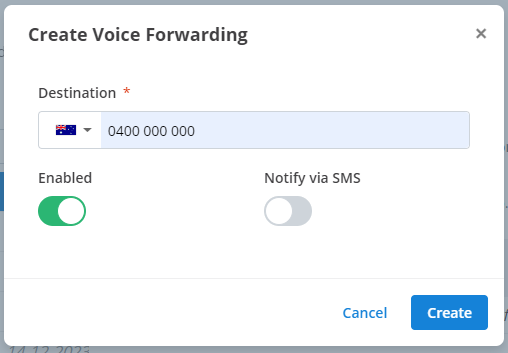
Use these options to configure the forwarding process:
- Destination: the phone number you are forwarding the call to. Eg 0400 000 000 Use the drop-down menu on the left of the text box to specify the region of the phone number.
- Enabled: this will enable/disable the functionality of this forwarding process.
- Notify Via SMS: enabling this will send an SMS to the forwarding destination to provide some context about the incoming forwarded call.
Finally, to add this forwarder to the VN, click Create.
Once you have created a forwarder, it will appear in the below menu. To edit a forwarder, click the pencil icon. To delete a keyword reply, click the trash icon.
Bulk Configuration
If you have selected multiple numbers for feature configuration, an extra option will appear. You can configure a feature for multiple numbers simultaneously by clicking the 'Add to X numbers' outlined below (sometimes this will be 'Edit X numbers').

Clicking on this button will open the relevant feature configuration menu. Configure the options you want to apply to all the selected VNs, and then click Apply or Create to apply the changes to all the selected numbers simultaneously.
Copy Settings
You can copy the settings/configurations on one VN to another. Every feature configuration will have a 'Copy Settings' button like the one outlined below.
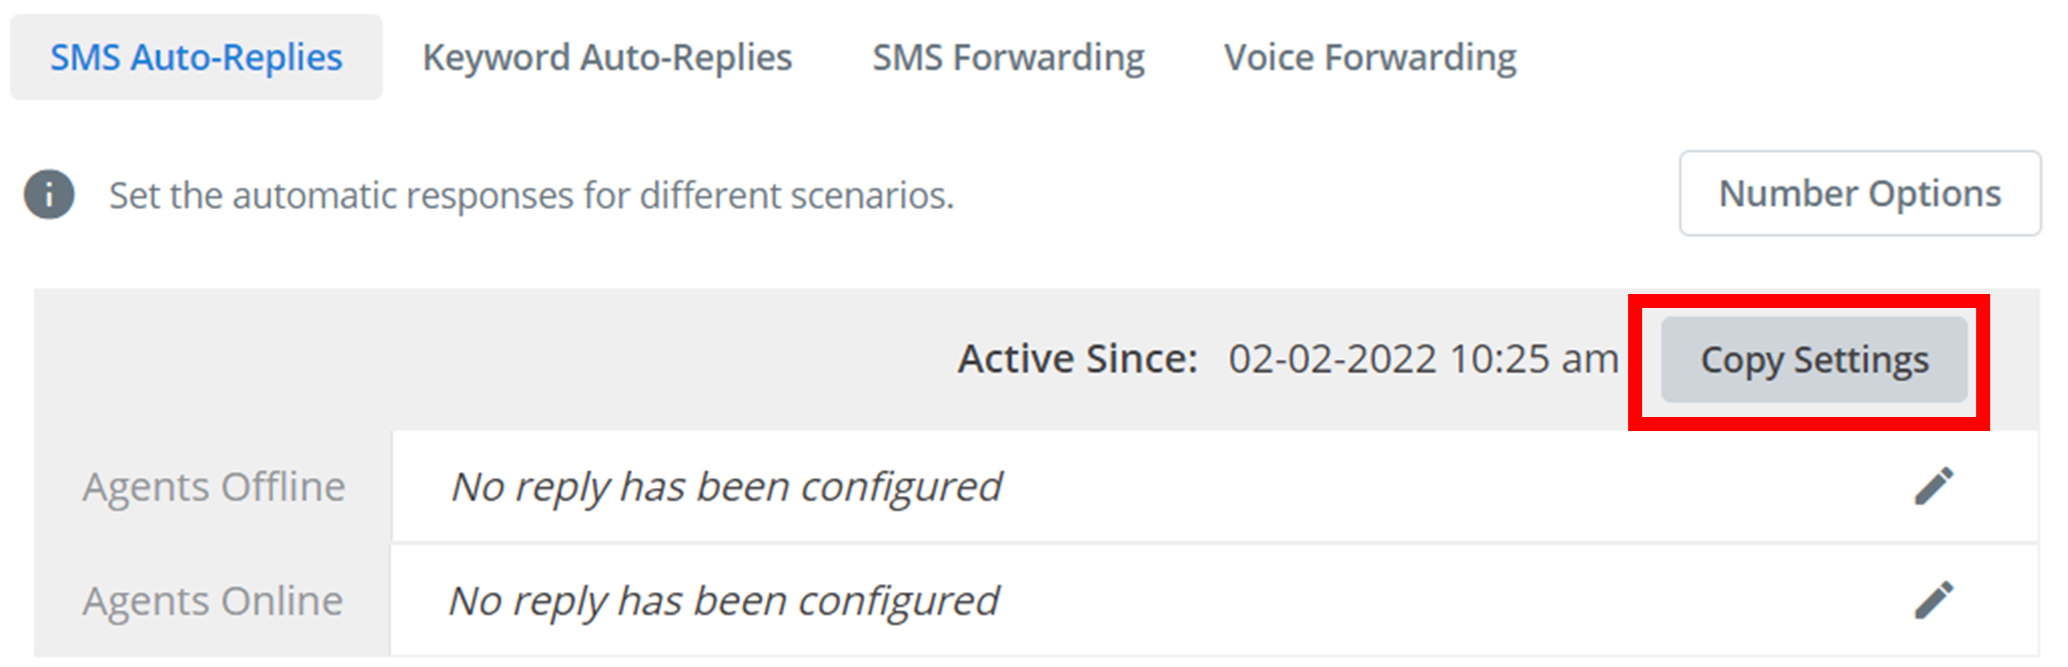
Clicking on this button will open the below menu:
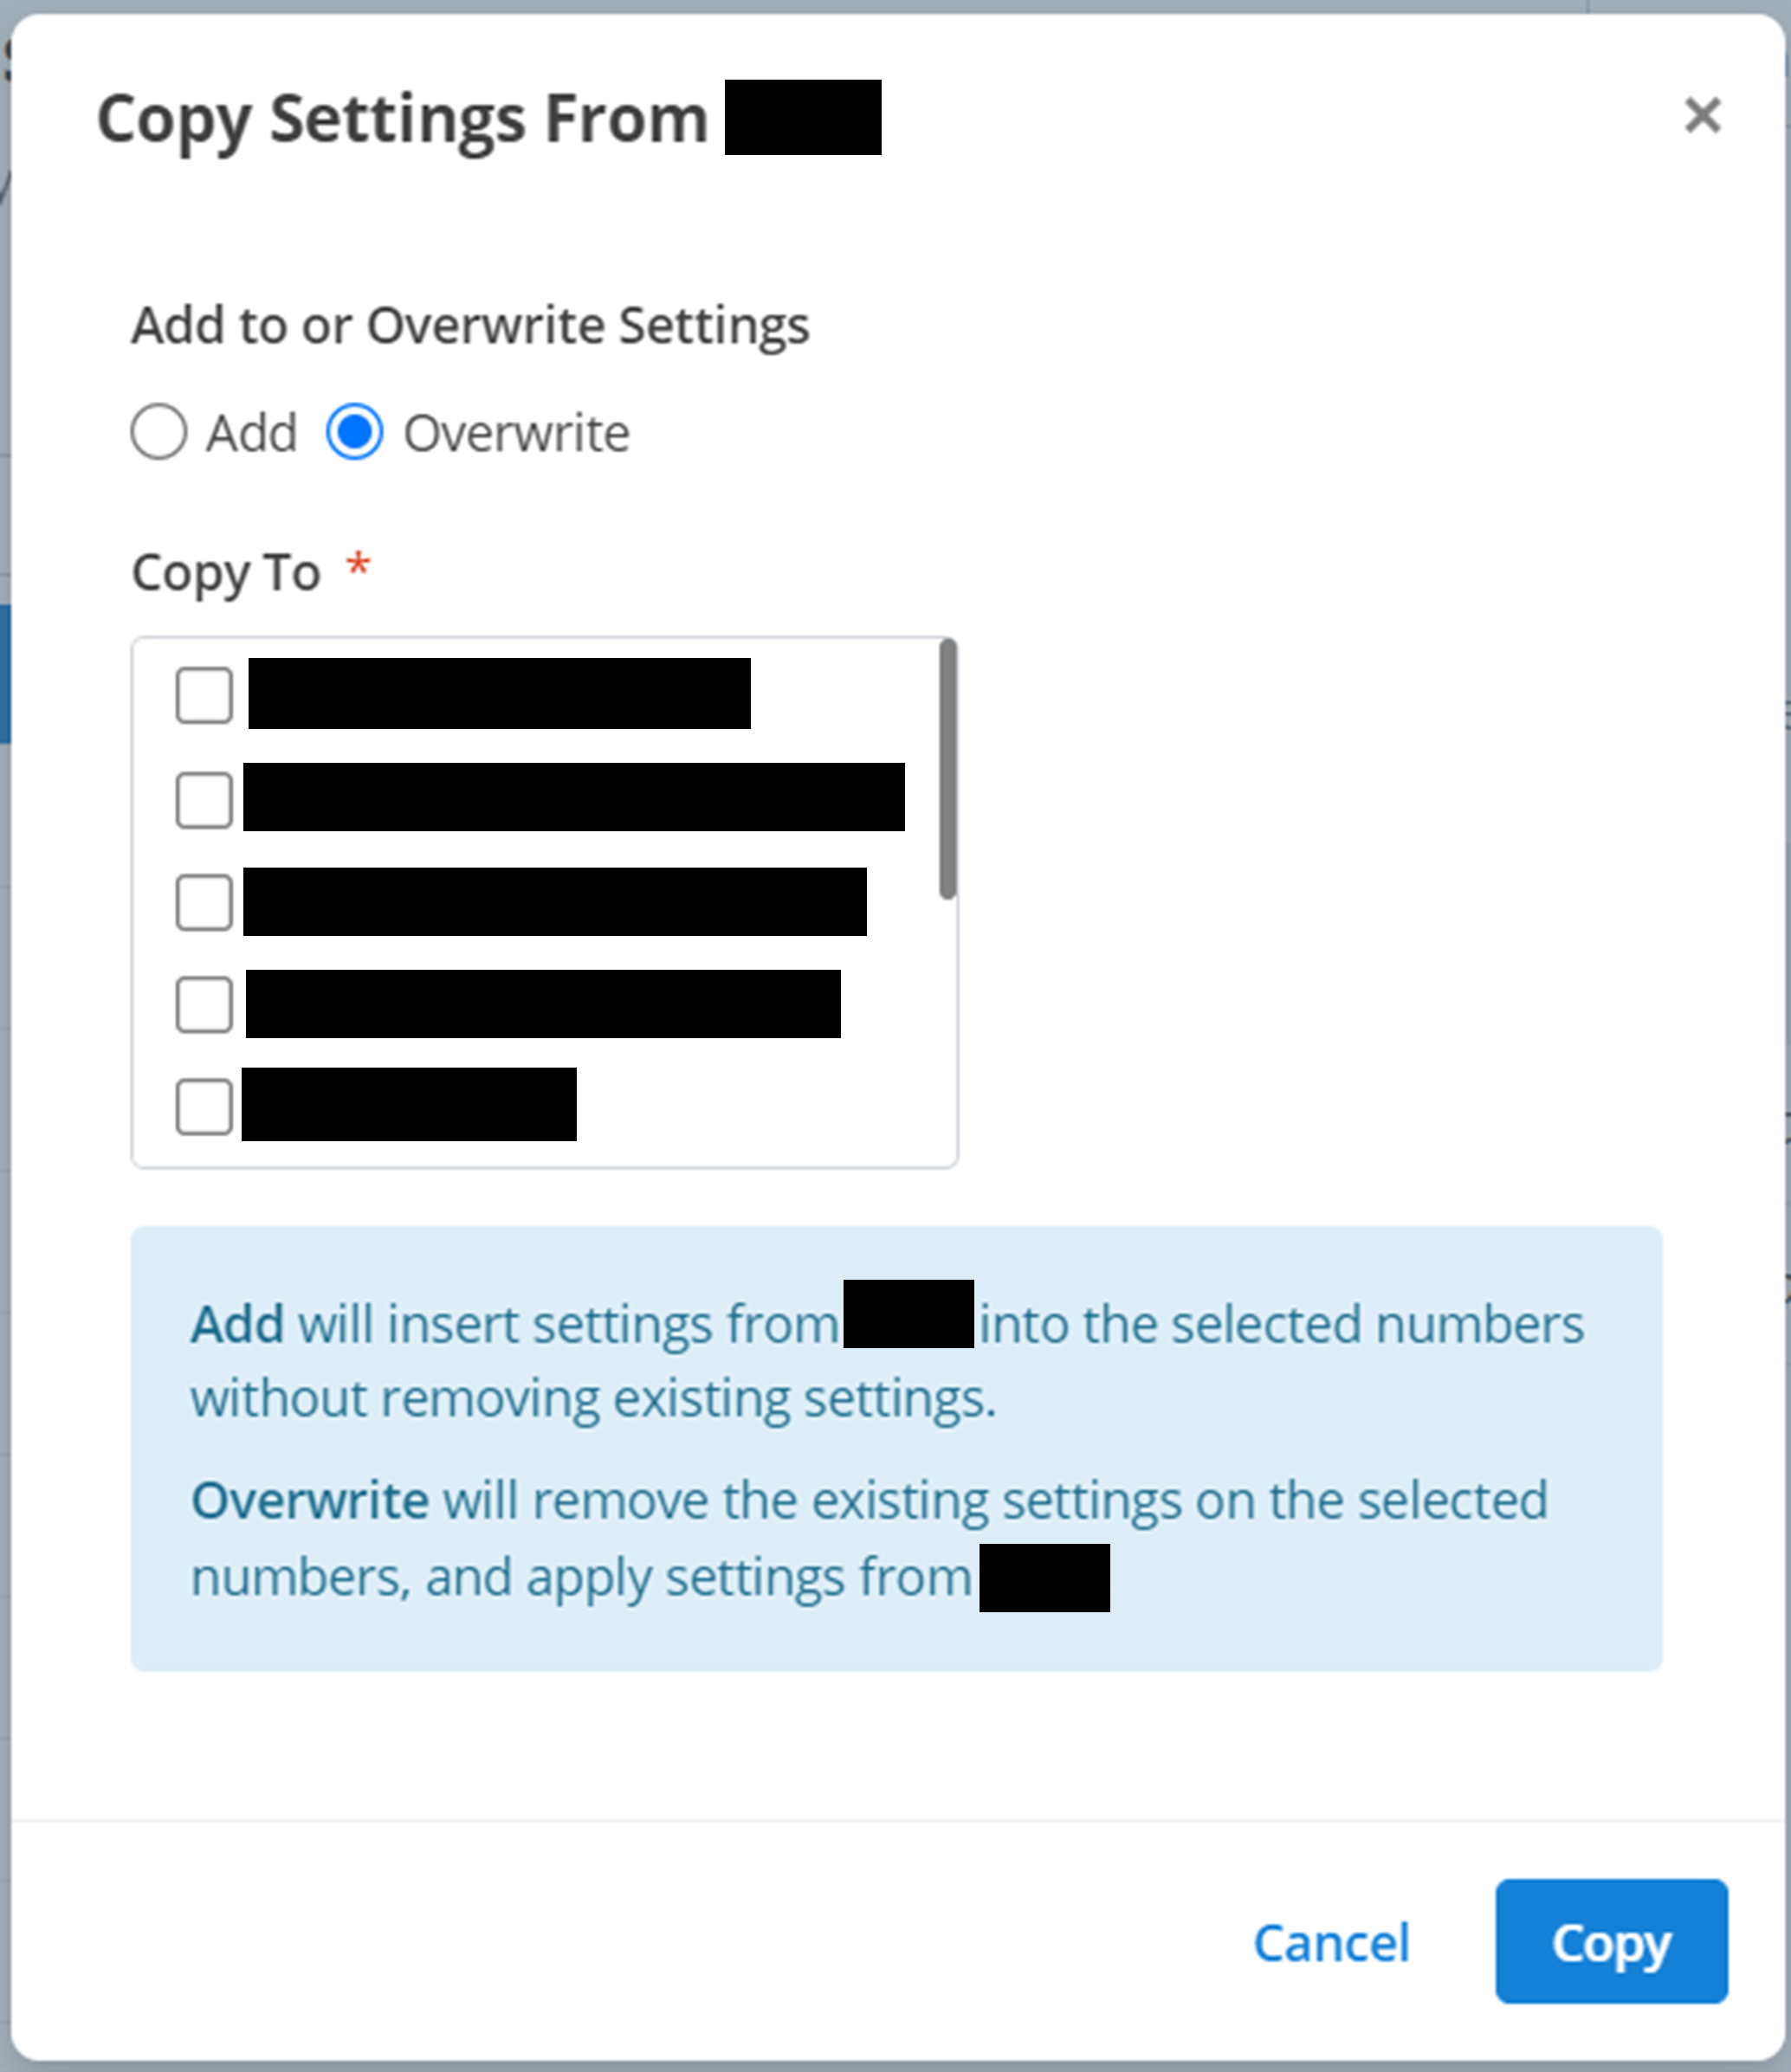
To copy settings from one VN to others you need to specify:
- Add to or Overwrite Settings: this is the type of copying you want to use. 'Add' will insert the settings on this VN into the selected VNs without deleting any pre-existing settings. 'Overwrite' will replace all the settings on the selected VNs with the settings on this VN (pre-existing settings on selected VNs will be deleted).
- Copy To: all the VNs you are copying the settings into.
Finally, to copy the settings over, click Copy.
How is this guide?