Core Concepts
Overview
A workflow is an automated set of tasks that are executed based on logic. A workflow is comprised of various 'steps'. Each step is a mini task that is executed. These steps are then sequenced together to automate a larger process. In general, a step has three phases:
- Data CollectionWrapper
- Evaluation of Data
- Execution of Actions Based on Evaluation
Each of these phases has instructions on how to execute them. These instructions are all encoded in JSON. Learn how to use the JSON editor here.
The first phase collects data using a fetch request or a file stream. The second phase evaluates data using a set of conditions. A condition is an expression of logic, usually comparing two values. They are essentially 'if' statements. Each of the conditions will have associated "actions". If the condition is found to be true, then its actions are executed. This is the third phase of the step. These actions may include: making a HTTPS request, returning some data to the API caller, or navigating to a new step.
Activation
A workflow is activated when a POST request is made to the workflow's start endpoint. The body of this request becomes the 'payload' for the first step in your workflow. The payload is a chunk of data that is passed between steps in a workflow. For example, Step 1 receives a payload from the POST request, processes this data, and then sends a new payload off to Step 2 to process. Learn more about this activation here.
Once it is activated, it creates a new 'instance' of the workflow. An instance is a specific iteration of a workflow. For example, one instance may receive some data that triggers output A, and another instance of the same workflow may receive some data that triggers output B. Each instance executes the same workflow, but they are unique iterations of it.
Each instance of the workflow is stored in the logs. These instances have their own ID (accessed via the logs or placeholders). You can store data within a specific instance so that it can only be accessed from within the same instance.
Execution
Once the workflow gets to the end of a step, it actually stops and goes into a temporary stasis. A new step can only be reached by using an execution key. Learn more about execution keys here.
Initialisation

Name Your Workflow
Clicking that button will open this menu:
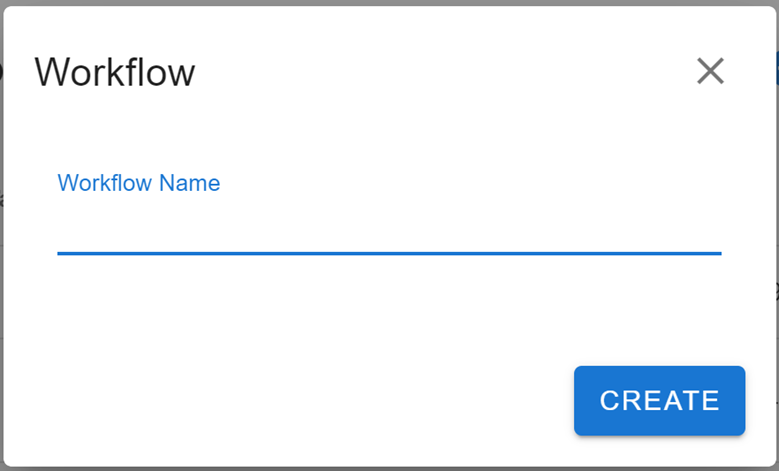
Give your new workflow a name under 'Workflow Name'. This will be used to help identify your workflow within your workspace. Finally, click Create to finalise the initialisation of your new workflow.
Configuration
JSON Editor
All of the logic in the workflows is encoded as JSON. To configure a piece of JSON logic in your workflow:
Edit the JSON.
Check that the formatting is correct by clicking the VALIDATE button in the bottom right.
Ensure the program says 'Valid JSON' in the bottom left. Otherwise, format your JSON correctly and validate until 'Valid JSON' appears.
Click UPDATE DRAFT to save the changes.
At later stages, you can also click REMOVE to delete the step from the workflow.
Info
Deleting a step from your workflow will move all subsequent steps to the unassigned tab.
Toolbar
Your workflow will start empty. It will look like this:

This menu is called the toolbar. Each button on this toolbar will help you start creating and customising your workflow. From top to bottom and left to right, these buttons are:
Pencil Icon
Edit the properties of the workflow. These properties are global within the workflow. These properties are:
- credentials: the credentials from the Credential Vault that are used in the workflow. Learn more about credentials here.
- logLevel: the level of detail in the logs. The possible values are:
off: no logs.error: only errors are logged.warn: errors and warnings are logged.light: errors, warnings, and elementary information is logged.moderate: errors, warnings, and some specific information about actions, groups, and steps.debug: logs everything.
- timezone: the default timezone the workflow will use for the date substitutor.
- initialStep: the ID of the first step that will be run when the workflow is activated. To see the ID of a step, click the
{...}button on the step and find theidproperty. - store: information stored manually within the workflow. It is an object, so data is stored in key-value pairs. Use this to store any constants you wish to reference throughout your workflow. To learn how to access this information, see placeholders.
- name: the title of your workflow.
- tags: a tag is an extra identifier you can place onto a workflow. Usually, it identifies the categories that the workflow belongs to. This property is an array. To add a tag, insert the tag as a string into the array. You can add multiple tags, but they must be distinct items in the array. An example tag property on a workflow may look like
"tag": ["Communications", "Bot", "Management"].
Caution
The debug logLevel can impact performance and could possibly log sensitive information.
Power Button
Runs the workflow with test data. Used for testing the workflow. Learn more here.
Upload Button
Upload steps into workflow. Delete the curly braces that are present by default. Steps must be uploaded in a single array. Under the {...} button at the top of individual steps, you will find the JSON object that represents one step. Insert this object as an item within the array you are uploading. The formatting should be identical to that found in the "Download" Button adjacent to this button. Your upload should look something like this:
[
  {
    step_1_goes_here
  },
  {
    step_2_goes_here
  }
]
These steps will automatically be sent to the "Unassigned" tab. You may also need to refresh to see them.
Download Button
An overview of the JSON of the entire workflow. It is an array where each item is the JSON of a single step. Formatted as above.
Add (+) Button
Adds a new step to the workflow. Learn more about steps here.
Save Icon
View all recent changes to the workflow. Click PUBLISH 1 CHANGES to save and publish these changes.
Caution
Any changes made to a workflow will be lost if you do not save them.
Active
All steps that are currently being used within the workflow.
Unassigned
All steps that are not currently being used within the workflow. New steps that have not been allocated a location in the workflow will appear here.
Logs
Records the details of every instance. Learn more about the logs here.
Question Mark
The workflow will try to determine where it is being triggered and activated from. It will display those locations here. If it cannot find any, it will display a question mark.
Lock Button
Toggles the security of the workflow. If it is 'unlocked', then the workflow can be activated without Message2Give API authentication. If it is 'locked', then a Message2Give API authentication is required to activate the workflow.
Steps and Workflow Logic
When you create a new step in your workflow, the following menu will appear.
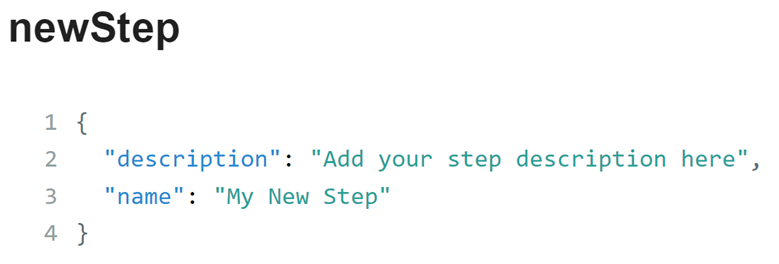
When creating a new step, you need to specify the 'description' and 'name' property:
- description: a short explanation of what the step is doing.
- name: the name of the step. This is used to identify different steps within your workflow.
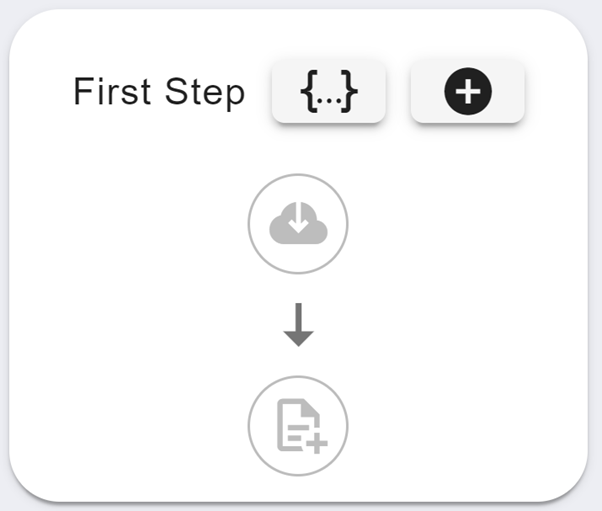
Your new step will appear below the toolbar and should look something like this:
Note
If you create a new step and it does not appear here, it may be stored underneath the 'Unassigned' tab in the toolbar.
The {...} button will display an overview of the JSON for the entire step (including the ID of the step). The cloud download button is for the fetch request in your step. The file add button is for the stream function in your step. The '+' button will add a new condition to your step.
Important
A step will usually follow the same format comprised of three stages. It will gather data (fetch and stream), evaluate the data (condition), and then make decisions based on the evaluation (actions).
Placeholders
A workflow automation revolves around the flow of data, API requests, and data evaluations. To maintain the flow of data, your properties can refer to 'placeholders'. These placeholders are indicated by double curly braces: {{example}}. Placeholders point to a value that is defined elsewhere. For example, the {{fetched.status}} placeholder points to the HTTP status code of a step's fetch request.
Important
When placeholders point to objects, to access the values of the object's properties, use dot notation (eg {{example.property_name}}).
These placeholders can point to two different types of data stores - static and dynamic. Static data stores do not change; they are predetermined. Dynamic data stores will change depending on the outcomes of steps in the workflow. There are two static data stores and seven dynamic data stores you can use in a workflow:
Static Data Stores
{{store}}: data added into the 'store' of the workflow. Read about the Edit Button in Configuration for more details about the store.{{CREDENTIAL}}: data stored in your Credential Vault. This is most commonly API keys or environment data.
Dynamic Data Stores
{{payload}}: data that has been passed to a step. The step may have received this data from a POST request or a previous step.{{fetched}}: data received from the response of the fetch request in a step. Formatted as{ status: xxx, data:{} }.{{fetched.status}}will return the HTTP status code of the request.{{fetched.data}}is the body of the data. Learn more about fetching here.{{http}}: data received from the response of a http request. Formatted as{ status: xxx, data:{} }. A HTTP request is slightly different from a fetched request because it is an action.{{memory}}: data stored within the current step. Data is usually stored here via file streaming.{{instance}}: data stored in the current instance. By default, this data store is empty. Data can be stored here using the "Save to Instance" action.{{execKeys}}: an execution key generated in a step. Learn more about execution keys here.{{instanceKey}}: the ID of the current instance of the workflow.
Important
{{payload}}, {{fetched}}, and {{memory}} are local to a step. They are cleared at the end of a step.
Example
Consider the example below. The "value1" property has value "{{fetched.status}}".
{
  "conditionCombiner": "&&",
  "group": null,
  "conditions": [
    {
      "value2": 200,
      "value1": "{{fetched.status}}",
      "operator": "=="
    }
  ],
  "name": ""
}
If the HTTP status code of the fetch request was 200, then the workflow will evaluate this JSON as:
{
  "conditionCombiner": "&&",
  "group": null,
  "conditions": [
    {
      "value2": 200,
      "value1": 200,
      "operator": "=="
    }
  ],
  "name": ""
}
Undefined Placeholders
If the value of a placeholder cannot be found, it will return the placeholder name as a string. However, this will also prevent the JSON from being evaluated. To override this failsafe and evaluate the JSON anyways, add the “permitUndefinedExecution”: true property to the JSON.
Note
The payload for the first step of a workflow is the body of the POST request to the workflow.
Other Substitutions
While placeholders are subtitutes for data stores, a workflow can also have subsitutes for maths, random values, and dates.
Math Expression
A math expression takes the form M{maths_goes_here}. For example, the expression M{2 * (1 + 3)} would be a subtitute for 8. This substitution supports the standard maths operations: +, -, *, /, **, %.
Random Integer
A random integer can be expressed as R{lower_bound,upper_bound}. In the workflow, this expression will be evaluated as a random integer from the lower bound to the upper bound. If not given, the default lower bound is 0, and the default upper bound is 100.
Random Boolean
A random boolean expression will be randomly evaluated as either true or false. The chance of it being true or false can be also be defined. The full expression for a random boolean is RB{chance_of_true} where chance_of_true is the likelihood on a scale from 0 to 1 that the expression is evaluated as true. The complement of that chance is the chance the expression is evaluated as false.
Date
In general, D{} is a substitute for a date value. The default value is an ISO string of the current time. The default timezone used is the timezone property of the workflow (to see this timezone go to the workflow header and click on the pencil icon). You can customise the date value by adding 'rules'. A rule goes inside the curly braces. It follows the format "rule_name=rule_value". Multiple rules are joined using '^'.
The rules are:
- date: the actual time you want to reference in ISO format.
- rule: modifies the date by a set amount. It takes three values in the form "rule=operator,amount,time_unit". The operator is how the rule is changing the date (add/subtract). Then, the rule changes the date by the amount of time units. For example, "rule=1,add,hour" will add one hour to the date.
- timezone: the timezone you want the date to appear in. It should be formatted as "Country/City".
- format: the display format for the date. For example, "DD/MM/YYYY" will convert ISO format "2024-09-06T18:42:25" into "06/09/2024".
Here is an example of all the rules in action:
D{date={{instance.instanceCreated}}^rule=add,1,day^timezone=Australia/Brisbane^format=YYYYMMDD}
This will be evaluated as the time when the workflow started running in Brisbane, plus a day, in the format YYYYMMDD.
Tip
You can combine forms of subtitution. For example, you could perform mathematical operations on a placeholder value: M{{{payload.price}} * 0.95}.
Fetch
This function will make an API request. The response will be stored in the form { status: xxx, data:{} } where the data object is the body of the API response. This data store can be referenced elsewhere in the step using the {{fetched}} placeholder.
When creating a new fetch request, the following JSON will appear:
{
  "type": "https",
  "verb": "POST",
  "url": "",
  "headers": {
    "example-api-key": "apiKeyValue"
  },
  "body": {
    "examplePropertyOne": "valueOne",
    "examplePropertyTwo": "propertyTwo"
  },
  "nextStep": []
}
Explanations of the above properties:
- type: the type of protocol to use for the request.
- verb: the HTTP request method (eg GET, POST, FETCH).
- url: the API endpoint to send the request to.
- headers: the headers of your API request.
- body: the body of your API request.
- nextStep: learn more here.
Any other necessary properties follow standard API request standards.
Stream
Extracting Data
The file streaming function will extract data from a file to use within a step. The only file types currently supported are 'txt' and 'csv'. However, note that a CSV file is just a TXT file where each "column" is separated by a comma (","), and each "row" is separated by a new line (\n).
A streamed file is read line by line. Every time a new line is read, it overwrites the contents of {{memory.record}}. Thus, actions cannot be executed on an entire file at once. Actions must be executed on the file line by line. This process involves some looping logic. Learn more in this section.
{{memory.record}} is an array. By default, the whole line is stored as a single string in this array. You can break up this string into different elements within the array by using a delimiter. See below.
When you click to create a stream function in a step, the following JSON will appear:
{
  "skipLines": 1,
  "url": "{{fetched.data.file.url}}",
  "fileType": "csv",
  "delimiter": ",",
  "includeEmpty": false,
  "headerIndex": 0
}
Explanations of the above properties:
- skipLines: the program will skip this many lines before it starts reading the file. For example
"skipLines": 1will start reading the file on the second line. - url: the destination of the file.
- fileType: the type of file you are using.
- delimiter: the character that splits the line into different elements. Eg
"delimiter": ","would store the line"I bought cookies, milk, and chocolate."as["I bought cookies", " milk", " and chocolate."]. Note how","is not included in any of the strings. - includeEmpty: whether to include empty lines when recording data from the file.
truewill include empty lines,falsewill ignore empty lines. Empty cells in a CSV file will never be ignored. - headerIndex: (optional for CSV) the index of the row that contains the file's column titles. This will allow you to refer to column titles instead of column indexes when retrieving data.
Info
Since CSV file columns are separated by a "," when read, using "," as a delimiter is highly recommended. This will separate a row into each column.
Accessing Data
As previously mentioned, a line of the file is stored in {{memory.record}}. To access a specific item in this array, reference the index of the item. For example, {{memory.record.2}} would return the third item in the array. In the case of a CSV file, this would be the third column in the row.
For CSV files, if you specify the "headerIndex" property, then you can reference columns using their column title. For example, to access the value in the "email" column, you would reference {{memory.record.email}}.
Example Reading
Consider the following example CSV file:
First Name,Last Name,Email
John,Smith,abc123@example.com
Jane,Doe,def456@example.com
Once the file has been fully streamed, it will return {{memory.record}} as:
["Jane", "Doe", "def456@example.com"]To just extract the email "def456@example.com" from the data, you can use {{memory.record.2}}. Alternately, by including "headerIndex": 0 in the file stream JSON, you can use {{memory.record.Email}} to extract the desired data.
Important
Usually, a file is fully streamed first, and then actions are executed. Since each new line overwrites {{memory.record}}, accessing {{memory.record}} in the actions will usually only return the last line of hthe file. To access every line, extra looping logic is required.
Using Every Line
By default, a file stream will read every line, and then execute conditions and actions. This makes {{memory.record}} always the last line of the file. With some extra configuration, the conditions and actions can be evaluated every time a new line is read. This gives the step a looping nature.
The Save to Instance action has this property by default. However, the Return to Caller and Execute Step actions require you to opt in. To opt in, give the action the "stream": true property.
Info
- the step will loop back to the start of the file stream. This means the step will go new line, conditions, actions, new line, conditions, actions, new line...
- once the file has been fully streamed (the loop is complete), the
{{memory.default.allRead}}property becomestrue. Use this in a condition to execute an action once at the end of the loop. - other types of actions are currently unsupported for this looping
Consider the following example - you have a single step with a file stream and an Execute Step action. The Execute Step action is as follows:
{
  "body":
  {
    "value": "{{memory.record}}"
  },
  "stream": true
}
When the step is run, it will send every line in the streamed file individually as the payload for the next step. Thus, the next step will be run once for every line in the streamed file, each time with a new payload. If there were 5 lines in the file, then the next step would run 5 times.
Tip
The workflow will only run one step at a time. Thus, it will actually "queue" several iterations of the step to run once the current step has finished executing. In the above example, the workflow would queue five executions of the next step, each with their own payload.
To store a CSV file within Message2Give, use the Stream To action.
Conditions
Conditions compare sets of data, and executes different actions depending on the outcome of that comparison. For example, it may check if a certain data value from an API request is equal to a certain target value.
Upon creating a new condition, you will be met with the following JSON:
{
  "conditionCombiner": "&&",
  "group": null,
  "conditions": [
    {
      "value2": 200,
      "value1": "{{example.property}}",
      "operator": "=="
    }
  ],
  "name": ""
}
Explanations of the above properties:
- conditionCombiner: if you have multiple conditions, this is the logical operator used to combine them into one condition. "&&" is an AND logical operator (all conditions must be met), and "||" is an OR logical operator (at least one condition must be met).
- group: the group that the condition belongs to. Groups are CollectionWrappers of conditions. Two conditions belong to the same group if their
"group"value is the same. Conditions are evaluated from left to right in a step. If multiple conditions are satisfied but belong to the same group, only the first satisfied condition will be run. In other words, conditions in the same group act as a chain ofelse ifstatements. - conditions: the data comparisons/conditions. This is an array of objects. Each condition is a separate object. To add a new condition, add a new object within this array. All objects must be separated by commas.
- value2: one value being compared.
- value1: another value being compared.
- operator: the comparison operator between value1 and value2 (see here for a list of all available operators and their function)
- modifiers: optionally add some modifiers onto the
"value1"and"value2"properties. They are useful for altering any unknown input formats. This is an object with properties"value1"and"value2". The value of these properties is the modifier to apply to them within the condition.- value1: the modifiers to apply to
"value1"in the condition. This is an array of strings, with each string being a modifier. The only modifiers currently supported are "uppercase" and "lowercase". These convert"value1"into all uppercase characters and all lowercase characters respectively. - value2: the same as
"value1", except applied to"value2". - an example modifier object may look like
"modifiers": {"value1": ['lowercase'], "value2": ['uppercase']}. This will convert"value1"into all lowercase characters and"value2"into all uppercase characters in the condition.
- value1: the modifiers to apply to
- name: the name of the condition. Used to identify conditions within a step.
All satisfied conditions are executed, unless they are a part of a group.
To create a condition that will always be true, make the "conditions" property an empty array.
Important
Conditions are evaluated left to right and are asynchronous. This means that the program will not wait for a condition's actions to be completed before evaluating the next condition. To override this, add the "synchronousEvaluation": true property to the JSON of the overall step. You can find the overall step JSON under the {...} button. This will make the program wait for a condition's actions to be completed before evaluating the next condition.
Operators
The operators follow javascript conventions. For example ">" can compare the value of two numbers or the alphabetic order of two strings.
The operators you can use within a condition are:
- ==: value1 equals value2
- !=: value1 does not equal value2
- &&: value1 and value2 are both truthy
- ||: either value1 or value2 is truthy
- >: value1 is greater than value2 (numerically for numbers, alphabetically for strings. Same applies for the next three operators)
- <: value1 is less than value2
- >=: value1 is greater than or equal to value2
- <=: value1 is less than or equal to value2
- sw: value1 starts with value2 (string only)
- ew: value1 ends with value2 (string only)
- !sw: value1 does not start with value2 (string only)
- !ew: value1 does not end with value2 (string only)
- in: value1 includes value2 (string or arrays)
- !in: value1 does not include value2 (string or arrays)
- fi: value2 includes value1 / value1 found in value2 (string or arrays)
- !fi: value2 does not include value1 / value1 not found in value2 (string or arrays)
- tr: value1 is truthy
- !tr: value1 is not truthy
Actions
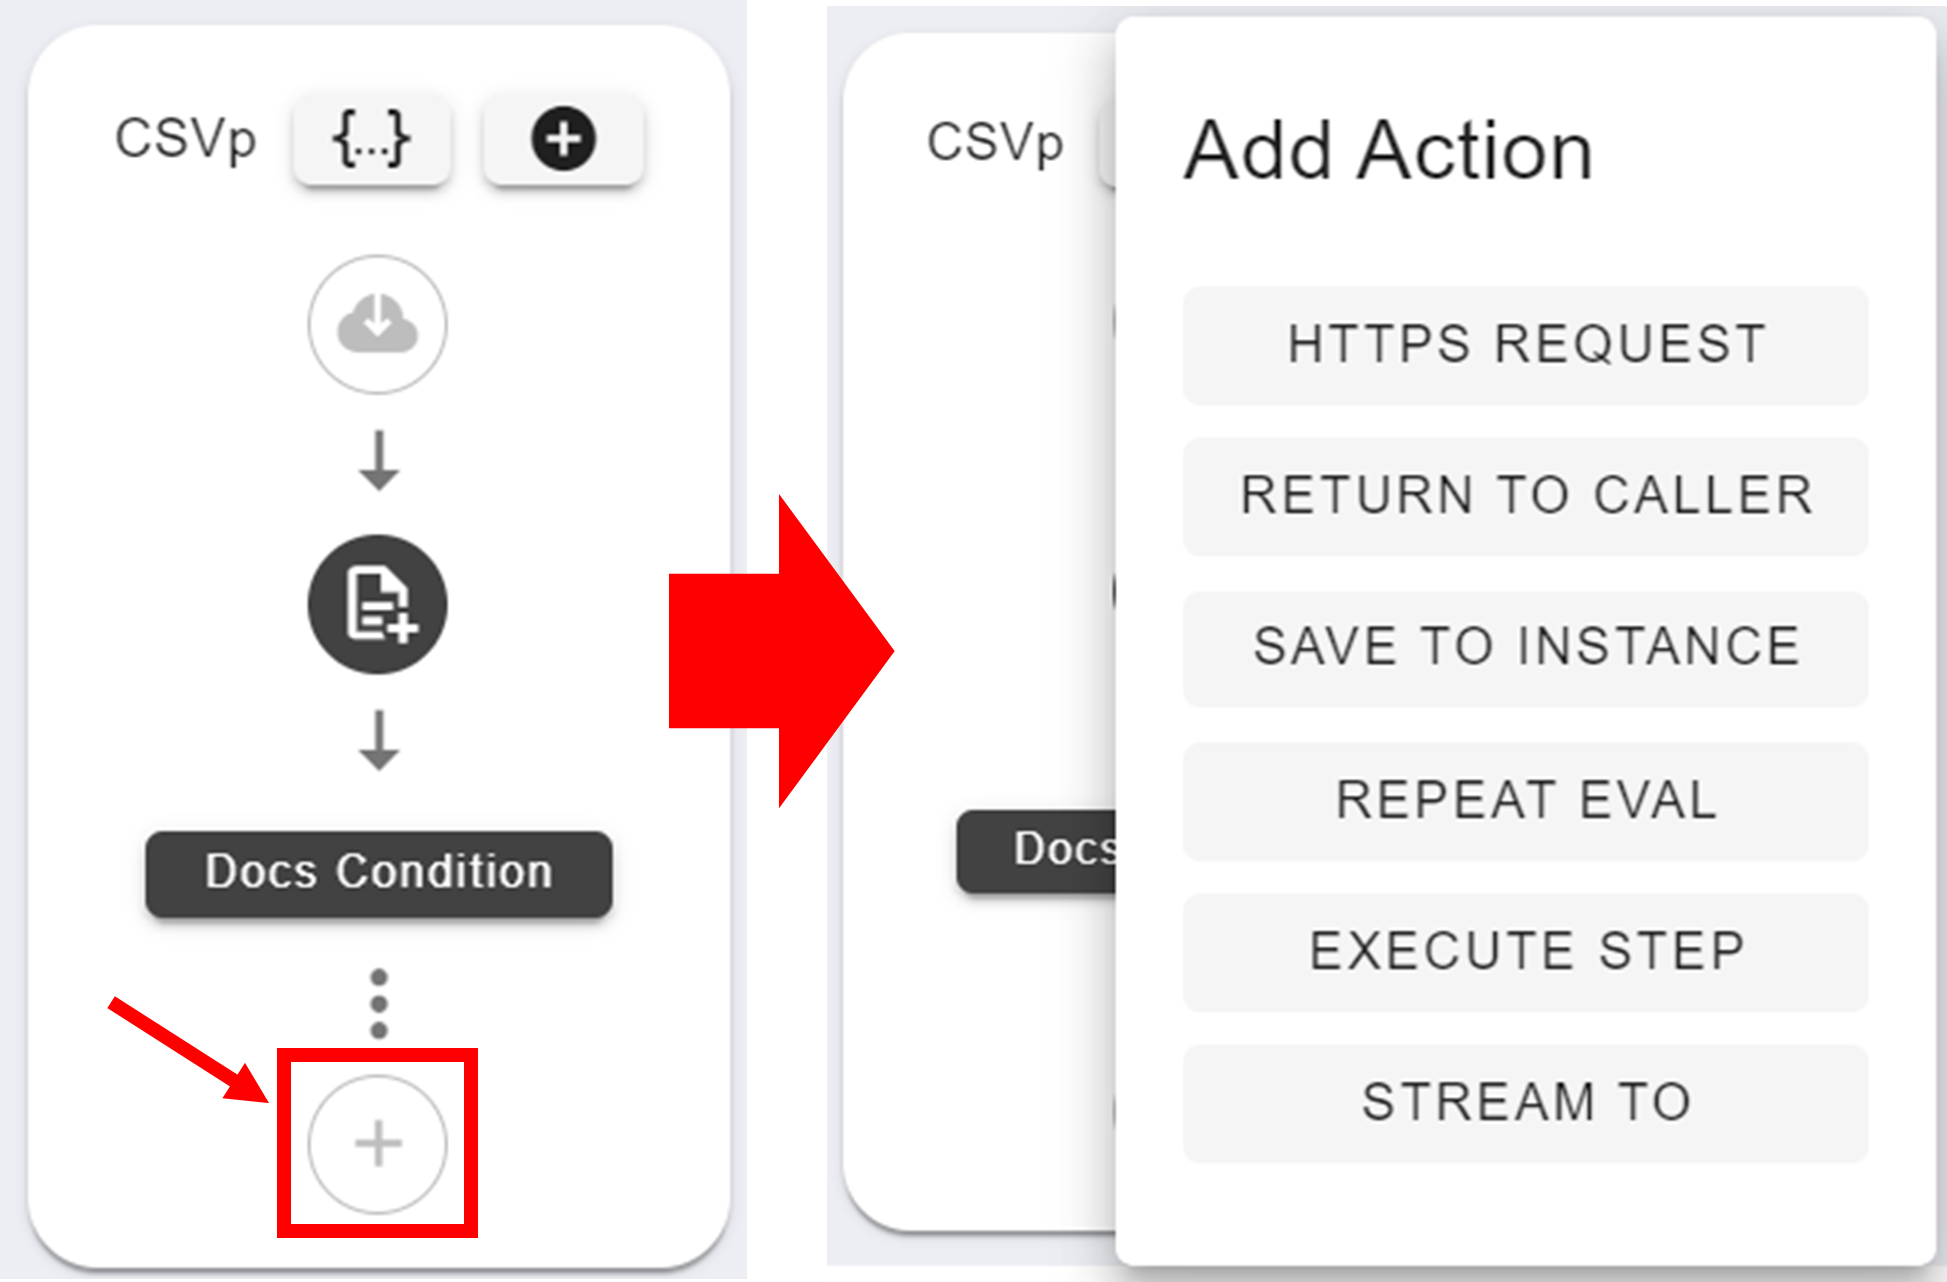
After creating a condition, an extra option will appear at the bottom of the step. This is where you add actions to your step. Each action is connected to a condition, and will only run if the condition is satisfied. Every condition in a step can have unique actions associated with it. Actions are also the final stage of a step. To add a new action to a condition, click on the '+' button and select the desired action type.
Each type of action serves a unique purpose:
HTTPS Request
Creates an API request. It is functionally identical to the earlier fetch request. The data from this request is stored under {{http}} instead. {{http}} data is not cleared at the end of a step and will hold its value until overwritten.
If multiple HTTP requests are made in a workflow, then only the data from the latest request will be stored. To store multiple HTTP requests, you need to name them. To name a HTTP request, insert the "name" property into its JSON. The value of that property will be the name of your request. Then, to access that request's data, format your placeholder like "{{http.request_name}}". This action also supports the "nextStep" property. Learn more about it here.
Tip
HTTPS Requests are usually use to send data outside the workflow. A fetch request is usually used to bring data into the workflow.
Return to Caller
Sends data to the sender of the POST request that activated the workflow. The JSON for this action is:
{
  "body": {
    "examplePropertyOne": "valueOne",
    "examplePropertyTwo": "propertyTwo"
  },
  "nextStep": []
}
The "body" object is the data being sent. You can put any JSON data inside this object. Learn more about the "nextStep" property here.
Save to Instance
The JSON for the Save to Instance action consists of a single property "store". This property is a two-dimensional array. Each item in the "store" array is a set of instructions on how and what data to save. These instructions take the form of another array. This instructional array has two mandatory items and a third optional item.
So, your JSON should look something like this:
{
  "store": [
    [
      "location1",
      "data1",
      {
        "flagName": "flagValue"
      }
    ],
    [
      "location2",
      "data2",
      {
        "flagName": "flagValue"
      }
    ]
  ]
}
The first item in this array is the location to store the data in. The location should be formatted as dot notation "example.property_name". The only data stores permitted as locations here are instance and memory - anything else will be ignored. You can also create new properties within the data stores to save the data into here. For example, since the instance data store by default is empty, saving a piece of data to "instance.storedValue" will create a new property "storedValue" within the instance object data store, and then save your data into that new property.
The second item in the array is the data you are saving. This does not have to be a string.
The third item is an object. Within this object, you can create some "flags" to give the program some extra instructions on how you want the data to be saved. This object can have the following properties:
push
Boolean. If true: adds data as an element within the array of the property. Will only work if the data storage location is an array. If the data storage location does not exist, it will create it as an array. If this flag is false, it is functionally the same as the flag not existing.
spread
Boolean. Adds data as an array within the array of the property. Will only work if both the data and the data storage location is an array. If the data storage location does not exist, it will create it as an array. If this flag is false, it is functionally the same as the flag not existing.
remove
Boolean. Removes a property from an object. The first item in the array is the property to be removed, and the second item in the array can be anything, but must exist. For example:
{
  "store": [
    [
      "instance.example",
      "Anything Goes Here",
      {
        "remove": true
      }
    ]
  ]
}
In this example, the instance data store will lose the example property. If the "remove" flag is false, it is functionally the same as the flag not existing.
split
Splits a string into an array. It will split the string at the value of this property. For example, if you had "split": ".", each item in the resultant array would be separated at the location of any periods in the original string. Consider the following example:
{
  "store": [
    [
      "instance.example",
      "Example 1. Example 2. Example 3.",
      {
        "split": "."
      }
    ]
  ]
}
Here, the value of {{instance.example}} would be ["Example 1", " Example 2", " Example 3"].
Important
The character that you are splitting on is not included in the resultant array.
slice
Returns a small chunk from the middle of a string or array. The value of this property takes the form [lower_bound, upper_bound], where the lower bound is the index of the start of the chunk, and the upper_bound is the index of the end of the chunk. The upper bound is not included in the sliced string. Consider the following example:
{
  "store": [
    [
      "instance.example",
      [0, 1, 2, 3, 4, 5, 6],
      {
        "slice": [2,5]
      }
    ]
  ]
}
Here, the value of {{instance.example}} would be [2, 3, 4].
truncate
Returns the beginning of a string and adds a suffix. This flag is an object with properties "length" and "extension". "length" is an integer value that indicates how many characters will be in the final string. "extension" is a string that will be appended to the end of the truncated string. Its default value is "...". It should be noted that the "length" property includes the length of the "extension" string. So, consider the following example:
{
  "store": [
    [
      "instance.example",
      "Elephants are wonderful creatures that can do amazing things.",
      {
        "truncate": {
          "length": 30,
          "extension": "---"
        }
      }
    ]
  ]
}
Here, the value of {{instance.example}} would be "Elephants are wonderful cre---".
join
Returns an array as a string. Each item in the array is joined to the next using the value of this property. Consider the following example:
{
  "store": [
    [
      "instance.example",
      ['one', 'two', 'three', 'four'],
      {
        "join": " and "
      }
    ]
  ]
}
Here, the value of {{instance.example}} would be "one and two and three and four".
replace
Replaces certain characters with a new character. This flag is an object with the properties "search", "modifiers", and "replacer". It works by running a regex search on a string and then replacing all matched text with the replacement string. "search" is a regex pattern of the text you are searching for (eg "[0-9]{3,}-[0-9]+"). "modifiers" are the regex modifiers on the pattern (eg "gim"). "replacer" is the string you are replacing the matched text with. Consider the following example:
{
  "store": [
    [
      "instance.example",
      "The African Elephants are wonderful creatures that can do amazing things.",
      {
        "replace": {
          "search": "t",
          "modifiers": "gi",
          "replacer": "w"
        }
      }
    ]
  ]
}
Here, the value of {{instance.example}} would be "whe African Elephanws are wonderful creawures whaw can do amazing whings.".
parse
Convert a string into a different data type. This property only currently supports the value "json" which will convert a string of a JSON object into a JSON object.
increment
Increases an existing number by the given amount. For example, "increment: 2" adds two to the data stored at the targetted storage location. The second item in the saving-instructions array can be anything, but it must exist. The target saving location must already exist for this flag to work. Consider the following example:
{
  "store": [
    [
      "instance.example",
      "Anything Goes Here",
      {
        "increment": 2
      }
    ]
  ]
}
If the previous value of {{instance.example}} was 5, then its new value will be 7. If {{instance.example}} has no previous value, then this expression will fail.
padStart
Add some text to the start of a string to inflate its length. This flag is an object with properties "length" and "filler". "length" is the desired length of the string. "filler" is the characters repeatedly inserted at the beginning of the string until it reaches the required length. Consider the following example:
{
  "store": [
    [
      "instance.example",
      "42",
      {
        "padStart": {
          "length": 5,
          "filler": "0",
        }
      }
    ]
  ]
}
Here, the value of {{instance.example}} would be "00042". This flag is useful when you need a specific length for a string. In this case a 5-digit number was needed.
padEnd
This property is the same as the "padStart" property, except the filler text is added to the end of the string.
Tip
- You can use placeholders like
{{payload}}or{{fetched}}to save data from earlier in the step. - Saving data to a step's
{{memory}}data store is useful when you are repeating the step multiple times. The memory data store will survive the duration of the step, and then get wiped once the step finishes looping and goes to a new step.
Repeat Eval
Repeats a step. The JSON for this action is always empty. When it is run, the workflow will return to the beginning of the step and increment {{memory.index}} by 1. {{memory.index}} starts at 0 on the first execution of the step.
Caution
There is no limit to this action. You must break the loop yourself. For example, you may move the Repeat action under a condition that will only run if {{memory.index}} is below a certain value. Then the step will stop repeating after that many loops.
Execute Step
Passes a new payload to the next step. It is functionally the same as the 'Return to Caller' JSON. The "body" of this action is the payload of the next step. There is an extra property you can add here besides "body". The "delay" property specifies the time interval (in seconds) to wait until the next step is started.
Important
Whilst the "Return to Caller" action will send the data to the API caller by default, without needing to generate an execution key, the "Execute Step" action has no default functionality. Without an execution key, it will not do anything. Learn more about execution keys here.
Stream To
Stores a new plain text file (eg CSV, TXT, etc.) within Message2Give that you can access within your workflow. You may use this to store some collated data permanently into a file, or to modify the formatting of a streamed file and potentially insert new information.
The JSON for this action is:
{
  "destination": "",
  "authHeaders": {},
  "header": "",
  "line": "",
  "footer": "",
}
Explanations of the above properties:
- destination: the new file name. For example:
"my-file.csv". - authHeaders: authorisation headers. These are the headers that you use in any Message2Give API requests to authorise the request. It is usually either tokens or an API key. This API authorisation process gives you permission to store your new file at one of the Message2Give API endpoints.
- header: the first line of the file. If you're creating a CSV file, this would be the column titles.
- line: the data you are writing to the file. This property is a string. Separate the data into new lines using
\n. For a CSV file, separate data into columns using,. - id: (optional) an identifier for your file. This can be any miscellaneous string. You can use it to reference the file elsewhere in the workflow.
- footer: the last line of the file.
Example
Consider the following CSV file:
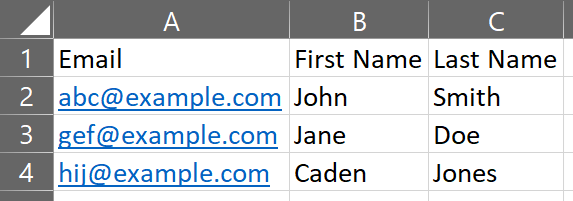
In order to recreate this with the Stream To action, you would use the following JSON ("destination" and "authHeaders" have been left out):
{
  "header": "Email,First Name,Last Name",
  "line": "abc@example.com,John,Smith\ngef@example.com,Jane,Doe\nhij@example.com,Caden,Jones",
}
Iteration
If you are streaming a file, this action will loop over each line by default. The repetitions of this action will not replace the content in the file, but will instead add the data to the file on a new line. The "header" and "footer" will not be repeated, and will only appear once.
Tip
Use "ignoreAutoAppendNewLine": true so that each repetition of the action does not create a new line. New lines will have to be added manually using \n.
File Storage
Once the Stream To action is completed, the entire file will be stored at one of the Message2Give API endpoints. You can access the file again by streaming it from the Message2Give API endpoints with a GET request and the file ID.
There are two ways to access the file ID. If the file did not have the "id" property in its "Stream To" action, then you need to reference it by its name. To access the file ID using the file name, use {{memory.nameCsvId}} where name.csv is the name of the file. Alternately, if you gave your file an "id" property, you can reference the file's ID using {{memory.nameId}} where "name" was the value of the "id" property.
Using similar methods, you can reference the number of lines in a file. If there is no "id" property, you reference it with {{memory.nameCsvLines}} where where name.csv is the name of the file. If there is an "id" property, you reference it with {{memory.nameLines}} where "name" is the value of the "id" property.
Execution Keys
Overview
Once a workflow gets to the end of a step, it stops. In order to get to a new step, you need to use an execution key. Execution keys are unique encrypted strings that point to a step in a workflow. An execution key can only be generated within the workflow. A new execution key is generated in every new instance of the workflow.
When an API caller makes a POST request using an execution key, the workflow will start back up. It will start at the step in the workflow that the execution key points to. The body of the POST request will become the payload fed into this new step. It will also resume the exact same instance that the execution key was created in. This means all instance data will be the same, including the instance's ID.
Imagine it as this: A step generates an execution key pointing to the next step, and then the step ends. The workflow is now in a temporary stasis. Once an API caller makes a request using the execution key, the instance of the workflow resumes from where it left off, just at a new destination, with a new payload.
The URL for the execution key POST request should be formatted as "https://workflows.dev.tedirex.yabbr.io/2022-02-14/execute/{{execution-key}}" where {{execution-key}} is the execution key.
Once an execution key has been used, it cannot be used again.
Important
Execution keys only last for 90 days. 90 days after an execution key has been generated, you will no longer be able to use it to continue a workflow.
Creating Keys
An execution key can be created with a fetch request, HTTPS Request action, Return to Caller action, or Execute Step action. To create the execution key, click on the '+' button that appears underneath one of the previous functions:

An execution key has a name and a destination. Its name is used to reference it later in the step. Its destination is the step that it points to. Creating a new execution key will give you the following menu:
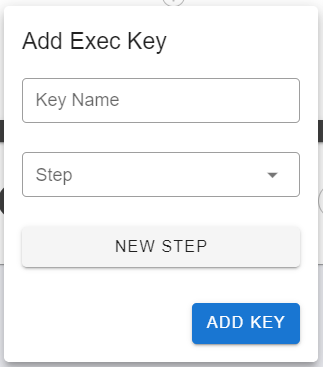
Here you can give the key a name (Key Name) and a destination (Step). You can either select a pre-existing step from the drop-down menu as your destination, or create a new step for the execution key to point to. Then, to generate the key, click ADD KEY. It should appear as a small yellow attachment icon.

Important
Even though the UI shows the execution key being generated after the action, in reality, the execution key is generated before the action. So, in the above example, the HTTPS request could reference the execution key that appears underneath it.
To remove an execution key, just click on its yellow icon and click REMOVE. You can generate multiple execution keys with one action.
Referencing Keys
To reference an execution key within your workflow, you can use the {{execKeys}} data store. Each execution key will have a name. Thus, to reference a specific execution key, format a placeholder as {{execKeys.name}}, where "name" is the name you gave to the execution key.
Since execution keys can only be generated by the workflow, for an external destination to access and use an execution key, the workflow must send it out using a HTTPS request. The external destination can then use that key to reactivate the workflow. It is good practice to send out the full execution URL: https://{{CREDENTIAL.company-name.workflow-url}}/execute/{{execKeys.next}}. This example includes another common practice - including API URLs inside the credentials vault.
If an execution key is generated with an Execute Step action, then it will automatically use the execution key and run the next step internally. The "body" of the Execute Step action becomes the payload for the next step.
Caution
Any steps that have been run internally by an Execute Step action are unable to communicate with the original caller of the API request. This renders the Return to Caller action unusable after an Execute Step action.
nextStep Property
Overview
The "nextStep" property is another way of generating execution keys besides the '+' button in the UI. Any action that can generate an execution key can also have this property - fetch requests, HTTPS Request, Return to Caller, and Execute Step.
The property is an array. Each item in the array is an object. Each of these objects provides instructions for the generation of an execution key. These instructions have two properties - "name" and "id". "name" is the name of the execution key, and "id" is the ID of the step that the execution key is pointing to. Since you can generate multiple execution keys at once, you can include multiple objects in this array, each generating a different execution key.
Example
An example HTTPS request using this property may look like:
{
  "verb": "POST",
  "url": "example-url.com",
  "headers": {
    "api-key": "{{CREDENTIAL.company-name.api-key}}"
  },
  "body": {
    "executePathOne": "https://{{CREDENTIAL.company-name.workflow-url}}/execute/{{execKeys.firstOption}}",
    "executePathTwo": "https://{{CREDENTIAL.company-name.workflow-url}}/execute/{{execKeys.secondOption}}"
  },
  "nextStep":[
    {
      "name": "firstOption",
      "id": "1234"
    },
    {
      "name": "secondOption",
      "id": "5678"
    }
  ]
}
The important properties to notice here are "body" and "nextStep". The "nextStep" property is generating two execution keys pointing to two different steps. Then, the HTTPS request sends the full execution URLs for these keys to "example-url.com". "example-url.com" can then choose a URL to use to reactivate the workflow with. Each URL will reactivate the workflow from a different step.
Execute Step
As discussed earlier, execution keys generated with the Execute Step action are automatically used internally to run the next step. The same principles apply here. If the Execute Step action has an execution key specified in the "nextStep" property, it will be automatically used internally.
So, you can either use the '+' button underneath the actions to generate an execution key, or you can generate them using the "nextStep" property; the methods are interchangeable.
Important
Once the JSON has been saved, the "nextStep" property will become invisible if you try and access the JSON again. Instead, the execution keys specified within the property will transform into the little yellow attachment icons below the action shown earlier.
However, you can still find the original "nextStep" property in the overall step JSON under the {...} button.
Testing the Workflow
To test your workflow, you can get your machine to act as the caller of the POST request to the workflow. The testing menu is accessed by clicking the power button in the toolbar. The menu will look like this (the IDs have been redacted):
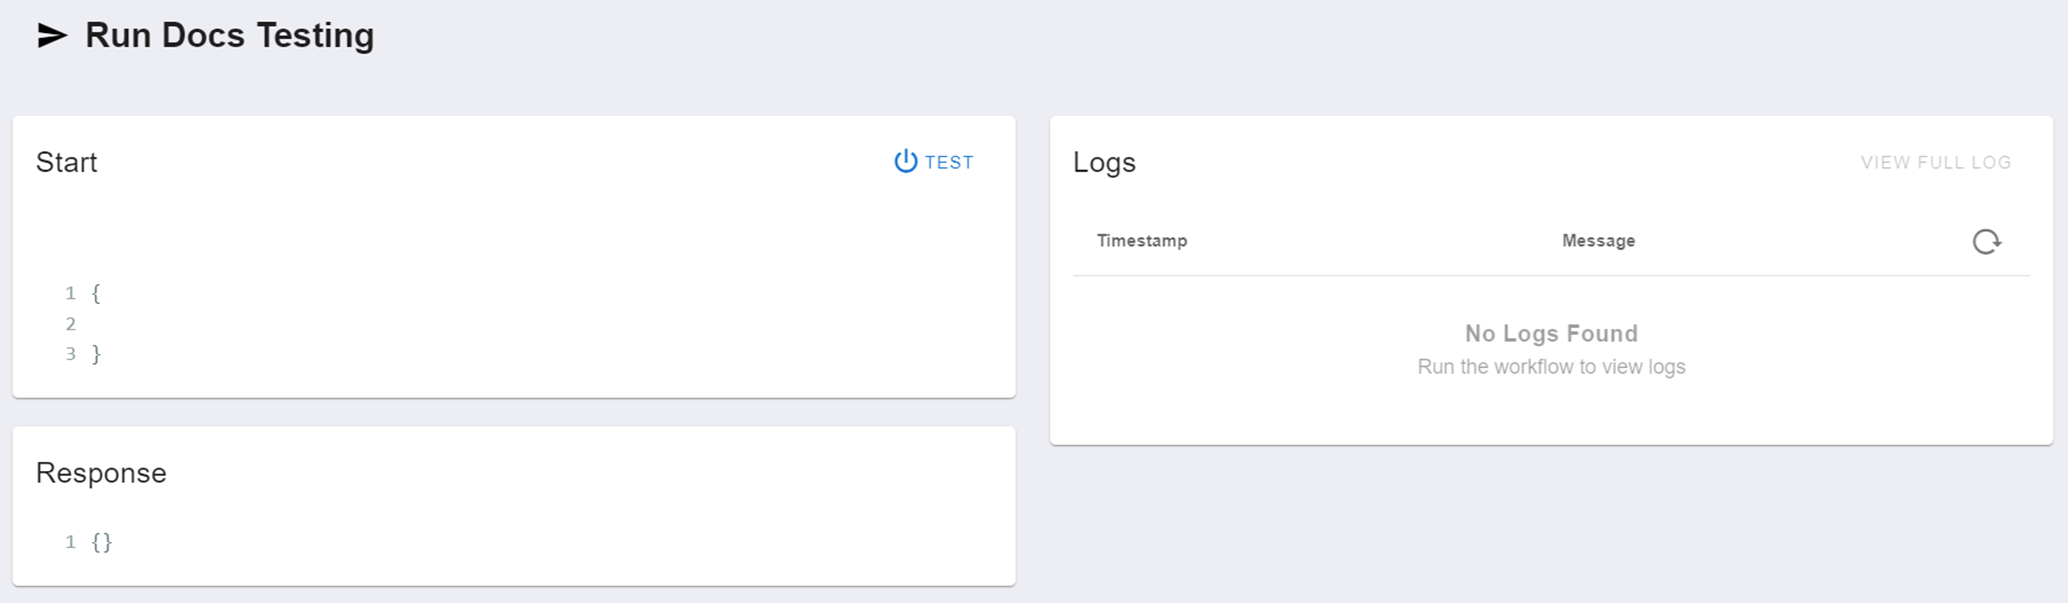
Start
The configurable JSON under 'Start' will be the body of your request. This will be the {{payload}} data store for the first step. Once you have configured the body of your request, click 'Test' to send the request and activate the workflow. It will go through its steps and logic, and then will send data back to the caller (you) when it is completed. You can also configure this response in your workflow using the "Return to Caller" action.
Response
The returned data will appear under 'Response'. This allows you to validate your workflow's functionality.
Logs
For a more detailed view of the functioning of your workflow, you can view the Logs. This will document the execution of the workflow. The level of detail in these logs is determined by the value of "logLevel" in your workflow's properties (under the pencil icon in the toolbar).
Logs
Overview
Depending on the "logLevel" property, a new set of logs is created for every new instance of the workflow. Logs record what happens in a workflow whilst it is running. For example, it may log the start of a step, the start of an action, the end of an action, the result of an action etc. This detailed documentation of the processes in your workflow is very useful in identifying any unwanted behaviour.
For example, a log may show you that the result of your fetch request doesn't actually include all the data that you needed. By searching through the logs for each step and process, you can pinpoint any logical errors, formatting mistakes, incomplete requests and more.
Accessing the Logs
These logs can either be accessed when testing your workflow, or by navigating to the LOGS tab in your toolbar. The LOGS tab will open a menu that looks like this:
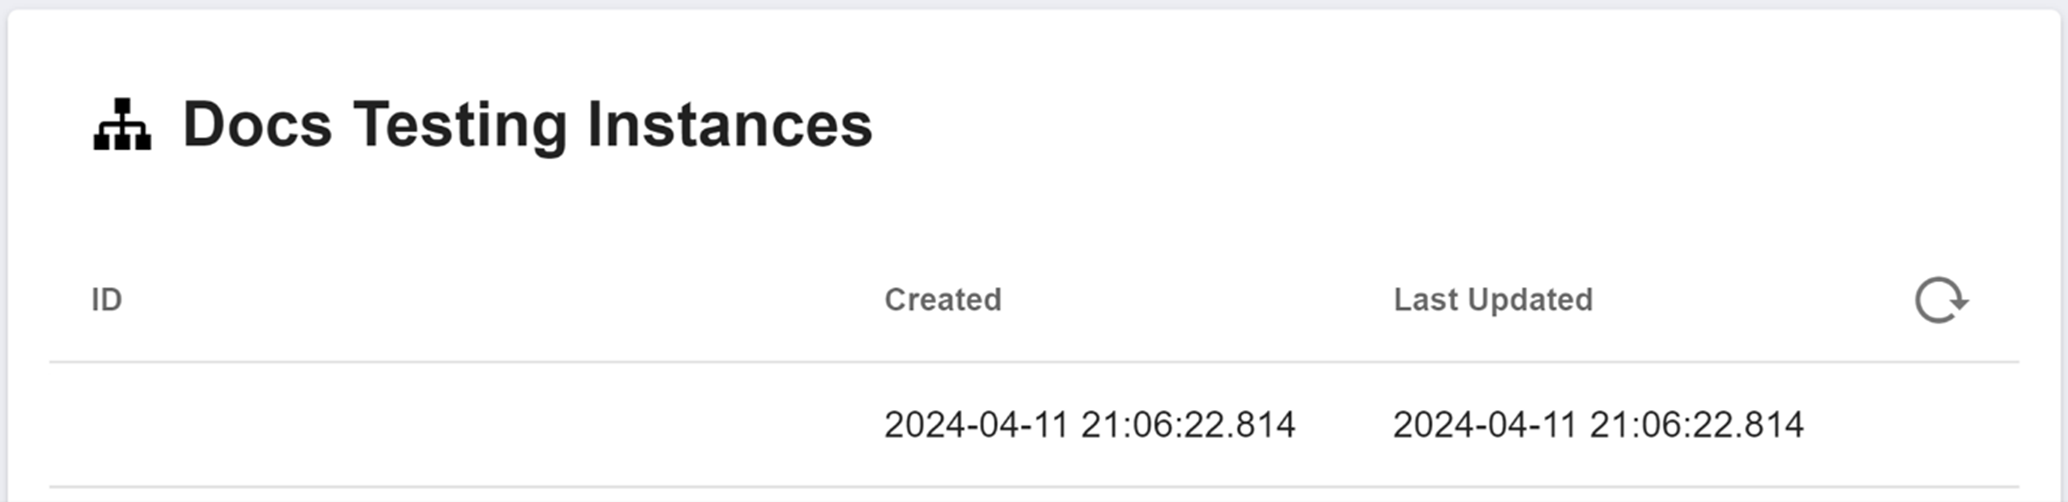
This menu will show you a list of every instance of the workflow ever run. You can click on the headers "ID", "Created", and "Last Updated" to sort the instances by that property. Clicking on a heading will toggle it between a sort of increasing order, decreasing order, and no order. By default, the instances are ordered with the most recent at the top, and oldest at the bottom. To view the logs of a particular instance, click on it.
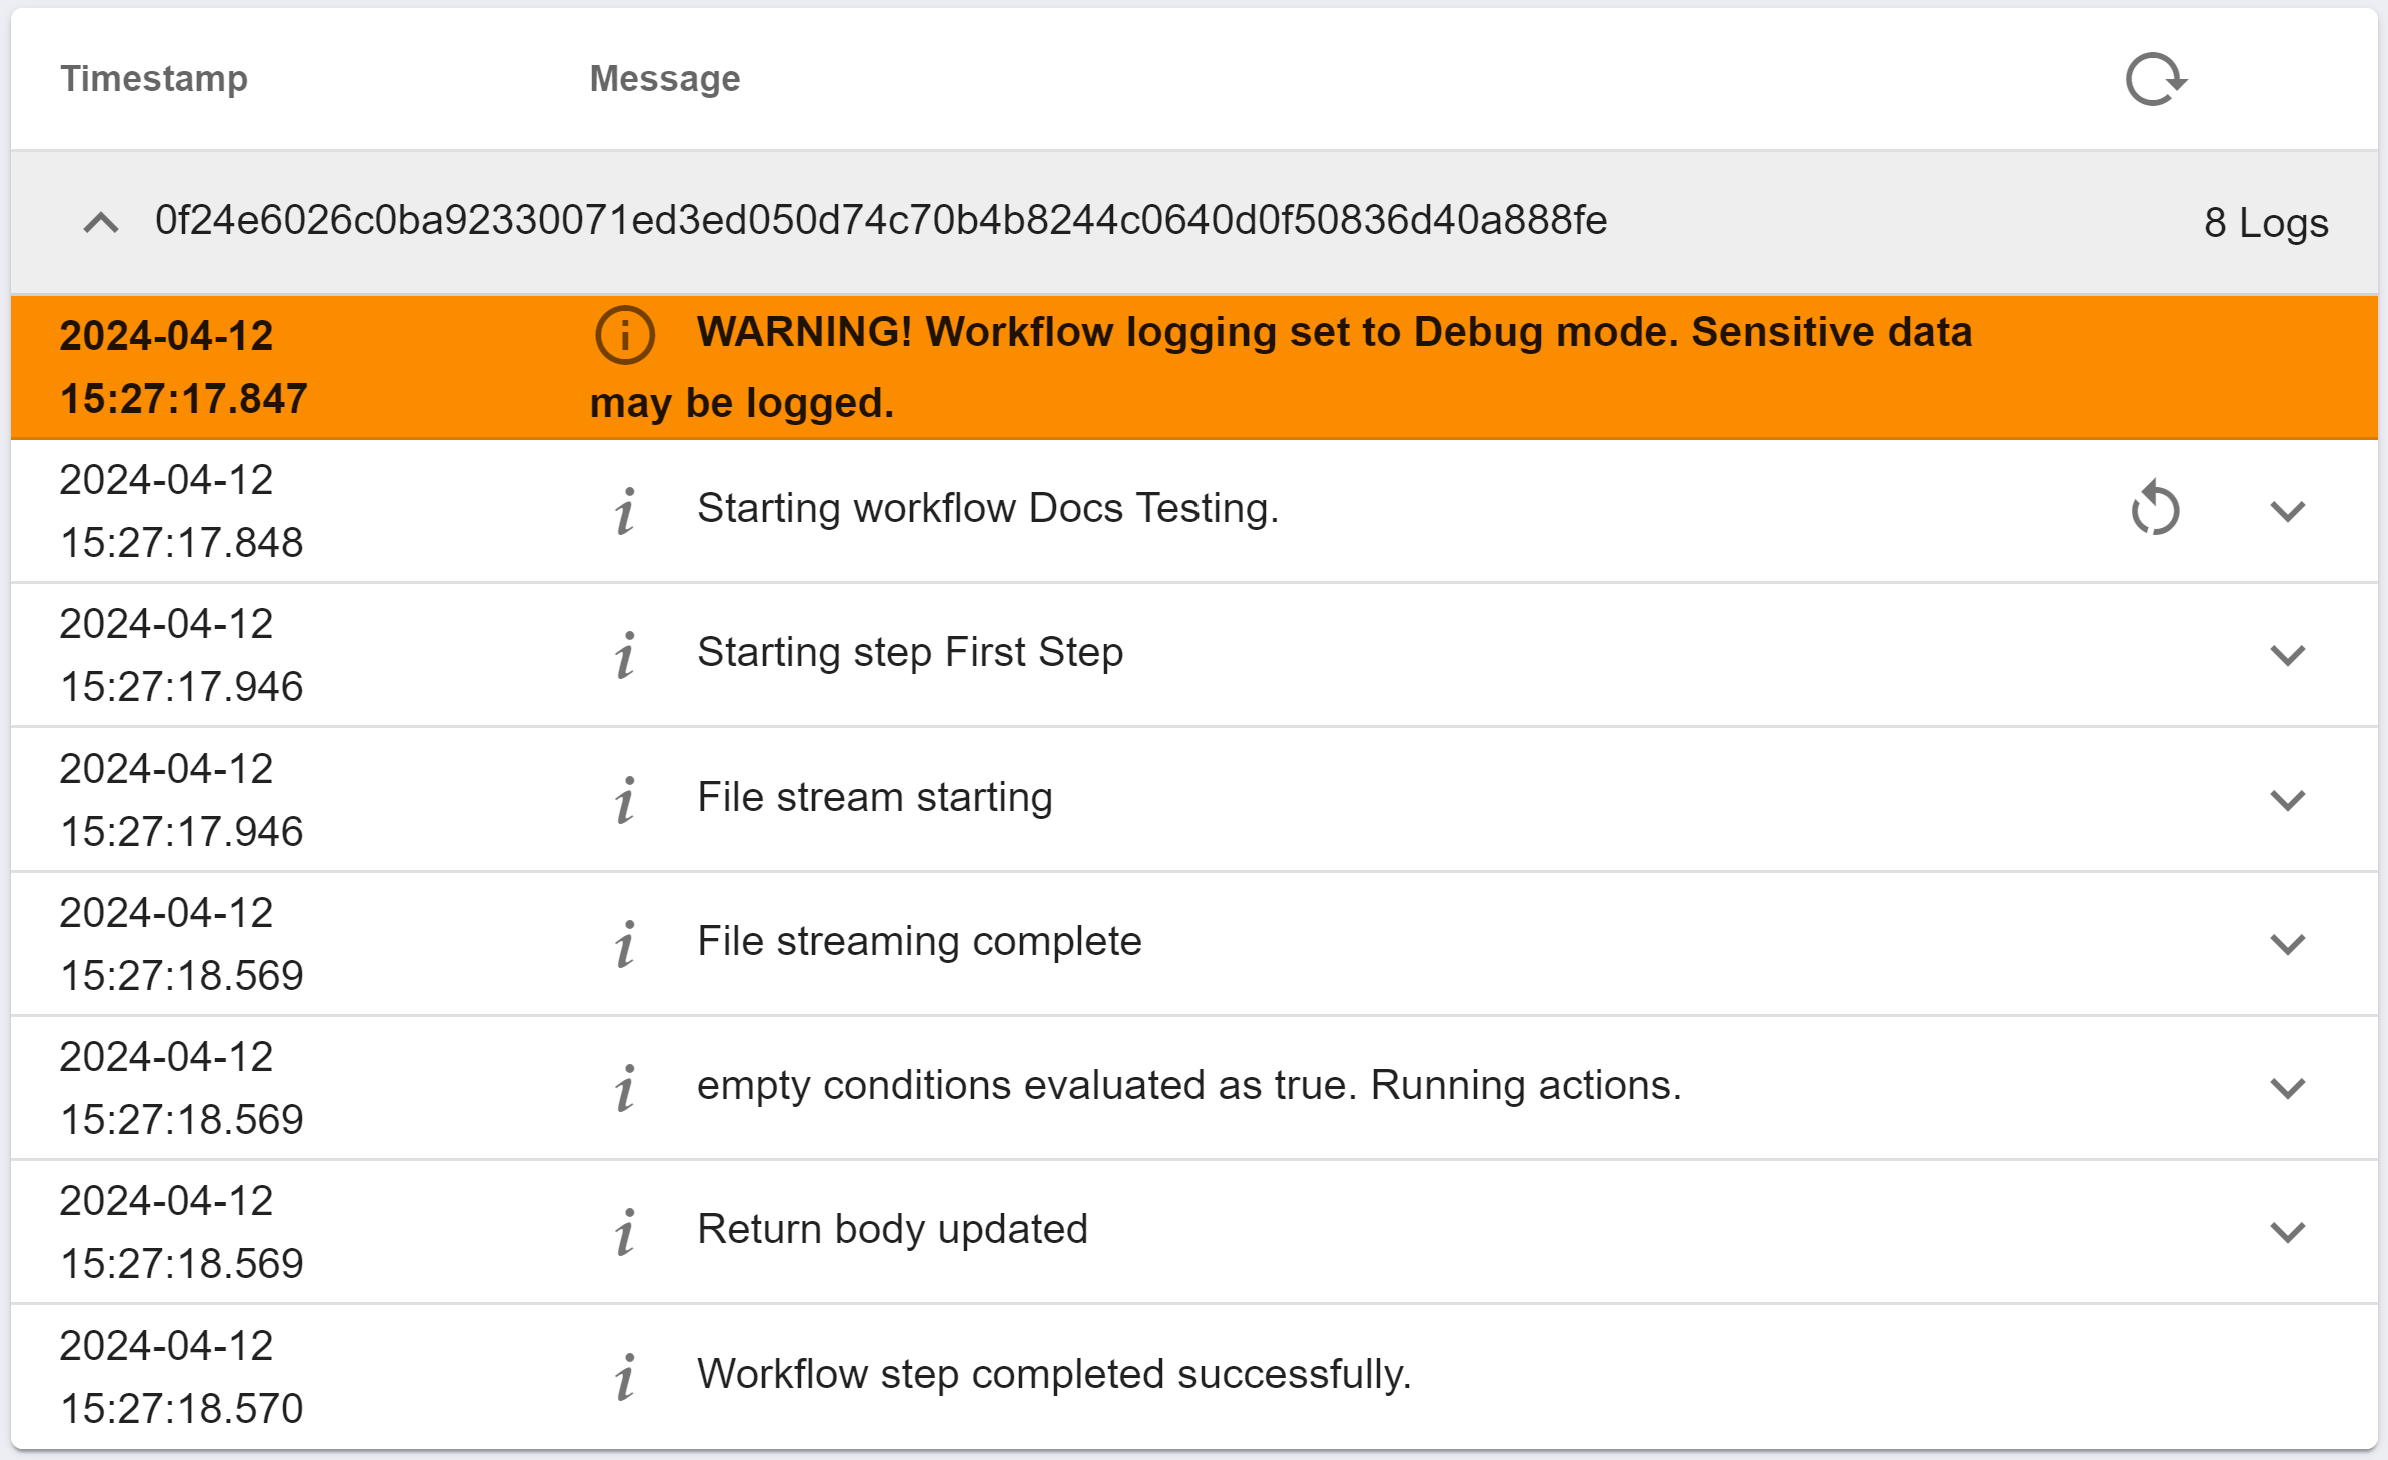
This view will be the same as what appears under the "Logs" section when testing the workflow and running an instance of it. The following example has "logLevel": "debug":
Using the Logs
These logs are ordered with the first executed processes at the top, and the last executed processes at the bottom. Each record in this log has a "Timestamp" that records when the process was executed, and a "Message" which describes what process was executed. This menu alone should give a general overview of every process that happened during the instance of the workflow and in what order. However, you can see more information about each process.
To see the JSON of a specific process, click the '˅' button on the right of the process. To re-collapse the menu, click the arrow again.
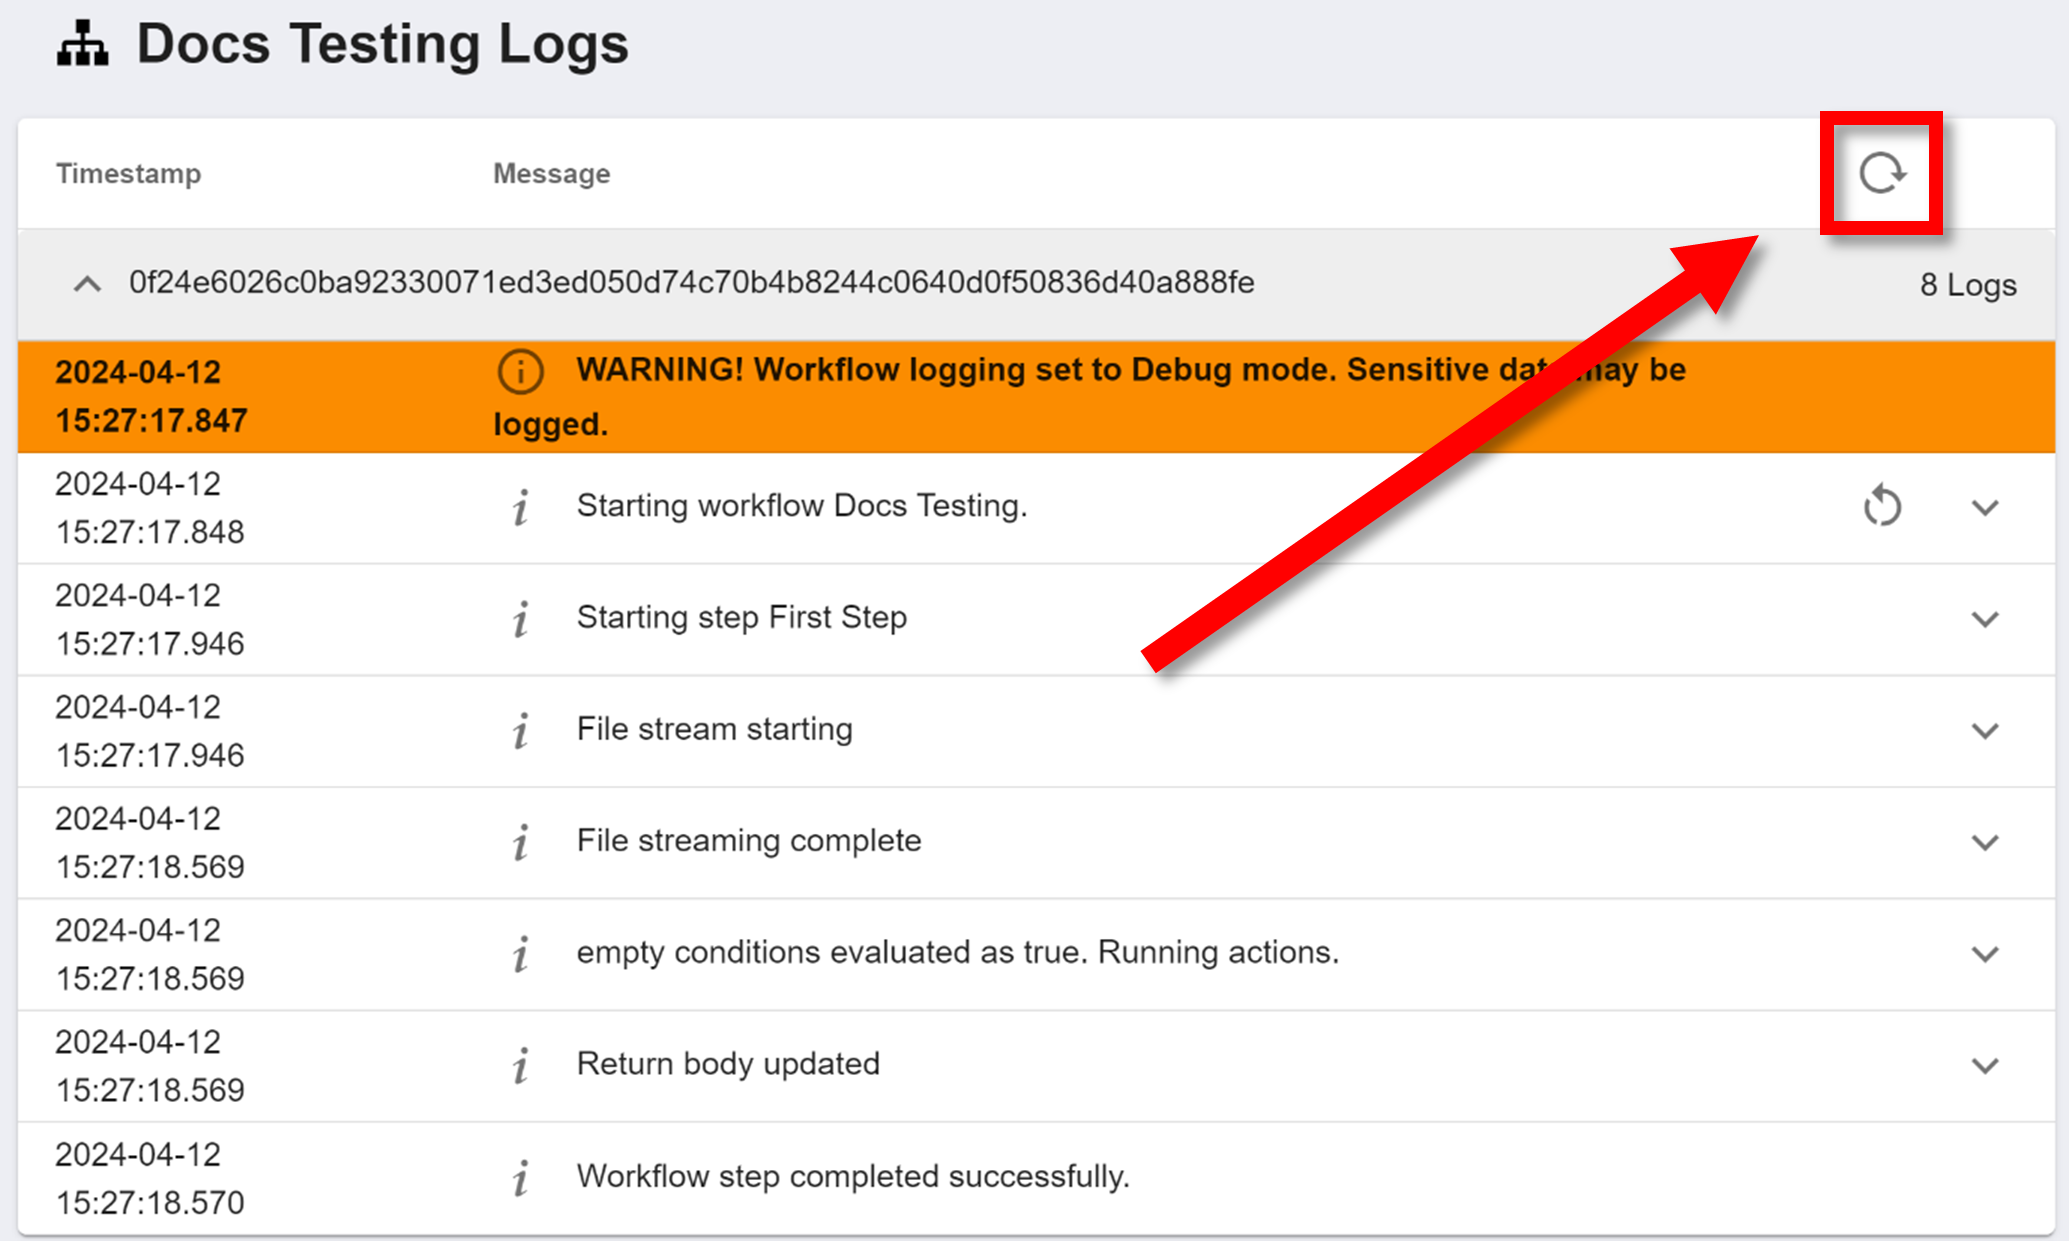
The workflow may take a while to execute, especially if there are some intentional scheduling delays or execution key exports. To refresh the logs to see any new/recent processes, click the circular arrow in the far top right of the logs:
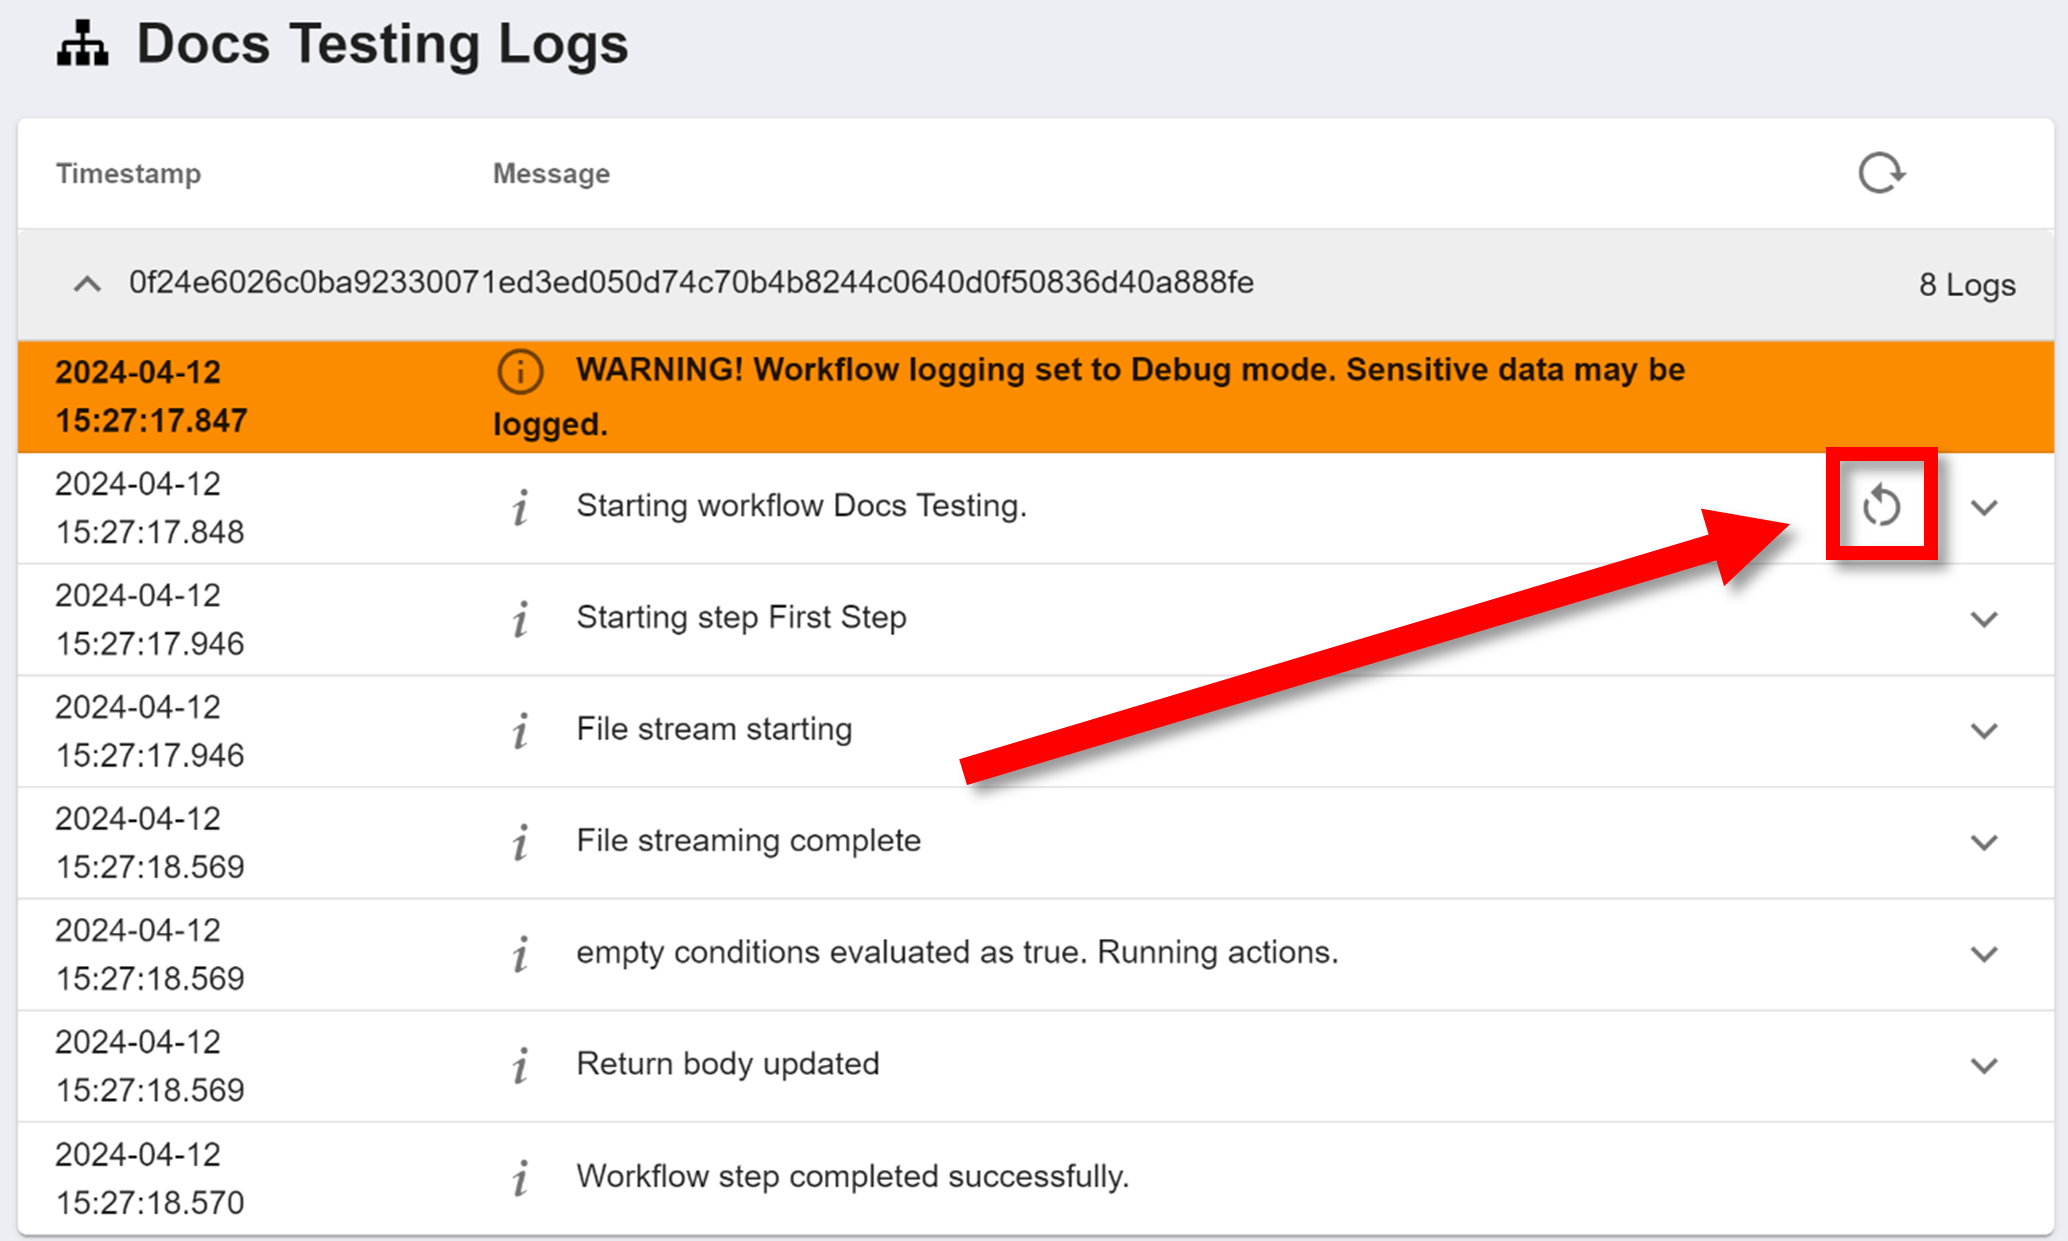
To quickly start a new instance of the workflow again with the same payload, click the other circular arrow below the refresh button:
Activating the Workflow
To start a new instance of a workflow, you need to make a POST request to the workflow's start endpoint. That endpoint will look something like "https://workflows.dev.tedirex.yabbr.io/2022-02-14/start/{{workflow-id}}" where {{workflow-id}} is the ID of the workflow.
When you make a POST request to this endpoint, it will start a new instance of the workflow, starting at the first step. The body of your POST request becomes the payload of this first step.
Keys
You can also add a "key" to this request. The start endpoint with a key will look like "https://workflows.dev.tedirex.yabbr.io/2022-02-14/start/{{workflow-id}}/{{key-name}}" where #123;{key-name}} is the name of your key. This key can be anything. The first request made using the key will execute normally. However, any future requests made using the same key will not be executed. Instead, the workflow will just return the same response it gave on its first execution with that key. For example, if the first execution of "https://workflows.dev.tedirex.yabbr.io/2022-02-14/start/{{workflow-id}}/onlyonce" returns "success", then, regardless of any other factors (including payload), the second execution of "https://workflows.dev.tedirex.yabbr.io/2022-02-14/start/{{workflow-id}}/onlyonce" will also return "success".
INFO
The ID of your workflow can be found on the workflows homepage. Learn more about this here.
Management
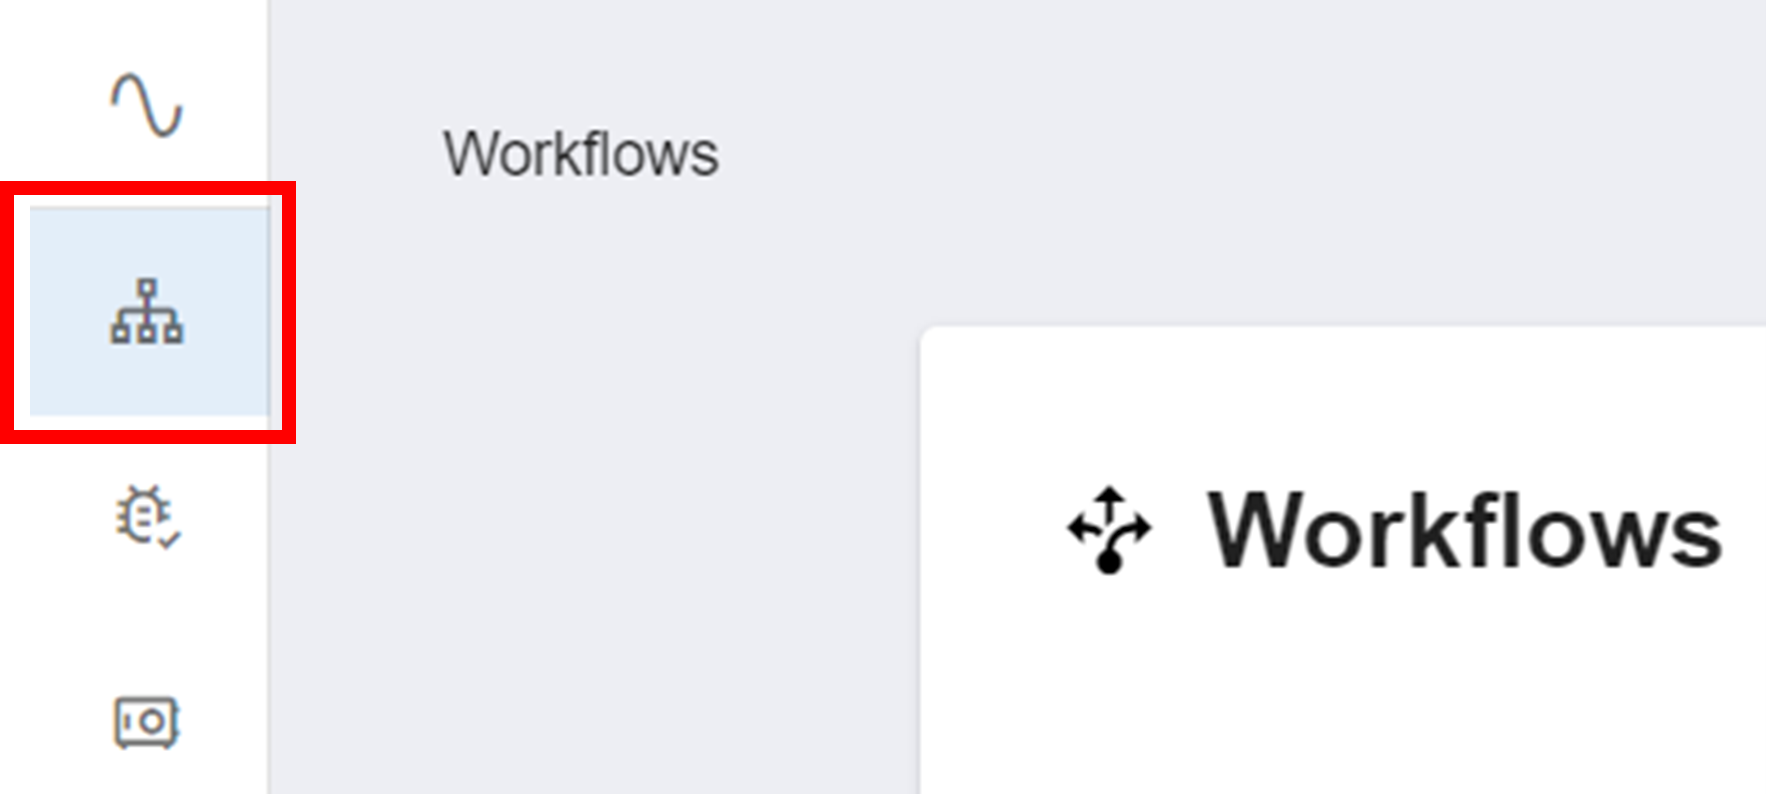
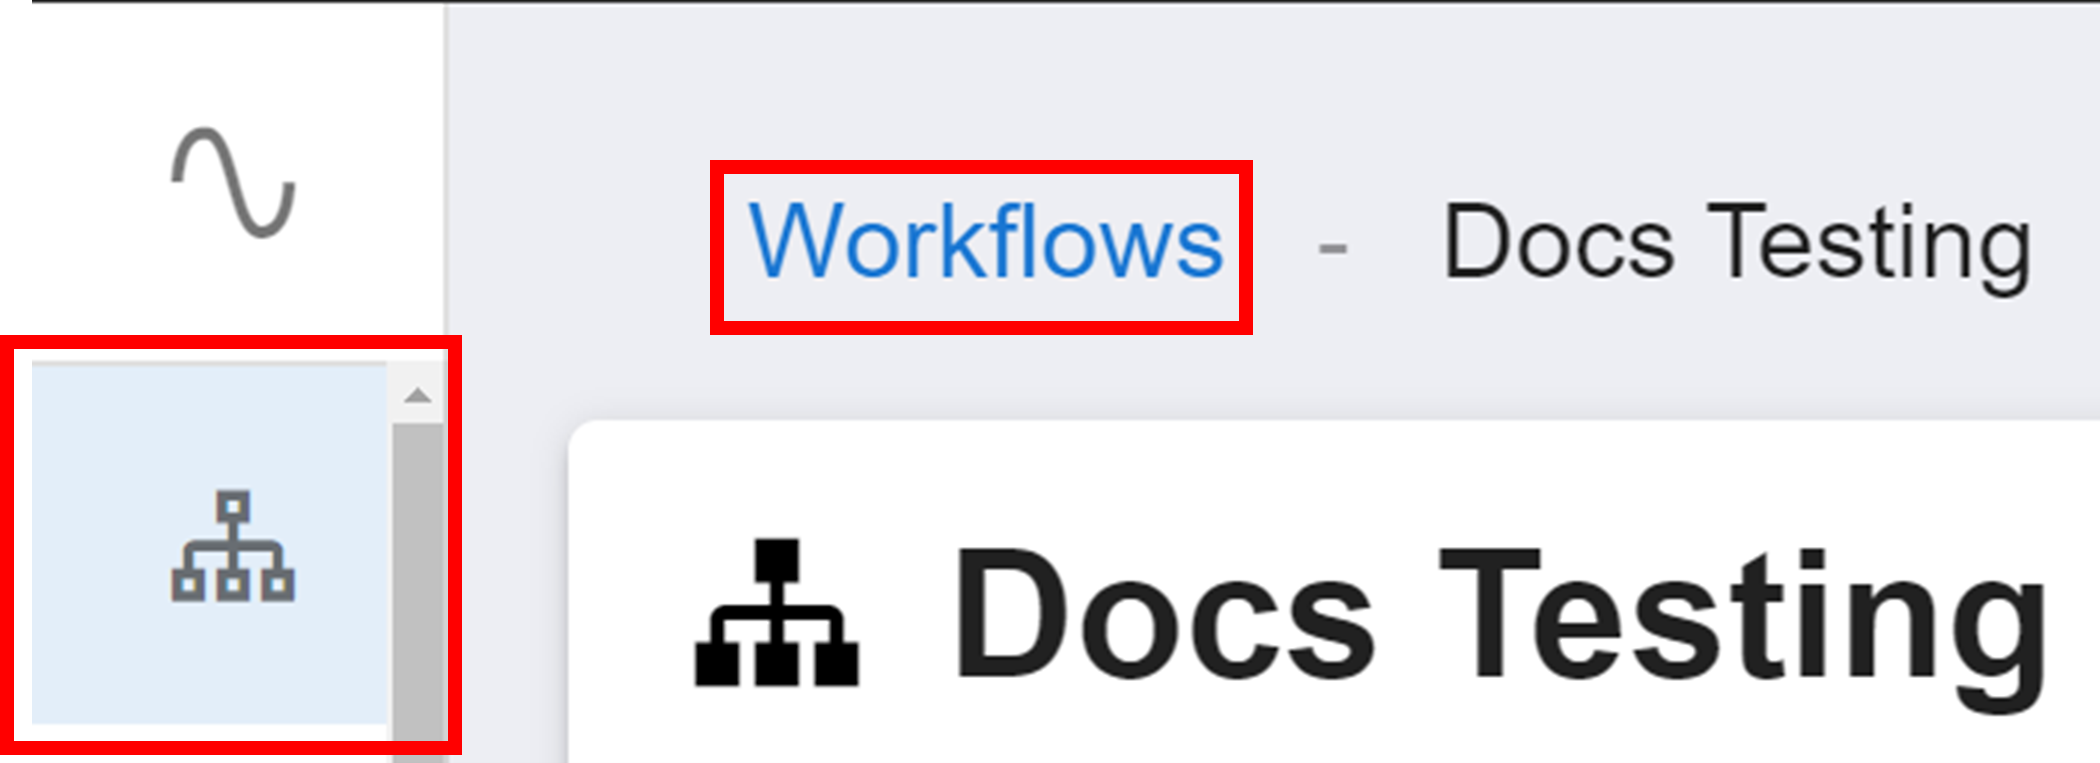
The workflows homepage can be accessed by following the breadcrumbs at the top of the page, or selecting the Workflows icon on the sidebar:
This homepage is where you find and manage all of your workflows. For each workflow, from left to right, it will display:
- the name of the workflow
- any tags on the workflow
- the ID of the workflow (used to activate the workflow in the URL of the API request)
- the delete button
To delete a workflow, click the delete button. A small menu will then appear where you need to confirm the name of the workflow you are deleting. Then click DELETE.
Tip
You can click on the headers "Name", "Tags", and "ID" to sort the workflows by that property. Clicking on a heading will toggle it between a sort of increasing order, decreasing order, and no order. By default, the workflows are ordered with the most recently created at the top, and oldest at the bottom.
How is this guide?